|
|
|
|
EARNING & DEDUCTION Entry/Edit Form This Entry/Edit Form allows you to View, Add, Edit or Delete EARNING and DEDUCTION codes.
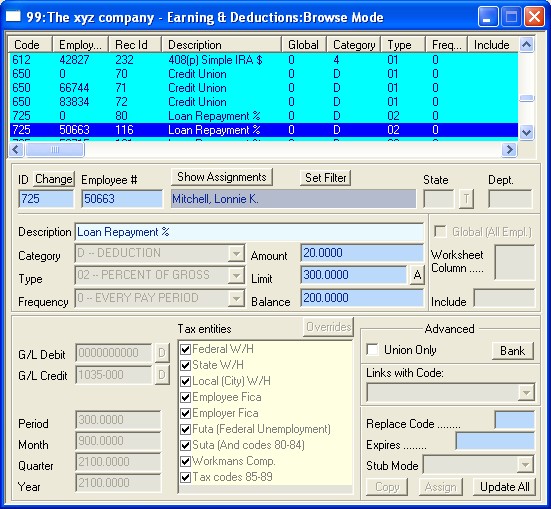
As depicted above, the active COMPANY is "XYZ Company". The user is browsing (Browse mode) and is currently looking at the CODE "725" for Employee 50663(Mitchell, Lonnie K.) which has been given the description "Loan Repayment %." Note: Codes in this form can be defined as EARNING CODES or DEDUCTION CODES according to the TYPES to which they are assigned. In light of this fact, we will use the neutral term CODE as a generic reference to EARNING or DEDUCTION CODES. Note: When you select a CODE from the LIST control (click on a line) in the upper portion of the Form, the associated CODE data will be displayed in the bottom portion of the Form. You may also delete CODES by highlighting a CODE and clicking the DELETE key. Clicking on a Column heading will sort the list by that Column; clicking again on the column header will toggle the sort order (Ascending vs. Descending). Note: Although this form contains predefined controls, they may be configured to meet your specific "Business Rules." See Validation Methods for more information on customizing controls. See The Mouse verses the Enter/Tab Keys for information on moving through a form. See Importing Data for information on importing initial data. CODES are 3 character numeric fields that are completely user-defined with the following exceptions: CODES 1-100 are utilized by CCS to define common EARNING and DEDUCTION categories and are not available for assignment. (See Tax Entities for special functionality for Codes 80-89.) CODES Overview: CODES are used by CCS Payroll to detail all of the EARNING and DEDUCTION transactions that, in aggregate, comprise an Employee's PAYCHECK. CCS offers an incredibly versatile and flexible array of options for creating CODES to cover virtually any conceivable payroll situation and for assigning CODES to EMPLOYEES. Once CODES are properly set up, creating checks for any pay period is a mere click of a button. The CCS Payroll program comes with a set of CODES already set up for basic payroll earnings (regular, overtime, holiday, etc.) and deductions (FICA, FUTA, Federal W/H, State W/H, etc.). These CODES range between 1 and 100 and are user editable, however, we recommend that you only: Add additional state & local taxes in codes 80-96. Add or change the Suta experience rating of the company in code 93 - 0, the yearly limit will automatically calculate for you, the balance is 0.00. Add banking information if you wish to make the Suta payment via the CCS Payroll Program. Click the Bank Button and put your UCT Code # in the Ref. field. Remember to click the show address click box and fill in the agency name & address if you will be paying with a paper check, also click the Combine multiple weeks click box unless you want each payperiods line item listed separately on the Suta payment check See BANK BUTTON below for a more in depth explanation. Please read about POST TO EMPLOYEE below. Click the Global checkbox of code 96 - 0, if your state has a withholding tax and add banking information if you wish to make the State withholding payment via the CCS Payroll Program. Remember to click the show address click box and fill in the agency name & address if you will be paying with a paper check, also click the Combine multiple weeks click box unless you want each payperiods line item listed separately If you have Worker's Comp. Insurance, edit code 94 - 0 to set this up, if you wish to make the Worker's Comp. payment via the CCS Payroll Program. Remember to click the show address click box and fill in the agency name & address if you will be paying with a paper check, also click the Combine multiple weeks click box unless you want each payperiods line item listed separately. Put your Worker's Comp. Account number in the Ref. field inside the Bank Button. If you require multiple Worker's Comp. rates refer to the Help system. If you will be paying FICA, Futa, Federal Withholding & Medicare via CCS Payroll then put the payment information inside the Bank Button of code 90 - 0. This will automatically link to codes 79-0, 91-0, 95-0, 98-0 & 99-0, you do not need to fill in the banking information for them separately. Remember to click the show address click box and fill in the agency name & address if you will be paying with a paper check, also click the Combine multiple weeks click box unless you want each payperiods line item listed separately. You do not need to input Ref. information for these three codes, the program will automatically get the EIN from the company information. If you need additional earning type codes please add them using ID numbers between 100 and 499. If you need additional deduction type codes please add them using ID numbers between 500 and 999. Because CCS automatically assigns basic payroll earnings and deduction CODES to every new EMPLOYEE, you can begin generating payroll checks as soon as you enter EMPLOYEES without assigning a single additional CODE. If your needs are more complex, read on--CCS Payroll can automate your requirements irrespective of the complexities involved. NOTE: Predefined Deduction Codes for withholding tax have special functionality. For details, click here. New CODES are added to meet the payroll requirements of your specific situation. Using the above picture as an example, CODE 725 has been defined as Loan Repayment. Notice that the first line of the list box shows CODE 725 with an EMPLOYEE # of 50663. If the employee number were 0 this would be the COMPANY LEVEL Code. Every time a new CODE is defined, the EMPLOYEE # is zero, and all of the fields are available for input (including the ones disabled in the above picture). You must define a Company Level code before Defining an Employee Level Code. Once the code has been fully specified at the COMPANY LEVEL, you have three options for assigning it:
What is the difference between a Company Level Code and an Employee Level Code?
For instance, say you create the Company Level Code 192 has a Bonus with a calculation that defines a 2.25% Bonus based on Regular Earnings (on a Paycheck) and assign this Code to all employees by Clicking the "Global (All Employees)" check box. (How to create such a code is described in detail below.) During the generation of Paychecks, this Code will be included for all Employees, causing a bonus of 2.25% to be added to their Gross Pay. Now let's further assume that you have created an Employee Level Code 192 for Employee 86746 "Samuel Mayfield" and have changed the amount from 2.25% to 1.25%. When the CCS Automatic Paycheck generation logic creates the Paycheck for Samuel Mayfield, it will see that an Employee Level Code 192 exists; it will use the values defined in it (i.e., 1.25% instead of 2.25%), causing the bonus for Samuel Mayfield to be calculated at the lower rate. Employee Level Codes can be used to override calculations as well as expirations for any category and type of Code. If you define an Employee Level Code, then that code is always utilized by the program for the Employee for whom it was created, regardless of the method used to assigned it. Employee Codes are most useful when the values used in calculation (all of the fields available at the Employee Code level) will differ from Employee to Employee:
During the creation of a PAYCHECK, all CODES assigned to an EMPLOYEE will be available by default for data entry, regardless of how they were assigned, and regardless of whether they are Company or Employee Level Codes. Using the example from the above picture, Mitchell, Lonnie K. (#50663) would have a deduction of 20.00% of her Gross Earnings for "Loan Repayment" on every PAYCHECK until the balance of 1720.00 is reduced to zero. Once the balance is reduced to zero, the code will become inactive for Employee 50663. (Note: The Limit of 300.00 prevents more than $300.00 from being taken from any one paycheck.) The Value that calculated during the creation of a paycheck is the "Default" value; it may be overridden at that time. Once CODES are assigned, how can they be manipulated during paycheck creation? NOTE: Paychecks can be created using Timecards or they can be created without using timecards (see Paychecks Without Timecards for details). On any PAYCHECK, you have 5 options insofar as CODES are concerned: 1) Accept the entire paycheck as is, with all calculations made by the program based on the CODES that have been assigned, whether globally or specifically, to that employee. 2) Modify the values of any CODE, overriding the default calculations. 3). Zero out a default CODE. Note: The zeroed CODE will not appear on the specific PAYCHECK. It will, however, continue to appear as a default CODE for the EMPLOYEE until you delete it from the specific EMPLOYEE. See below for details. 4) Change the CODE ID, which has the effect of removing the old CODE and adding the new one. 5). Add as many additional CODES as needed for the specific pay period. These newly added CODES would not automatically appear in future PAYCHECKS for the EMPLOYEE. You would have to assign new CODES to an EMPLOYEE (Rates tab of Employee file) in order for them to appear as default CODES on future PAYCHECKS. Once CODES are properly set up and assigned, the vast majority of your PAYCHECKS, with all of the applicable detail, will be created automatically by clicking on the Auto Create button in the Paycheck Form. Note: When you use the Auto Create feature with the "Create All Paychecks" mode, all paychecks are created at once. These values can then be changed if needed via the Edit mode.
EARNING AND DEDUCTION CODE Maintenance: To Add a new CODE: 1. Select Maintenance|Earnings & Deductions from top menu bar or go to the Payroll Home Menu, Click the "Codes" button, then "Deductions" button on the Codes & Maintenance Menu. 2. Click ADD on the SIDE
TOOLBAR or 3. Complete the form as described below. After the last Entry is completed, the record will be saved automatically. Note: The first time you add a new CODE, the COMPANY LEVEL record must be created. Once created, the COMPANY LEVEL record can be tailored to a specific employee by creating EMPLOYEE LEVEL records. For example, if you wanted to assign CODE 725 (defined as Loan Repayment in the above picture) to Thomas Nichols, you would take the following steps: A. Initiate the Add Mode (see #2, above). B. Input "725" in the ID field. C. Either enter the EMPLOYEE ID or, if you do not know it, type a portion of the Employee's last name and press <Enter>. A window will appear showing all matching EMPLOYEE records. Select the desired EMPLOYEE. D. Enter any details specific to that EMPLOYEE and save your work. In the above example, you would want to deduct a specific percentage from Thomas Nichols paycheck until the loan was repaid. So you would enter the deduction in the Amount field, the maximum amount to be repaid during a single pay period in the Limit field, and the balance owed on the loan in the Balance field. Every paycheck for Thomas Nichols would show a deduction for the percentage entered in the Amount field until the Balance is reduced to zero. The amount of the deduction would be fully editable until the PAYCHECK is actually closed out. See CLOSING PAYROLL in the Help Index. The payroll for each period must be closed out before the loan balances will be updated. We recommend that you leave the Payperiod open until the next time you need to run a payroll for each company, so changes can be made and checks can be reprinted if necessary. The Closing of the payroll would be the first step in the next payroll run.
Note: Our Code 725 uses a "Percent of Gross" so that the Limit Field can be discussed. More often than not you would probably set up a Loan Repayment type as a Fixed amount (Say $50.00 / Week) without regard to the Gross Earnings on the Paycheck.
To Edit an existing CODE: 1. Select Maintenance|Earnings & Deductions from the top menu bar or go to the Payroll Home Menu, click the "Codes" button, then the "Deductions" button on the Codes Menu 2. Enter the CODE NUMBER you wish to edit in the ID field. Press ENTER. Enter the EMPLOYEE# (zero if you want to edit the COMPANY LEVEL record). If the CODE exists, it will be displayed. (To search alphabetically by name, see Alpha Search.) Additionally, you can use the RECORD buttons to locate a particular CODE or select the CODE from the LIST control in the upper portion of the Form. 3. Complete any changes needed as described below. Tabbing past the last entry; moving to a different record; or clicking ADD, SAVE, or OK on one of the TOOLBARS will validate and save your changes. Note: Any changes made to a COMPANY LEVEL CODE record will automatically be changed for every EMPLOYEE who has been assigned that CODE by closing the form or by clicking "Update All". If, for example, you decided to change the description of CODE 725 from lower case "Loan Repayment" to upper case "LOAN REPAYMENT", all EMPLOYEE CODE records assigned to CODE 725 would receive that change automatically. Exception: EMPLOYEE LEVEL fields with non-zero dollar/percent values would not be updated by any change to the COMPANY LEVEL record. Using the above-pictured example, if you changed Amount for the COMPANY LEVEL (Employee #0) record to, let's say, 10%, none of the existing Employee records would be affected since they all have non-zero values. To Delete an existing CODE: 1. Select Maintenance| Earnings & Deductions from the top menu bar or go to the Home Menu, Click the "Codes" button, then "DEDUCTIONS" button on the Codes Menu 2. Enter the CODE NUMBER you wish to delete in the ID field. Press ENTER. Enter the EMPLOYEE# (zero if you want to delete the COMPANY LEVEL record). If the CODE exists it will be displayed. Additionally, you can use the RECORD buttons to locate a particular CODE or select the CODE from the LIST control in the upper portion of the Form. Note: If you delete a Company Level Code, All Employee Level Codes for that same code will also be deleted. 3. Click the DELETE button on the SIDE TOOLBAR or See Edit Modes for more information on the Edit modes used by most CCS forms.
The Controls of the CODES Form: Note: The values shown below in square brackets represent the default range applicable to each control, however these ranges can be configured to allow additional values (or restrict values). See Validation Methods for more information. The CODE ID is used to uniquely identify a CODE. This will be the value used to represent a particular CODE throughout the program. NOTE: The Change button above this control allows you to change the assigned Code for any user-created Earning or Deduction Code. (This button is disabled for Codes 1-100.) Say, for example, you created a Deduction Code for 401K's and assigned it an ID of 590. You later decide that you want it to be Code 600. You would locate the desired Deduction Code record and click on the Change button. The program would ask you what the new ID should be and, upon your confirmation, change the Code from 590 to 600, changing all affected records in the process. There is one exception: If you put a Code in an Include textbox, it will not be updated. You would have to change those records manually. For a COMPANY LEVEL record, the EMPLOYEE# is always zero. Once a COMPANY LEVEL record has been created, you can create a CODE that is specific to an EMPLOYEE by entering the EMPLOYEE #. If you do not know the EMPLOYEE #, type a portion of the Employee's last name and press <Enter>. A window will appear showing all matching EMPLOYEE records. Select the desired EMPLOYEE and the EMPLOYEE # will be filled in by the program. STATE:[1-3 alphanumeric characters] This field is only enabled if you have multi-state employees (payroll tab of the Company form.). See Multi-State Employees for details. Note: The department column size can be altered. (For instance if you need a 4 character department.) Please see the "Size" button in the Department form. If a particular CODE should always default to a particular department when used within a paycheck, then enter that department here. This will cause any earning line item using this CODE on the paycheck entry screen to default to the department you have entered here (which can be changed during paycheck entry/edit of course.). When you use the Multi-Department per Paycheck mode, (See the Payroll tab of the Company Form), you may enter a different department for each earning item on a paycheck. Generally, the department used on each line item will default to the department used by the paycheck itself (which is generally set to the department the employee has been assigned to in their employee form.) If; however, the department for a particular CODE is always the same for all employees who use the CODE, then entering that department here will prevent having to change the department during entry of the paychecks. This logic also affords a handy way to setup multiple pay rates for a group of employees based on the department they work. For example: If Department 010 represents bartenders, and all bartenders are paid $5.50/hour, $6.25/hour, or $7.00/hour depending on years of service and experience etc., then create three earning codes. (For instance 201, 202 and 203), and enter a description such as Bartender Pay (Grade 1), enter "010" as the department for all three, make them a category of "R" (regular pay), and a TYPE "07" (hours x amount). Enter the pay rates in the amount field as applicable. Then assign the codes to each of the employees who work as bartenders. (Via the Earnings pick list in the employee file.). When you enter or edit paychecks for employees who have one of these CODES, the program will allow you to enter the number of hours worked in this CODE (and thus this department.). If you do not enter any hours for the CODE (skipping over it) then no earnings will be given to "Bartender Pay" in department 010. This is a very handy way to assign multiple pay rates to employees who work in multiple capacities (and/or departments). Multiple pay rates can also be established via CLASSES when used in conjunction with TIMECARDS
DESCRIPTION:[1 to 25 alphanumeric characters] The DESCRIPTION is used to label the CODE. This description will appear on most reports pertaining to CODES. A CATEGORY determines whether a CODE is an Earning or Deduction Code. CATEGORIES provide descriptive details for check stubs and provide for further refinement of reports by describing the Calculations that will be performed on them. Choose from one of the following:
Some CATEGORIES are identical internally; they exist for clarity and for reporting purposes. For example, the CATEGORY <B> is handled identically to CATEGORY <E> in all aspects of all internal CCS Logic, yet was created so that Bereavement pay could be tracked and reported on with greater ease. Note: If you do not see a specific Category that you had in mind, then choose the category that best matches that which you are defining. For instance, if you are defining a Tuition Allowance, simply use <E> for Earning and give the Code the name "Tuition Allowance." The values you enter while completing the form will actually define how the "Tuition Allowance" code will be handled by the CCS Paycheck creation logic. If, however, the allowance is paid directly to the school (and not to the Employee), then select Category <N> for non cash Earning. Note: Category Z exists for the sole purpose of setting up Direct Deposit for employees. TYPE:[01,02,03,04,05,06,07,08,10,11,21] TYPE further defines a CATEGORY and the Calculations (if any) that will be performed on a Code. TYPE often interacts with the AMOUNT field (see below) to determine the unit of measure, the formulas to apply etc. The following TYPES are available:
Note: All Categories and Types can be further refined by use of the INCLUDE field, which is described in detail later.
This field allows you to define how often a CODE is applied. The available options are as follows:
The FREQUENCY entered here is compared with the Frequency entered in the Auto Create Dialog of the Paycheck Form. This comparison controls which codes will appear on a Paycheck for a particular paycheck run. For further information see the Paycheck Auto Create Dialog. Note: The Frequency field is restricted to the values shown above (0,1,2,4,8) Enter the AMOUNT or PERCENTAGE as required in the calculation of hours, wages, taxes or deductions for this CODE.
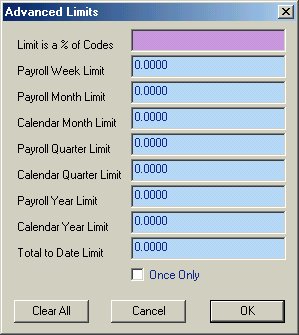
Enter the LIMIT as required in the calculation of hours, wages, taxes or deductions for this CODE. This field is used in one of the following manners: A. In conjunction with tax CODES 90-99 (either Employee or Employer) to limit the total amount of tax during the calendar year. For example, as of this writing, an employee is taxed at a rate of 6.20 percent on the first $87,000.00 of the gross wages for Social Security. The limit used for CODE 90/91 (Employee/Employer FICA) would be set to '$5394.00' (6.2% of $87,000.00). The CCS Paycheck generation Logic will automatically disable the deduction when the limit of $5294.00 is reached. (The medicare tax of 1.45% would continue to apply) B. In conjunction with a DOLLAR ACCUMULATOR to set the maximum HOURS per pay period which may considered by the ACCUMULATOR. This value represents the total hours which may be used in the calculation, not the calculated limit itself. For example, a limit of '40.00' allows the ACCUMULATOR to total all hours in the PAYCHECK (within the criteria of the INCLUDE field) up to a maximum of 40.00. This total is then used in the calculation. The Limit of 40.00 does not limit the final output of an Dollar Accumulator to 40.00 as seen in A. and C. C. In conjunction with all other CODES to set the maximum amount which can be earned or deducted in any one occurrence of the CODE (generally once per Paycheck). This is applicable to both Company Level Codes as well as Employee Level Codes. For example, a Company Level Code defined as 10% percent of Gross could be given a LIMIT of $25.00. This LIMIT would cap the deduction at $25.00 in the event the Gross wage exceeded $250.00 on the paycheck currently being generated. Most Codes allow you to establish a relationship between itself and another Code or Codes. Clicking on the button next to the LIMIT field (captioned "A") initiates the process and causes the following window to pop up:
LIMIT IS A % OF CODES:[List of Codes] (Advanced Includes) If the Limit that you entered is to be a percentage of one or more other Codes, you would list the Code(s) here, with multiple codes being separated by commas. (As soon as you input any value in this control, the other controls on this form are disabled.) Let's say, for example, that you wanted to match 50% of your Employee 401K contributions not to exceed 5% of gross pay. You would create a Code as follows to handle this scenario (See Code 600 in Company 99 for one that is already set up.):
You would then click on the Advanced Limit button and list the Code(s) for your Employee 401K. Company 99 has two: 601--a percentage of gross, and 602--a flat rate. So, for Company 99, the proper entry for this control would be "601,602" (without the quotes, of course). Whenever a paycheck is calculated that includes Code , it would force the program to calculate the employee's gross pay, take 5% of it, and then see if Codes 601 and/or 602 pertained to this employee. If either or both did, it would match the amount calculated by these Codes, thereby insuring that the matching amount did not exceed the 5% of gross amount. (See Defining a 401K for more details.) 403B: To set up a 403B, use Category 4 (Employee) or K (Employer). Be sure to use "403" in the Description. (The program looks for "403" in the Description during the printing of W-2's to differentiate between a 401K and a 403B.) Uncheck the taxes for which the 403B is a pretax.. A 403 prints as an "E" in box 12 of the W-2 408P or Simple: For a Simple Plan: Insure either the text "408P" or "Simple" appears in the description. Use Category 4 (Employee) or K (Employer).-- A "S" will be put in box 12 of the W-2. A "408" in the description without the "P" or "Simple" in the description will report on the W-2, box 12 as a "F". Uncheck the taxes for which the Plan is a pretax. Section 125: To set up a Section 125 (Cafeteria Plan), use Category D if paid by the employee or Category X if paid by the employer. Be sure to use either "125" or "Cafe" (or "Cafeteria")--not case sensitive--in the Description. Uncheck the taxes for which the section 125 is a pretax. If you place a minus sign (-) as the first character in the list, then the list of codes become an exclude list, instead of an include list. See the discussion of the include field below:
Remaining Controls: Each of the remaining fields on the advanced limits form allows you to enter the maximum allowable amount that can be earned or deducted within the time frame indicated by the caption. If, for example, you wanted to deduct $50 a week from the selected employee, but you only wanted to do so four times a month, you would enter $200 in the Payroll Month Limit. Whenever a month occurred that had five pay periods, the $50 would not be withheld on the fifth pay period because the Payroll Month Limit would already have been met. ONCE ONLY:[Checked or Unchecked] Check this box if this earning or deduction Advanced Limit set of parameters should occur only one time. NOTE: The Limit field is a per occurrence (per Code on the paycheck) limit except for codes 80-99 which are tax codes. For these codes, the Limit is interpreted as a yearly limit. However, if an Advanced Limit is entered in Codes 80-99, then the limit is interpreted as a per occurrence limit, the same as all other Codes. Note: If you use the "Total to Date" (TTD) column in conjunction with an accumulator, then the current TTD will be calculated as follows: Sum of all unclosed records + value in the employees accumulator. For example: Given a Sick pay accumulator with an advanced limit of 100.00 hours in the TTD column., and an employee having accumulated Sick hours in the amount of 98.0 (as seen in their Employee file in the Accumulated Sick pay column), and further assume an unclosed paycheck in the current period (or previous period) with an entry of 1.25 hours of accumulated Sick pay. Then when the next check is generated for this employee, the Sick Pay accumulator will be automatically limited to .75 hours. (98 + 1.25 + .75) = 100.00 The Balance is used in when a CODE defines a Deduction that needs a declining balance. An obvious example is a Loan Repayment as depicted in our picture above. The Current Balance is shown as 1720.00. This Code will become disabled once the Balance is reduced to zero. Balances are updated during the closing of a payroll. Therefore they always reflect the latest closed payroll, without regard to Paychecks created but not yet closed. It is important that you close those payrolls that have been completed to insure that the balances are correct. Note: The Balance field is disabled if the LIMIT is set to zero. This prevents the needless entry of large values in the BALANCE field for deductions that do not require a Declining Balance, such as Child Support. Note: If you enter a limit, but no balance for any non-tax type (not codes 80-99) then the code is will be treated as "Expired", and no amount will be automatically deducted on the paycheck. Note 2: If you enter a limit, but but no balance for any Employee override code, including tax types then the code is will be treated as "Expired", and no amount will be deducted on the paycheck. For example: Code 93-0 (Company level Suta), does not require a balance, however, 93-5 (A Suta override for employee #5), requires a balance, or the code will not considered during paycheck generation.
A "Global" code is automatically included during the generation of each Paycheck (for all Employees). Regular Pay, FICA, Fed. W/H, UNION DUES are examples of Global Codes. These CODES apply to all employees, even though the amount will vary from pay period to pay period and Employee to Employee. Note: The inclusion of a Union Code is ignored for non-union Employees. When you click this checkbox you are basically informing the CCS Automatic Paycheck Creation Logic that this code should be utilized during the creation of all paychecks for all employees. You may elect to create codes that perform no calculations or have calculations which produce values of zero and yet globally assign them to all employees. For instance, a CODE for OVER/SHORT pay could be defined with a flat amount of 0.00 and be globally assigned. This code would then appear on all paychecks with a default amount of zero dollars. In the event the employee is to be given a credit/debit of some type, you would simply override the zero amount with the needed value. Codes should not, however, be defined as global if they are rarely used since system performance will be degraded by the inclusion of a large amount of normally unneeded codes. Note: CCS Predefined Codes that are needed during the creation of Paychecks which are based on the values of TIMECARDS need not be assigned to an Employee in any manner. For example, if your payrolls will be based on TIMECARDS, then you need not assign CODES such as Reg. Pay Shift 2 to any employee. The CCS Paycheck Creation Logic will automatically utilize such codes when a TIMECARD has been entered that incorporates an extended regular, overtime, double time, passive pay or Holiday type. You should, however, always mark the Regular and Overtime base pay codes (CODES 4 & 8) as Global so that their inclusion is assured irrespective of how paychecks are created.. WORKSHEET COLUMN:[Actual Value] CCS Payroll incorporates an open-ended report (Payroll Worksheet) that can be used to record hours worked for all employees in preparation for data entry. This report lists all of the employees for the Company and has ten columns without headings. The Worksheet Column creates column headers for this report. Using Regular Pay (Code 04) as an example, if you type "Reg. Hrs." in this textbox ( it will scrunch up as you type, but it will print out OK on the report) when you run the Payroll Worksheet report, a column on the report will contain the heading "Reg. Hrs."; this column would then be used to record the number of Reg. Hours each employee worked. The report is accessed as follows: Click on Reports from the Payroll Home Menu. Under Worksheets and Misc. Forms, select Payroll Worksheet. INCLUDE:[A string of comma delimited codes] (Optional Field) The INCLUDE field provides an explicit method of choosing which CODES will be included (or excluded) in the calculation of a particular CODE. To choose which codes are to be considered by the calculation logic, simply enter the CODES separated by commas. For instance, entering 601,602 will cause the program to include only codes 601 and 602 in it's calculations for this code. If you place a minus sign (-) as the first character in the list, then the list of codes become an exclude list, instead of an include list. causing the entered codes to be excluded (not included). For example, entering -533, 601, causes the program to include all other applicable codes in the calculation of this code, except codes 533 and 601. Note, the minus sign did not need to appear before code 601. This concept is very useful for garnishments where you are to withhold a percentage of the employee's disposable income (gross less taxes). By creating a percent of net deductions (category 'D', type '21') and entering the elective deduction codes in this list (a 401k code for instance), the garnishment code calculation will include all earnings and taxes (if they are not in the exclude list), but skip the voluntary deductions (if they are in the exclude list.). You may also cause deduction codes to be deducted from a percentage of gross (type code 2) deduction calculation, by placing deduction codes in the include list. Any deduction code in the include list of a non-tax type code (not codes 79-99), percentage of gross calculation, will be deducted from the calculated gross, before calculating the current code. For example, if a company's 401K policy states that any section 125 must be deducted from the gross, before calculating the 401K, then in the include list for the 401K, simply enter the code number(s) of all of the section 125 codes. Note: You should precede this list with a minus sign if you are not also controlling which earning codes should be specifically included, or no earnings will be used for the calculation. This is an optional field. A blank include field means all applicable codes should be considered in the calculation of this code. The entry of a code in the include list will not cause it to be considered if is not otherwise applicable to the calculation. For instance, a deduction code in the include list of a vacation accumulator will be ignored during the calculation of the vacation accumulator.
Examples using the Include/Exclude field: Example of a deduction based on hours worked in a particular group of codes.
The assumption above, is the codes 125, 126 and 155 represent hours worked in a particular area (job, craft, class, department, etc.) that should be taxed by this particular union code.
Example of a hourly vacation accumulator, which should include only regular and overtime (no other codes will contribute to the vacation accrual.)
The 1.96% was derived by taking the number of vacation hours an employee will earn in a year based on a 40 hour week (2080.00) and subtracting the vacation hours that the employee will not work in the year, (40 hours for 1 week of vacation pay.) This leaves 2040 workable hours. 40 hours / 2040 hours = .0196 vacation hours to be earned for every hour worked. Based on this formula, and employee who works 40 hours regular time, and 8 hours over time in the current week will earn .784 hours vacation for the week. (40 x 1.96) = .784. Only 40 hours was allowed, since the limit was set to 40.00 Note: If your accumulator should take into account other hourly earning codes, simply enter them in the list. It is not necessary to put any codes in the include field, if all hourly type earning codes should be considered. A blank include field simply means all applicable codes should be considered. Please see PTO examples in this help system for more examples on setting up accumulators.
Example of a IRS garnishment code which excludes both the 401K and cafeteria plans (which are elective.). This is a disposable income calculator and deduction code.
The assumption above is that code 533 represents a cafeteria plan and code 601 represents a 401K plan. These values and codes were chosen randomly, your values and codes are likely to be different of course. You would not need to exclude employer taxes (or employer matches), or direct deposit codes, since they are not considered in a Percent of Net calculation to begin with.
See also Advanced Includes above.
UNION ONLY:[Checked or Unchecked] Check this box if this Earning or Deduction Code is for Union Employees only. If you click this option, then this code will only be given to union employees. An employee is considered a union employee if you have entered a union number in their employee record. (Assignments tab.)
Links with Code is powerful advanced feature that allows codes to be grouped together for inclusion onto a paycheck, form or report. It is generally used, when a particular code or codes should always appear together on a paycheck whenever some other code is present. For instance when code 90 (SS Employee) is added to a check (or the employee's pick list), you will almost always want codes 91 (SS Employer), 98 (Medicare Employee) and 99 (Medicare Employer) to be added at the same time. To insure this occurs, codes 91, 98 and 99 link to code 90 (This is done for you by the CCS Setup routines.) Another instance when this feature is most useful, is when you have a unique tax (unique to your state, like a Training tax or SDI etc.) that should always appear when for instance the state SUTA code is present. If you link this tax (Say code 80) to your SUTA code (code 93), then anytime code 93 is present on the check, code 80 will be added for you automatically. You can accomplish the above inclusion without the use of links, simply by adding all codes that need to be included together on a paycheck using the global setting, or adding them to the employee's pick list (rates tab), but linking is a more natural way of doing this, and allows the CCS Payroll program to insure the integrity of these groupings for you. (It will always work with the codes as a group, once you define your links.). The Links with code logic, is extremely useful when you have employee's who move from state to state and are therefor subject to different state or local taxes from time to time. See setting up job based taxation in the Multi-state Overview. Note: When you link codes, and any code in the chain is added to a paycheck, all other codes will be added. For instance, adding code 98 to the paycheck will add codes 90, 91 and 99 if they are not already present. When you set a code to link to another code, that codes global check box is disabled, the code will always be processed when the code it links to is processed. Note: A Earning code can only link to an earning code, and a deduction code can only link to a deduction code. There is no limit to the number of links you can create, and a code that is being linked to, can link to another code, forming a chain of linked codes. It is permissible for a code to link to another code, that links to a 3rd code, that links back to the 1st code, however such a setup will prevent any codes global checkbox from being modified, therefor this is not a recommended setup. You should always have a "Top" level code that other codes link to either directly or indirectly, that will be used to control the global setting for the entire chain. Another very important use of linked codes is to group Worker's Comp. codes. This is described fully in Setting up Worker's Compensation.
Whether or not to tie banking information to Deduction Codes (the button is disabled on Earning Codes) is an important decision. Here are some guidelines:
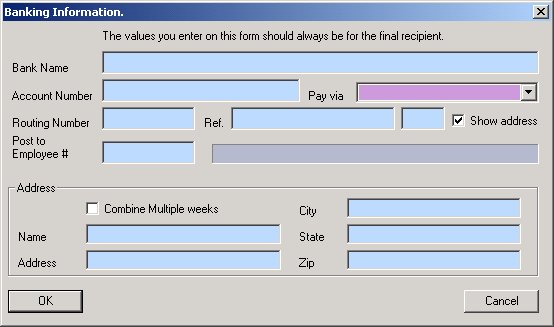
Clicking on the Bank Button brings up the following form:
(As pictured, the Show Address check box has been checked, which caused the Address portion of the form to be visible.) BANK NAME:[60 Alphanumeric Characters] If paying this code electronically, enter the name of the bank that will receive the funds when this Deduction Code is disbursed. Not necessary if paying this code with a paper check. ACCOUNT NUMBER:[15 Alphanumeric Characters] If paying this code electronically, enter the number of the account to which the funds will be deposited when this Deduction Code is disbursed. Not necessary if paying this code with a paper check. Choose the default method of payment when this Deduction Code is disbursed. This default method is utilized by the Disbursement Form whenever you request a specific Pay Mode. Choices as of this writing are: ACH, ACH Impound, EFTPS Batch Filer, EFTPS PC Filer, Mark as Paid only, Paper Check or Paper Check Impound. ROUTING NUMBER:[9 Alphanumeric Characters] If paying this code electronically, enter the routing number of the bank that will receive the funds when this Deduction Code is disbursed. Not necessary if paying this code with a paper check. Ref:[30 Alphanumeric Characters] Enter data relevant to the payment. You could, for example, put a Case # for a child support payment or a garnishment. This field will print on the check and its stub. If this was a payment to an insurance company you might put the policy number or account number. In code 93 - 0, Suta please input your UCT code number here. POST TO EMPLOYEE #:[90000-999999] If you plan to disburse funds from this Code by creating a paper check, the program needs a way to incorporate this check in with the remainder of your payroll checks. This is accomplished by creating an "employee" that receives neither a W-2 nor a 1099. These paper checks will be assigned to this "employee", thereby allowing the check to appear in your check register and in all applicable reports. NOTE: You should assign Employee #'s to these bogus employees that are well beyond the range of actual employees. We suggest starting no lower than 90000 for these "employees." If you have several Employee-Level Codes that are disbursed to the same bank, use this field to save duplicate data entry: assign a bogus Employee # the first time you enter the banking information for one Code. On the next Code, just enter the assigned Employee #. The program will copy the data from the first entry. NOTE: Code 90-0 (SS Employee) banking information is linked to 91-0 (Company SS), 79-0 (EIC), 95-0 (Federal Withholding), and 98-0 (Employee Medicare) and 99-0 (Employer Medicare). When you complete the banking information in Code 90-0, the program fills in 91-0, 79-0, 95-0, 98-0, and 99-0 for you. NOTE: If you do not put a number in this field and disburse the funds from this Code via a paper check, CCS Payroll will create a bogus employee for you and assign it the next available number within the allowable range. NAME, ADDRESS, CITY, STATE, ZIP:[Real Values] If you will be creating paper checks to disburse the funds from this Code, input the Payee's name and address information as will be printed on the check. NOTE: See Disbursements and Direct Deposit for important details relative to banking information.
When a Code expires, the REPLACE CODE will be used in lieu of the original CODE. If no REPLACE CODE is entered here, an expired CODE will simply be ignored by the CCS Automatic Paycheck Generation. A Code expires in one of two ways:
The EXPIRATION DATE can be used to cause a CODE to expire on a specific calendar date. Expired codes that have no REPLACE CODE are ignored by the CCS Automatic Paycheck Generation Logic. The EXPIRATION DATE is compared with the Week Ending date (the date entered in the Welcome Screen) to determine if this code has expired. A code expires the last minute of the last hour of the EXPIRATION DATE; therefore, a code is expired only if the Week Ending date is greater than the EXPIRATION DATE. How the CCS Automatic Paycheck Generation Logic Handles Replacement Codes and Expirations.
In summary, when a child tree expires, it always unwinds, and reverts back to the first company code that has not expired above it in the replacement sequence. Expirations can be used to control when a CODE begins as well. For example, assume an Employee is not eligible for Holiday pay until a certain date. Define a "Dummy" CODE that has no calculations and expires on the date you want your Holiday CODE to begin. Use your Holiday CODE as the replacement code for this "Dummy" Code. When the "Dummy" Code expires, the Holiday Code will be enabled.
This setting allows you to control which earning and deduction codes should appear on the paycheck stubs, and under what circumstances they should appear. The Stub Mode Drop down List Box is only enabled when you set the "Enable Stub Mode" preference via preferences to YES. When this option is enabled, the newer style pay checks are used that allow more control over the formatting of the paycheck. As of this writing, both style paychecks are present and available for use. Future versions of the program will only use the newer style paychecks. Valid choices are: N- Never -- This code should never appear on a paycheck stub. C - Current Activity -- This code should appear on the paycheck stub if it was active on the paycheck being printed. A - Any YTD Activity -- This code should appear on the paycheck stub if the code has been used by the employee during the course of the payroll year. Y - YTD total <> 0, -- This code should appear if the YTD total for this code is not zero and it has been used by the employee during the payroll year. When the "Enable Stub Mode" is enabled in the other preference area, and you leave the Stub Mode blank (in this form/column), then the stub mode processing will assume the "A - Any YTD Activity" option. When the Enable Stub Mode option is not enabled in the other preferences area, then this field will be disabled and the paychecks will utilize the "C - Current Activity" setting only.
If you will be interfacing your payroll system with a G/L then enter the G/L Debit or Credit Account that this code will affect in the your G/L; otherwise leave these fields blank. You may enter just a base account such as "6500" or you may enter a base and DEPT combination, such as "6500-000". The CCS G/L uses a 4 dash 3 G/L Structure. However you may enter any format that is applicable to your G/L. --See below for further information regarding G/L Exporting and Account setup. The "D" button on the right of the GL DEBIT/GL CREDIT entry area allows you to further define the transfer characteristics for this code. Pressing this button will display the dialog shown below:
"Transfer all detail" -- is used when you want all detail (Every single transaction involving this code) to be transferred to your G/L. This is very useful for instance with code #2 (Net -- Which is your Payroll Checking Account). This will cause all the net amounts of all Paychecks and Disbursements via Paper check to be transferred in detail to your G/L. When the Detail mode is used, additional information about the item is included in the export, including the Employee # and Check #. Normally, you will only want summary transactions. This mode, will summarize all occurrences of this G/L account in a given payroll period and liability period (check date). "Append Department # if applicable" is used when your G/L and PAYROLL modules use the same DEPARTMENT structure. When you enter an account number in the GL DEBIT or GL CREDIT fields, you have the option of using several formats. You may enter just a base account such as "6500" or you may enter a base and dept. combination, such as "6500-100". When you choose to enter a base number only, and then select "Append Department #", the department number of the transaction being exported is used to complete the account number during the export (or reporting process). For example, if we assume the following: You defined your E/D Code #4 (Regular pay) as having a base account of "7610" for the G/L DEBIT account (The expense side). You clicked the "Append Department #", (For the Debit side). Let's further assume that for employee 1916, you have created a paycheck which uses department "200". Given this setup, then during the transfer to G/L, the DEPARTMENT of the actual "Regular Pay" transaction of the paycheck detail line, will be appended to the base account to form the complete G/L ACCOUNT, with the end result being "7610-200". This logic allows a single E/D code to alter any number of G/L ACCOUNTS, without having to define a separate E/D code for each Department. Note: The XYZ Company (company 99) does not use this particular process, instead it has used a base - DEPT structure for all G/L Accounts. Additionally the G/L Department number for all expenses used was "010". There needs to be no correlation between your G/L ACCOUNT DEPARTMENTS and your PAYROLL departments, if you always use a full Account number in your G/L DEBIT/CREDIT fields. The G/L Account Prefix and G/L Account Suffix are optional alphanumeric extensions that can be added to the final G/L account number that is exported or printed on all of the CCS G/L reports. These numbers do not alter the lookup routines used by the G/L Account number to G/L Account Descriptions. They are simply added to the displayed G/L account during export and reporting. If you are appending the department number as well, then the department number will first be appended, then the G/L Account suffix field will be added to the right of the department. You may enter a dash if applicable in either field. Using the example above, if the base G/L number was 3010 and the department being exported was 010, then the final G/L Account number would be 3203010-0109
See Also the Payroll to G/L Export Dialog and the G/L Account Form for more information.
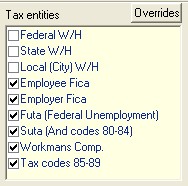
TAX ENTITIES:[Checked or Unchecked]
Most earnings and deductions can be designated as either taxable or nontaxable by each of the nine tax entities. This is accomplished by either checking or unchecking the checkboxes within this control. A deduction becomes a "Pretax" Deduction for those tax entities which are not checked. An Earning becomes a Tax-exempt earning for those tax entities which are not checked. The example above is often used for a 401k Deduction. The current checked/unchecked status shown above signifies that this CODE is a pretax deduction for Federal W/H, State W/H and Local W/H. The CCS Automatic Paycheck Creation Logic will deduct the "Total" for this CODE prior to the calculation of Fed., State and Local withholdings. However, the remaining taxes will be calculated as normal. Pretax deductions are calculated prior to all other deductions during the generation of paychecks.
Tax Overrides Dialog. This dialog is shown when you click the Overrides button above the Tax Entities area.
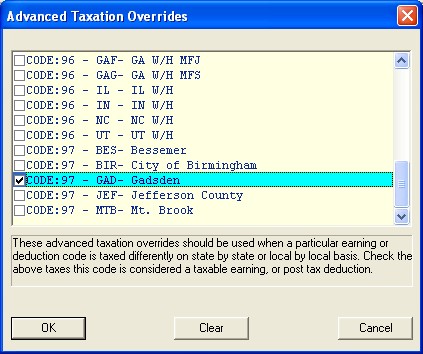
The "Overrides" button is only enabled when you set the "Enable Tax Overrides" preference to YES (via preferences -- Professional Version Only.) When this option is enabled, you can set the taxation for an earning or deduction on a state by state or locality by locality basis. If you are using the Multi-State Employees mode (Payroll tab of the Company form.), and you have a tax free earning or pretax deduction that must be taxed differently from state to state or locality to locality, then you will need to use the Tax Overrides area to further define the taxation for each such earning or deduction. When you click the Overrides button while located in an applicable earning or deduction, a list of all tax entities that you have defined will be shown. You can then specifically set the taxation on a tax by tax basis. Clicking the check box means the earning is not tax free (or the deduction is not a pretax.), those taxes left unchecked are tax free earnings or pretax deductions. You should not use this mode if all states or localites you have defined will handle the taxation in the same maner, as it requires greater processing during paycheck generation and tax reporting. The example above is for a fictitious cafeteria setup (Cafeteria plan), where the local tax GAD - Gadsen, does not allow a cafeteria to be a pretax. All other tax entities have allowed this cafeteria to be a pretax, therefor they are all unchecked. You may also use this capability to perform proper taxation during paycheck generation multi-state, multi-locallity earnings on a single paycheck.
Codes 79 and 90-99 are used by the CCS Payroll program in the following manner.
Versions previous to 3.00 used the following Codes:
See also State Tax Setup:
Other Taxes: Codes 80-89: Codes 80-89 are reserved so that you can create Tax Entities for state and local taxes, other than the standard state and local W/H taxes. Since most state and local taxes apply whenever SUTA applies, Codes 80-84 allow you to create Tax Entities that are levied whenever SUTA is levied. Codes 85-89 allow you to set up special State and Local tax deductions for those rare tax requirements that are levied differently from SUTA. Checking the "Tax Codes 85-89" checkbox (not shown in the above picture) will cause all of those Codes to be applied to the target earning. NOTE: Even though Deduction Codes 80-89 exist, they will not be considered by the program unless you assign them to your employees either globally or individually. Click here for a Alabama Example: Click here for a California Example: Click here for a New York Example: Click here for a New Jersey Example: Click here for a New Hampshire Example: Click here for a Iowa Example: Click here for a Massachusetts Example: Click here for a Nevada Example: Click here for a Washington Example: Click here for a Pennsylvania Example: Click here for a South Dakota Example: Click here for an Oregon Example: Click here for a North Carolina Example
Period:[read only], Month:[read only], Quarter:[read only], Year:[read only] Each of these four fields are used to store the associated totals for the CODE. These fields are updated during the closing of a payroll; therefore, they always reflect the latest closed payroll, without regard to Paychecks created but not yet closed. These totals are not used in any manner during the calculation or generation of Paychecks; they are provided for information only. YTD totals used by the calculations of the CCS Automatic Paycheck Generation Logic are derived by totaling all existing paychecks for a given year. For example, prior to determining if the Limit for FICA has been reached for a particular employee, all FICA CODES for all paychecks on file for the Employee in the current year, up to and including the weekending of the paycheck being generated are summed. This value is then compared to the LIMIT. The default handling for salaried employees can be modified to either use code 4 or code 7 as the code used to represent their salary during the creation of a paycheck. If you mark code 7 (Salary) global, then all salaried employees will use code 7, not code 4 on the paycheck. If, however; you do not mark code 7 global, code 4 will be used. Irregardless, code 7 will not be given to non-salaried employees during paycheck creation. This logic applies to global codes only. If you assign code 4 or code 7 directly to an employee, that code will always be used. Using code 7, instead of code 4 allows for more flexible reporting and G/L coding, since code 4 and code 7 can each be given separate G/L codes.
Setting up 3rd Party Sick Pay: To setup 3rd party sick pay, you will need to create the following earning and deduction codes: Create an Earning code of category "N" - Non cash earnings. -- Call it 3rd party sick pay (or whatever is applicable - however the text 3rd and sick must appear in the description) Note: Be sure to check or UN-check the proper tax entities for which the 3rd party sick pay is taxable by, this varies from state to state, please consult a tax professional in your state for assistance in this matter. Note: If you mark the first five checkboxes as tax exempt (Federal, State, Local, Employee FICA & Employer FICA) then this codes activity will be posed in box 12 of the W2 with a "J" -- 3rd party sick pay - Non taxable portion. Create the following 3 deduction codes: 1) Category "D", Type 33 called -- Fed W/H paid by 3rd Party. (All tax entities of this code should be checked.) 2) Category "D", Type 34 called -- SS paid by 3rd Party. (All tax entities of this code should be checked.) 3) Category "D", Type 35 called -- MED paid by 3rd Party. (All tax entities of this code should be checked.) Note: If the employee did not have federal withholding taken out of their sick pay earnings, then you do not need to create the Fed W/H deduction code shown above. On the Payroll tab of the Company form, choose "1 - Uses 3rd party Sick Pay." from the 3rd Party Sick Pay drop down box. Create a check for the employee in whatever quarter they had such payments. Enter the Sick pay payment on the earning side. (Using the "N" category earning code you created.). Allow the taxes to calculate, that were withheld or for which you are liable. Then on the last line item (on the right hand side) add the applicable deduction codes you added in the steps above. (fed/ss/med paid by 3rd party). These codes will automatically calculate to a negative amount equal to amount of Fed, SS or Medicare amounts shown on the paycheck. Important: Do not allow employee taxes to calculate that were not withheld (zero them out). You may allow any applicable employer taxes to calculate, as they will not affect the gross or net earnings of the paycheck. The check should now be zero. However the taxes and earnings have now been established. When you run the quarterly report, 941, 943 or 944, the 3rd party sick pay earnings as well as the applicable tax adjustments will be reflected on the reports without further entries. When you print the W2 the additional earnings will show up. If you have used a non-cash earning as described above and chosen "1 - Uses 3rd party Sick Pay." on the payroll tab of the Company form, then the employees having 3rd party sick pay will have a "X" in the applicable box. You do not need a separate W2 for the employee, both regular and sick pay earnings can go on a single W2. This example assumes you are liable for the employer side of the taxes. If you are not, then you will need to adjust your process accordingly.
|
|
|