|
|
|
|
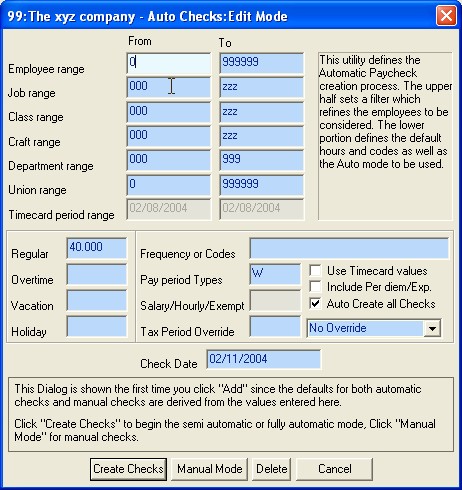
AUTO CHECKS DIALOG
The dialog pictured above is generated by clicking on the Auto Create button on the Settings tab of the Paycheck form. NOTE: In order to avoid check-by-check manual data entry tasks, be sure that your Employees and Earning and Deduction Codes are properly set up before initiating the Create Checks process. The Controls of the AUTO CHECKS Dialog: Note: The values shown below in square brackets represent the default range applicable to each control; however these ranges can be configured to allow additional values (or restrict values). See Validation Methods for more information. Employee Range From:[0-999999] and Employee Range To:[0-999999] If you want to limit the Paychecks to a certain subset of Employees, enter the Employee Numbers here. Paychecks will be created only for those Employees whose Numbers fall within the entered range. Job Range From:[000-zzz] and Job Range To:[000-zzz] If you want to limit the Paychecks to a certain subset of Jobs, enter the Job Numbers here. Paychecks will be created only for those Employees who are assigned to Jobs within the entered range. Class Range From:[000-zzz] and Class Range To:[000-zzz] If you want to limit the Paychecks to a certain subset of Classes, enter the Class Numbers here. Paychecks will be created only for those Employees who are assigned to Classes within the entered range. Craft Range From:[000-zzz] and Craft Range To:[000-zzz] If you want to limit the Paychecks to a certain subset of Crafts, enter the Craft Numbers here. Paychecks will be created only for those Employees who are assigned to Crafts within the entered range. Department Range From:[000-zzz] and Department Range To:[000-zzz] If you want to limit the Paychecks to a certain subset of Departments, enter the Department Numbers here. Paychecks will be created only for those Employees who are assigned to Departments within the entered range. Union Range From:[0-999999] and Union Range To:[0-999999] If you want to limit the Paychecks to a certain subset of Union members, enter the Union Numbers here. Paychecks will be created only for those Employees who are members of Unions within the entered range. Timecard Period Range:[Actual Date] Note: This field is disabled unless you click the Use Timecard Values check box. If you are using Timecards and you want to limit the creation of paychecks to a specific period of time, or combine one or more timecard weeks into a single paycheck, then enter the beginning and ending dates of the desired range. If Timecards exist and you want to ignore them, (for instance to create paychecks for salaried employees, then be sure to uncheck Use Timecard Values.
If you are not using Time Cards, and would like the program to use enter a value for regular hours for each employee, then enter the number of Regular (straight time) hours to be used as the default Regular Hours one each paycheck. If, for example, you wanted to pay all (or most) of your Employees for 40 hours this pay period, enter "40" here. Once the checks are created, you can edit individual checks and change the values as needed. Note: No entry is required here, you can leave this field and the Overtime, Vacation, and Holiday default fields blank. This will cause the paycheck generation logic to enter zero hours for each employee by default. If you are not using Time Cards, enter the number of Overtime hours to be used as the default number of Overtime Hours for each Employee. If, for example, you wanted to pay all of your Employees for 10 overtime hours this pay period, enter "10" here. Once the checks are created, you can edit individual checks and change this value as needed. If you are not using Time Cards, enter the number of default Vacation hours to be used for each Employee. If, for example, you wanted to pay all of your Employees for 8 vacation hours this pay period, enter "8" here. Once the checks are created, you can edit individual checks and change this value as needed. If you are not using Time Cards, enter the number of default Holiday hours to be used for each Employee. If, for example, you wanted to pay all of your Employees for 8 holiday hours this pay period, enter "8" here. Once the checks are created, you can edit individual checks and change this value as needed. Frequency or Codes:[alphanumeric] The Frequency & Codes field control which codes will be used during the paycheck creation process. Normally you will leave this field blank (or enter a 0) to process a normal check run. If however you want to create a check run using only certain Earning/Deduction Codes, (other than the norm, for instance a Bonus Run), there are several methods that can be utilized in conjunction with this control.
By Specifying one or more specific codes:
Utilize the Frequency # of the Earning/Deduction codes. In the Earning and Deductions code dialog, each code is given a "Frequency" of 0,1,2,4 or 8. A "0" causes the code to be considered for all payroll runs. The other values of 1,2,4, and 8 can be used to select a group of codes to appear in addition to the normal run. Below are 2 ways to utilize this feature.
No Frequency value will cause a code to be included on a paycheck if it is not global, or otherwise assigned to the employee. See: Creating a Bonus Run (at 25% taxation) for an example of Frequency and Code Sets in action:
Each Earning/Deduction Code that is defined is given a Type. Enter one or more of the following: <D>aily, <W>eekly, <B>i Weekly, <T>wice monthly, <M>onthly, <Q>uarterly, <S>emi-Annual, <A>nnual or <*> for all Types. If, for example, you only wanted paychecks generated for Daily and Weekly Employees, enter "DW" in this field. Use Timecard Values:[Checked or Unchecked] Check this control if you want to use the Regular, Overtime, Holiday and Passive pay values from the Timecards. (Only those Employees who have timecards will be considered.) Leave this control unchecked to ignore existing Timecards. The values you enter in Regular, Overtime, Vacation, or Holiday controls on this dialog are used when you are not creating paychecks from timecards. When you create paycheck from timecards, the values obtained from the timecards are used as the basis of each paycheck. Regardless of how a paycheck is first created, it can be edited as necessary, including after the fact payrolls of course. Note: When you check this options, the timecard range is enabled, allowing you to enter the range of timecard weeks to be used in the generation of a paycheck. Note: When you will be creating paychecks via timecards, you should first create all paychecks which are based on timecards, then create the remaining paychecks (for salaried employees for instance), by unchecking this option and using the auto mode to have the program create the remaining paychecks for you automatically. The automatic modes, will only create one paycheck per employee per week ending date. (Unless you close the payroll period and create a second payroll run in the same period.). You can create as many paychecks as you wish for an employee manually; however, the automatic paycheck creation logic will only create a check, if the employee does not currently have a check in that period. Include Per diem/Exp.:[Checked or Unchecked] Check this control if you want any Per Diem or Employee Reimbursements that have been added to the Per Diem and Expense form to be added to the paychecks as they are created. Auto Create All Checks:[Checked or Unchecked] If this field is not checked, then CCS Payroll will create one Paycheck and present it to you for editing before creating the next one. If this field is checked, then CCS Payroll will create all of the applicable Paychecks before placing you in an editing situation.
Enter the check date that will be used for both printing purposes and determination of the liability period.
See Check Date in the Paycheck form for more information.
Tax Period Override Value:[Any number between 0 and 365] You may override the number of days, weeks or months that this payroll run (or single paycheck) should be based on. This setting will override the taxation period for all paychecks created during this payroll run and will remain in force until the payroll dialog is closed. This is very handy for bonus paycheck runs where an employee is being paid for a yearly or quarterly bonus, since this check may be potentially much larger than their normal paycheck which might otherwise cause it to be taxed at a higher tax bracket than it actually should be. This allows you to let the program know that this check is for the entire quarter or year or just a couple days.
Tax Period Override Units:[No Override, Days, Weeks or Months] If you wish to use an override taxation period, select one of the following choices (Days, Weeks or Months) from the drop down list box. For example: Let's assume you are preparing to process a bonus run for the entire quarter. Since the checks you are about to create represent the bonuses only and they are for the quarter, not for a single payroll period, enter 3 (the number three), in the first field, and select Months from the drop down list. This tells the program that the taxation period for this check is for a quarter (3 months). The approriate tax brackets for table based withholding (Federal and State W/H tables for example), will be used. This setting would not change non-table based taxes. (For instance, social security is always a set percentage of the gross pay.) Another example where this override can be utilized, is for temporary employees and day lease employees. Temporary employees are often paid at multiple and variing intervals, instead of always weekly, biweekly, monthly etc. They may be paid for three days work, then next paycheck get paid for five days work. No particular pay period setting in their employee file would ever be completely accurate at all times. This override feature allows you to create a paycheck for the exact number of days worked, and have the taxation properly computed. For example: If an employee has worked four days, and you wish to create a paycheck where the taxations is based on for days. Click, Add from the right hand toolbar (or Auto Create) from the settings tab. Then enter 4 (four), and select Days from the drop down list. Click OK, and create the check as normal. The taxation routines will calculate the employees annual salary by annualizing this paychecks period (4 days) into the year, then back calculate the taxation for the four day period. For those who really want to know the math. Assume an employee earns $250.00 in a four day period, their annual salary would be computed to be $22,750. (364 days in year / 4 days this check = 91 periods) 91 periods x $250.00 is $22,750.00. The tax bracket for an employee making $22,750.00 would then be used in calculating all table based taxes. (Less any exemptions of course.) Note: Generally you will leave these two fields blank, allowing the CCS Payroll Program to use the employee's normal pay frequency setting in their employee file for computation of table based taxes. You can process the payroll of multiple employees with differening pay frequencies in a single run. Each employee's taxation will be always be based on thier pay frequency, unless you use these fields to override the default logic.
Also See Bonus Runs for setting up a Federal Tax rate at a set percentage for Bonus Runs.
|
|
|