|
|
|
|
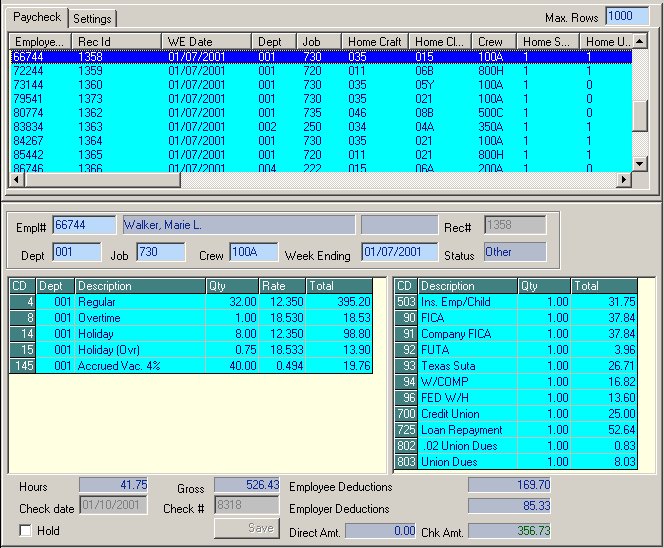
PAYCHECK Entry/Edit Form The PAYCHECK Entry/Edit Form allows you to View, Add, Edit or Delete PAYCHECKS:
As depicted above, the user is editing (Edit mode) PAYCHECKS for Employee # 66744, Walker, Marie L., who is an employee in COMPANY #99. This form has two tabs across the top: Paycheck and Settings. NOTE: Paychecks can be created using Timecards or they can be created without using timecards (see Paychecks Without Timecards for details). Note: When you select a PAYCHECK from the LIST control (click on a line) in the upper portion of the Form, the associated PAYCHECK will be displayed in the bottom portion of the Form. You may also delete PAYCHECKS by highlighting a PAYCHECK and clicking the DELETE key. Clicking on the Column heading will sort the list by that Column. Clicking again on the column header will toggle the sort order (Ascending vs. Descending). Note: Although this form contains predefined controls, they may be configured to meet your specific "Business Rules". See Validation Methods for more information on customizing controls. See The Mouse verses the Enter/Tab Keys for information on moving through a form. See Importing Data for information on importing initial data. PAYCHECK Maintenance: To Add a new PAYCHECK: 1. Select Maintenance|PAYCHECKS from top menu bar or go to the Home Menu and click the "PAYCHECK" button. 2. Click ADD on the SIDE
TOOLBAR or 3. Complete the form as described below. After the last Entry is completed, the record will be saved automatically. To Edit an existing PAYCHECK: 1. Select Maintenance|PAYCHECK from top menu bar or go to the Home Menu and click the "PAYCHECK" button. 2. Enter the EMPLOYEE# for the EMPLOYEE whose paycheck you wish to edit or any portion of the employee's last name (see Tip below) in the EMPLOYEE# field. Press ENTER. If the EMPLOYEE exists, he or she will be displayed in the Form. (To search alphabetically by name, see Alpha Search.) You can use the RECORD buttons to locate a particular PAYCHECK or select the PAYCHECK from the LIST control in the upper portion of the Form. 3. Complete any changes needed as described below. Tabbing past the last entry, moving records or clicking ADD or OK on one of the TOOLBARS will validate and save your changes. To Delete an existing PAYCHECK: 1. Select Maintenance|PAYCHECK from top menu bar or go to the Home Menu, Click the "Codes" button, then "PAYCHECK" button on the Codes Menu 2. Enter the EMPLOYEE# whose PAYCHECK you wish to delete in the EMPLOYEE# field (see Tip, above). Press ENTER. Use the RECORD buttons to locate a particular PAYCHECK or select the PAYCHECK from the LIST control in the upper portion of the Form. 3. Click the DELETE button on the SIDE TOOLBAR or See Edit Modes for more information on the Edit modes used by most CCS forms. The Controls of the PAYCHECK Form: Note: The values shown below in square brackets represent the default range applicable to each control; however these ranges can be configured to allow additional values (or restrict values). See Validation Methods for more information. The EMPLOYEE # is the EMPLOYEE's unique numerical identifier. This number is used throughout the program to reference the EMPLOYEE. (See Tip, above, for locating an EMPLOYEE by name.) This is the Department to which this EMPLOYEE is assigned. Any change that you make here will only affect this PAYCHECK. To change an EMPLOYEE's default assignment, go to the Assignment Tab of the Employee Form. This is the Job to which this EMPLOYEE is assigned. Any change that you make here will only affect this PAYCHECK. To change an EMPLOYEE's default assignment, go to the Assignment Tab of the Employee Form. This is the Job to which this EMPLOYEE is assigned. Any change that you make here will only affect this PAYCHECK. To change an EMPLOYEE's default assignment, go to the Assignment Tab of the Employee Form. This is the Week Ending date for the selected PAYCHECK. This field normally displays "Balanced." If you make any changes to the check, it will display "Modified" until a CONSISTENCY CHECK is run. If you manipulate the data with a third party program, then the check might be out of balance, i.e., the detail might not add up to the summary. If such is the case, this field will display "Unbalanced." All Earnings transactions for the selected PAYCHECK appear as rows in this grid. The default rows for this grid are created according to the EARNING CODE(S) assigned globally or assigned specifically to this EMPLOYEE. (See Earnings/Deductions Form for details.) All cells are fully editable until the PAY PERIOD has been closed out (see Utilities). To create a new row, tab past the last cell. To change Code assignment, enter the desired Code # or type the beginning of the Code Description and select the desired one from the window that appears. NOTE: Changes made to this grid only affect this PAYCHECK. Default Earning Code assignments must be modified from the Employee Form or the Earnings/Deductions Form. All Deduction transactions for the selected PAYCHECK appear as rows in this grid. The default rows for this grid are created according to the DEDUCTION CODE(S) assigned globally or assigned specifically to this EMPLOYEE. (See Earnings/Deductions Form for details.) All cells are fully editable until the PAY PERIOD has been closed out (see Utilities). To create a new row, tab past the last cell. To change Code assignment, enter the desired Code # or type the beginning of the Code Description and select the desired one from the window that appears. NOTE: Changes made to this grid only affect this PAYCHECK. Default Earning Code assignments must be modified from the Employee Form or the Earnings/Deductions Form. Enter the date that is printed on a check. This field is normally disabled because the program date stamps all checks for you; however, if you need to access this field, go to the Settings Tab and click on the Enable Check # Edit. Warning!! Changing the check date after a paycheck has been created, may cause several undesirable side effects including --Errors in liability reporting, errors in tax calculations, and out of balance conditions on some reports. When a paycheck is created, the liability period must be known in order to properly calculate taxes and other date sensitive items. This liability period is always based on the Check Date you entered at the "Auto Create" dialog, and is recorded in each paycheck record in the column (field) called "MMYY" (Month/Year). This column is only updated when the paycheck is initially created, and never upon a change in check dates. In other wards, changing the check date of a check, once it has been created, does not alter it's liability period. This is necessary, since taxes like FICA have limits, these limits are based on all paychecks that precede the paycheck being created, in the current year. The order of these checks is based on the liability period (Check date at time of creation.), since this order cannot be allowed to change, (since taxes where based on them), a change in check date cannot be allowed to change the liability period that was originally used for these calculations. Consider this example: Let's assume a check is created for employee #1, John Doe, with a check date of 6/30/04. All taxes are calculated for this check based on all checks for this employee beginning with 1/1/04 and up to and including all other checks dated 6/30/04. Now let's further assume, this check has caused Mr. Doe to exceed the Fica Limit. The program of course, sees this, and reduces the SS portion of the tax as required, yet continues to take out the full Medicare portion. Now, should the check date of this check be changed, to say, 6/16/04, and there exists a check for 6/23/04 for Mr. Doe, the taxes for this check will no longer have been calculated properly (based on the check date), but because the system maintains tax calculations based on the MMYY column, the taxes remain correct, based on the original parameters. But this functionality has it's downside as well. Since many reports must be based on the Check date, (The scld B. of the 941), the report and the liability period will differ, and this can cause balancing errors. To take a more extreme condition, imagine if the check date were changed from one quarter to the next, or even one year to the next! Calculations that the program originally made would be entirely wrong, which if fully allowed, would cause the program to have little or no integrity in this area. It is therefore recommended, that if the check date is wrong, you either void or delete the check and reenter it. If you know a change in the check date will not cause any taxation issues, (the check is for the payment of a vendor or a fully exempt employee perhaps, with no loans etc. ), you may safely make the change; however, if you are not completely sure, deleting and reentering the check is always the preferred option. The check date along with all other items comprising the paycheck cannot be changed once the paycheck is closed.
Enter the check number for this check. This field is normally disabled because the program automates check numbering for you; however, if you need to access this field, go to the Settings Tab and click on the Enable Check # Edit. WARNING: If you enable this field, you have complete control over its contents; the program does not do any data validation. You can duplicate an existing check number, use a check number that is out of sequence, etc. If an Employee's PAYCHECK is to be held, i.e., not to be printed, check this box. Electronic:[Checked or Unchecked] If this option is checked, the employee's pay stub will print, but the check portion will be marked as "VOID." Note: if an employee has opted for Direct Deposit, the amount deposited will show up in the Direct Amt. control at the bottom of the form. If the employee receives a check, the amount of the paycheck will show up in the Chk. Amt. control. See Direct Deposit for details. A special feature has been incorporated into this button in order to facilitate data entry. As pictured above, no changes have been made to the PAYCHECK, so this button is disabled. If you change any of the data, the button is enabled. If you click on the button, it behaves as expected. However, reaching for the mouse is a time-consuming process. To reduce mouse dependency, this button has a Yes/No control embedded in it. When the Save Button receives focus via Tab or Enter keystrokes, it looks like this:
Pressing Enter or Tab is the same as clicking on this button. Typing "N" places you back in the Earnings Code grid so that you can continue editing this record. When you create or edit a paycheck ALWAYS use the enter or tab key to run through the deductions side of the paycheck, this will make any calculations or recalculations as necessary. Settings Tab:
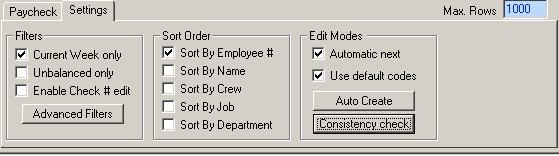
Current Week Only:[Checked or Unchecked] When checked, only those PAYCHECKS that are part of the Week Ending date selected when you entered the Company will be displayed. When unchecked, all PAYCHECKS will be available. To minimize resource utilization, this box should normally be checked. Unbalanced Only:[Checked or Unchecked] When checked, only those PAYCHECKS whose Status is "Unbalanced" will be shown. Enable Check # edit:[Checked or Unchecked] When checked, you will be able to change a check's date and/or number according to your needs. Sort by Employee:[Checked or Unchecked] When checked, PAYCHECK records will be sorted by EMPLOYEE #. New paychecks will also be generated by EMPLOYEE #. Sort by Name:[Checked or Unchecked] When checked, PAYCHECK records will be sorted by EMPLOYEE NAME. New paychecks will also be generated by EMPLOYEE NAME. Sort by Crew:[Checked or Unchecked] When checked, PAYCHECK records will be sorted by CREW. New paychecks will also be generated by CREW. Sort by Job:[Checked or Unchecked] When checked, PAYCHECK records will be sorted by JOB. New paychecks will also be generated by JOB. Sort by Department:[Checked or Unchecked] When checked, PAYCHECK records will be sorted by DEPARTMENT. New paychecks will also be generated by DEPARTMENT. Automatic Next:[Checked or Unchecked] This feature is not yet enabled. Use Default Codes:[Checked or Unchecked] If this option is checked, then any new check that you create will automatically calculate and present all of the CODES assigned to the selected EMPLOYEE. If this option is not checked, then a truly blank check will be created. You can add the CODES afterward if desired. Click on this button to have CCS Payroll create PAYCHECKS for the current Week Ending date. The PAYCHECKS will be fully editable until you close out the period. See AutoCreate Paychecks Form for details. Clicking on this button will cause the CCS Payroll to check the STATUS of every PAYCHECK in the current data set.
|
|
|