|
|
|
|
EMPLOYEE Entry/Edit Form
The EMPLOYEES Entry/Edit Form allows you to View, Add, Edit or Delete EMPLOYEES. The term EMPLOYEE is used throughout the CCS Accounting Program to refer to an individual who is (or was) employed by the COMPANY. This individual is someone on whom you will maintain personnel, payroll, and training data. Training Module: You can use the CCS Training Program to track scheduled maintenance and repairs on inanimate objects as well -- such as a bus, a piece of electronics, etc. Although most EMPLOYEES will probably be employees in the true sense of the word, there is no actual requirement that they be anything other than someone or something that you wish to maintain a database of requirements and compliance. The EMPLOYEE Entry/Edit Form:
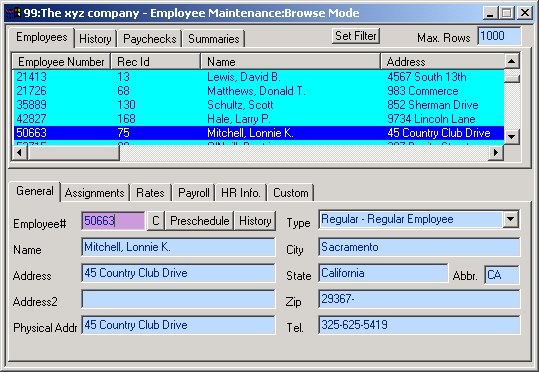
The EMPLOYEE Form has up to seven tabbed sections on the bottom half: General, Assignments, Rates, Payroll, HR Info., Training (not shown above) and Custom. There are up to five tabbed sections in the upper portion of the form: Employees, History, Paychecks, Training Summary (not shown above), and Summaries. The exact number of tabs that appear in each half depends on the module from which you launched the Employee Form. As depicted above, the active COMPANY is "The XYZ COMPANY #99", the user is viewing (Browse mode) the EMPLOYEE 50663 "Lonnie K. Mitchell". Note: When you select an EMPLOYEE from the LIST control (click on a line) on the EMPLOYEE tab in the upper portion of the form, the associated EMPLOYEE will be displayed in the bottom portion of the Form. You may also delete EMPLOYEES by highlighting a EMPLOYEE and clicking the DELETE key. Clicking on a Column heading will sort the list by that Column; clicking again on the column header will toggle the sort order (Ascending vs. Descending). For example, if you wanted the above data sorted by employee, click on the Employees column header and the data will be alphabetized from A to Z (Ascending). Click again on the column header and the data will be seen from Z to A (Descending). Note: This form contains controls with predefined labels and validation routines. However, these controls may be configured to conform to your specific "Business Rules." See Validation Methods for more information on customizing controls. See The Mouse verses the Enter/Tab Keys for information on moving through a form. See Importing Data for information on importing initial data. EMPLOYEES Maintenance: To Add a new EMPLOYEE: 1. Select Maintenance|EMPLOYEES from top menu bar or go to the Home Menu and click the "EMPLOYEES" button. 2. Click ADD on the SIDE
TOOLBAR or 3. Complete the Form as described below. After the last entry is completed, the record will be saved automatically. To Edit an existing EMPLOYEE: 1. Select Maintenance|EMPLOYEES from top menu bar or go to the Home Menu and click the "EMPLOYEES" button. 2. Enter the EMPLOYEE# for the EMPLOYEE you wish to edit or any portion of the employee's last name (see Tip below) in the EMPLOYEE# field. Press ENTER. If the EMPLOYEE exists, he or she will be displayed in the Form. (To search alphabetically by name, see Alpha Search.) Additionally, you can use the RECORD buttons to locate a particular EMPLOYEE or select an EMPLOYEE from the Employee LIST control in the upper portion of the Form. 3. Complete any changes needed as described below. Tabbing past the last entry, moving records or clicking ADD or OK on one of the TOOLBARS will validate and save your changes. Tip:You can select an EMPLOYEE alphabetically by entering any portion of the last name in the EMPLOYEE# field and clicking Enter. A list off all EMPLOYEES matching the entered text will be generated and displayed. Click on the desired EMPLOYEE in the listing; his or her record will be selected and displayed in the main Form. The Wild cards * and ? (* matches one or more characters, ? matches one character only) can be used in the search text. This AlphaSearch is available in most areas of the program where you would normally enter an EMPLOYEE#. (See Alpha Search for more details.) To Delete an existing EMPLOYEE: 1. Select Maintenance|EMPLOYEES from top menu bar or go to the Home Menu and click the "EMPLOYEES" button on the Home Menu. 2. . Enter the EMPLOYEE# you wish to delete in the EMPLOYEE# field (see Tip, above). Press ENTER. If the EMPLOYEE exists it will be displayed in the Form. Additionally, you can use the RECORD buttons to locate a particular EMPLOYEE, or select an EMPLOYEE from the Employee LIST control in the upper portion of the Form. 3. Click the DELETE button on the SIDE TOOLBAR or You may also delete EMPLOYEES by highlighting a EMPLOYEE in the Employee LIST control and clicking the DELETE key. See Edit Modes for more information on the Edit modes used by most CCS forms. See Importing Data for information on importing initial data. The Controls of the EMPLOYEES Form: We will examine the General Tab controls below. However, since EMPLOYEE data is utilized by several modules in CCS Accounting (Payroll, TimeKeeper, Training, and Human Resources), links are provided to the remaining tabs.
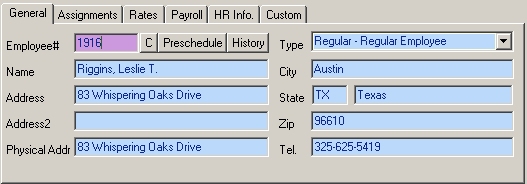
Controls of the EMPLOYEE General Tab:
Note: The values shown below in square brackets represent the default range applicable to each control, however these ranges can be configured to allow additional values (or restrict values). See Validation Methods for more information. The EMPLOYEE # provides each EMPLOYEE with a unique numerical identifier. This number will be used throughout the program to reference the EMPLOYEE. To the right of the employee number field you will see a C button. If you desire to change an employee's number, first select the desired employee, click on the C button and you will be asked what number you wish to change this employee to. Enter the number and click OK. The employee's number will be changed here and on all other related tables. Tip:You can select an EMPLOYEE alphabetically by entering any portion of the last name in the EMPLOYEE# field and clicking Enter. A list of all EMPLOYEES matching the entered text will be generated and displayed. Click on the desired EMPLOYEE in the listing; his or her record will be selected and displayed in the main Form. The Wild cards * and ? (* matches one or more characters, ? matches one character only) can be used in the search text: Jo* will match all EMPLOYEES with the name Jones, Johnson, Joiner etc. but not Jackson. ?ean will match EMPLOYEES with the name Dean or Bean but not Deen. Entering * alone will display all EMPLOYEES in the database. This AlphaSearch is available in most areas of the program where you would normally enter an EMPLOYEE#. Name:[1 to 30 alphanumeric characters] Important: Enter the EMPLOYEE NAME in LAST NAME, FIRST NAME MIDDLE INITIAL. format. Not using this format will make it difficult to sort reports in a useful manner. The CCS Accounting Program will properly reverse the EMPLOYEE NAME when needed on reports, paychecks and labels. Address and Address2:[1 to 30 alphanumeric characters] Enter the EMPLOYEE'S mailing Address in the fields provided. Use the second line when one address line is not sufficient. Physical Address:[1 to 30 alphanumeric characters] Enter the EMPLOYEE'S physical address if different from the mailing address. Select the Type of employee as follows:
Only globally defined codes are ignored as described above. Codes assigned specifically to a given employee, to include exemptions checked or unchecked, will still be applied in every instance. For example, to define an employee who is liable for Federal Withholding only, select "Exempt" as the employee's Type and add the code "95 FED W/H" to the Deductions list box (on the Payroll Tab) for this employee. Even though this is a global Code, assigning it specifically to an otherwise exempt Employee causes it to be applied irrespective of any other considerations. You could also create an employee-level Code for one of these employees and it would also be applied. Thus you can fully define the taxation desired for each employee; however, such uses should be carefully considered to prevent inadvertent under- or over-taxation for employees. Here is one more example: If you define an Employee as Exempt here, yet create an Employee Level Bonus Code, with the FICA and Company FICA Tax exemptions checked for this Employee, then the employee and Employer will become liable for FICA Payments--this Code overrides the Exempt status of the Employee--whether or not the tax is actually deducted on the paycheck. In other words, an Employee will have earned wages subject to FICA taxation due to the configuration of the Bonus Code. The end result will be a W-2 or 941 in which FICA Wages will be shown, yet no FICA Deductions will have been made for the employee. To resolve this error, you would need to also add FICA/Co FICA to the Employee's Deduction list box so that FICA would be deducted on each paycheck for the earnings due to the Bonus Code. Note: Be sure to add codes 90, 91, 98 and 99 together as a group. (If you add any one of these codes, be sure to all of them.) Tip: You can change an employee's type from one type to another during the course of the year or even a single payroll. The current setting is stamped on the paycheck as they are created. This is especially useful; for instance, if you need to create multiple 1099's at the end of year for a single employee. When you print the 1099's, only the checks that are applicable to the specific 1099 type you are printing will be used during the print job. If you have a situation where a single employee receives regular earnings (They will receive a W2) and also 1099 wages, create a 2nd employee number to represent the 1099 wages. When you enter the SSN number for the 1099 employee leave out the dashes, or use periods instead of dashes. This is necessary since the program will not allow you to duplicate SSN numbers. When the 1099's print, the SSN number will be transformed to use dashes.
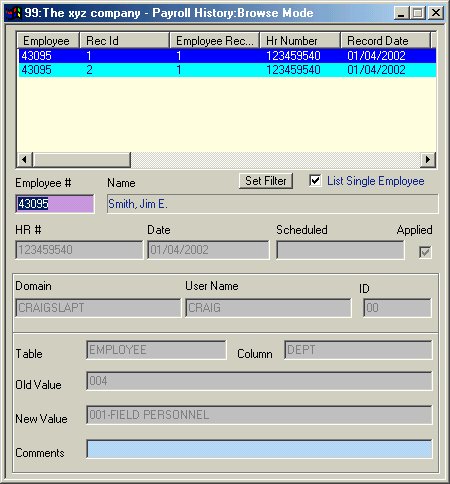
City:[1 to 20 alphanumeric characters] Enter the CITY in which the EMPLOYEE will receive mail. State Abbreviation:[2 digit state abbreviation] Enter the 2 digit state abbreviation. This entry is often used in electronic reporting, whereas the next field, STATE is used on paper reporting. State:[1 to 15 alphanumeric characters] If you entered a state abbreviation in the previous field, the full state name should be displayed automatically for you. You can change this if you prefer as required. This entry can be the state abbreviation as well if you prefer to see the abbreviation instead of the full state name on all reporting. Zip:[00000-99999 or zip+4] Enter the POSTAL ZIP CODE assigned by the POSTAL service for the EMPLOYEE. Enter the TELEPHONE number that can be used to reach the EMPLOYEE. The Preschedule Button allows you to make changes to EMPLOYEE records that will not take effect until the date that you specify. The process is thoroughly discussed in the CCS Message textbox. Enter the date that the edits you are about to make should take effect. Every change that you make to any EMPLOYEE becomes a pending record that is not put into place until the desired date. These records can be deleted prior to the target date--see HISTORY, below. CCS Payroll tracks all changes made to any Employee via the Employee Form. This history is viewable by clicking on the History Button. When you click on this button, you are taken to the Payroll History Browse screen (see below). CCS looks to see if the EMPLOYEE that you have selected has any History records (assuming that List Single Employee remains checked). If so, a scrollable list of his/her history is presented so that you can select the desired one. If not, you are so informed.
History records cannot be added or edited. If a record has not been Applied (which will only be true if the record was created via the Preschedule process), then you can delete it via the normal Delete options. Otherwise, all you can do is view these records and add a comment where desired. Comment:[30 Alphanumeric Characters] Add a brief comment to this History record. List Single Employee:[Checked or Unchecked] If this field is checked, History records only for the selected Employee will be visible; otherwise, all History records will be available for viewing. NOTE: A large number of History records can be created across time. Bringing all of them into this form for viewing can place a strain on your network resources. You should normally leave this field checked.
|
|
|