|
|
|
|
DISBURSEMENTS Form The DISBURSEMENTS Form allows you to create disbursements (EFTs or paper checks for direct deposit, union dues, FICA, insurance payments, child support,etc...).
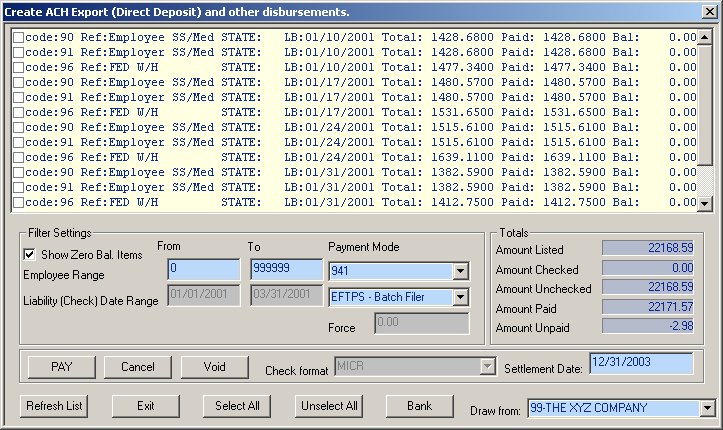
As pictured above, the Disbursements Form is showing EFTPS transactions for the quarter ending March 25, 2001 for all employees. The first three deductions have been marked for processing. This form can also be used to process direct deposits or to automate the payment of any deductions that are withheld from your employees' paychecks. These deductions could include Union Dues, FICA, Withholding, FUTA, Garnishments, State Taxes, Local Taxes, etc. In short, any deduction that you set up via Earning and Deduction Codes can be processed via this form. However, only those Codes that have banking information will show up on this form. For more specific information see the section Bank below. Note: This form contains controls with predefined labels and validation routines. However, these controls may be configured to conform to your specific "Business Rules." See Validation Methods for more information on customizing controls. See The Mouse verses the Enter/Tab Keys for information on moving through a form. The Controls of the DISBURSEMENTS Form: Note: The values shown below in square brackets represent the default range applicable to each control; however, these ranges can be configured to allow additional values (or restrict values). See Validation Methods for more information. EMPLOYEE RANGE FROM:[0-999999] Enter the beginning Employee # whose transactions you wish to view. Enter the ending Employee # whose transactions you wish to view. PERIOD ENDING DATE RANGE FROM:[Any Valid Date] Enter the beginning P/E Date for the transactions you wish to view. PERIOD ENDING DATE RANGE TO:[Any Valid Date] Enter the ending P/E Date for the transactions you wish to view. CLEARED DATE FROM:[Any Valid Date] If you select Direct Deposit from the Payment Mode combo box (see below), enter the beginning Cleared Date for the transactions you wish to view. Note: This control is disabled if the Uncleared Only checkbox is checked. CLEARED DATE TO:[Any Valid Date] If you select Direct Deposit from the Payment Mode combo box (see below), enter the ending Cleared Date for the transactions you wish to view. Note: This control is disabled if the Uncleared Only checkbox is checked. If you select Direct Deposit from the Payment Mode combo box (see below), enter the beginning Code for the transactions you wish to view. Note: This control is disabled if the Uncleared Only checkbox is checked. If you select Direct Deposit from the Payment Mode combo box (see below), enter the ending Code for the transactions you wish to view. Note: This control is disabled if the Uncleared Only checkbox is checked. Choose the type of deductions you wish to view. The options are as follows:
NOTE: If you have purchased any State Electronic Funds Transfer protocols from CCS, they will appear in this list also. CLOSED ONLY:[Checked or Unchecked] If checked, view only transactions from payroll weeks that have been closed out. This option is only available if the Payment Mode (see above) is Direct Deposit. UNCLEARED ONLY:[Checked or Unchecked] If checked, view only transactions that have yet to clear the bank. This option is only available if the Payment Mode (see above) is Direct Deposit. PRENOTE ONLY:[Checked or Unchecked] This option is only available if the Payment Mode (see above) is Direct Deposit. When you check this box, all ACH transactions created will be a zero amount and flagged as a prenote. Prenoting is used to verify the routing number/account number of a payee, the payee will receive a zero dollar ACH transaction. If you will be using this feature, you should send the prenote several days in advance of the regular credit transaction. Prenoting does not clear the checks from the disbursement screen since the direct deposit for these checks is still pending. Once the prenote has been verified by the bank, simply select these same checks and disburse them as normal (without the prenote checkbox clicked.)
TRANSFER TYPE:[List of Values] When you select a Payment Mode other than ACH, this control allows you to specify how you want to pay the selected obligations:
For more information on EFTPS Batch filer and PC Filer (EFTPS PC-Software), please see the document EFTPS. The Force control is to allow you to "Force" a disbursement to a particular amount. This generally should not be done, since the payment will not equal the liability and the liability will remain on file until it is balanced. To handle rounding errors inherent in quarter end disbursements, please see the "Quarter End Procedures" on your top menu. (Under Help)
SETTLEMENT DATE:[Actual Date] Input the date that you want stamped into the selected transactions as the date that they cleared. This date must be tomorrow's date or greater, up to three months in advance of today's date. You can mark items for future settlement as desired. Let's say that you finish processing a payroll and you want to go ahead and create an EFT for the payroll taxes, but the taxes are not due to be paid until the following month. You could initiate the process with a future date to relieve you of the obligation of remembering to do it at the appropriate time. NOTE: Since an EFT clears the bank on the Settlement Date that you choose, CCS Payroll automatically marks an employee's Direct Deposit paycheck as cleared on the Settlement Date. Select the Company to from whom funds will be drawn to cover selected disbursements. The default will be the Company in which you are currently working. COMMAND BUTTONS ON THIS FORM: Create ACH Export: If you are working with transactions that will be EFT's, irrespective of recipient, click this button after you have checked the transactions in the List Control that you want transferred. The program will create an ACH (Automated Clearing House) Export file that can be read into an ACH Processing program. You will be given the opportunity to name the file, to include the full path. If you have an ACH Processing program, utilize it to process the newly created file. If you do not have such a program, contact CCS Accounting for assistance. NOTE: In order to conform with Federal requirements, the ACH Export File will be formatted differently for EFTPS deductions than for other EFT's. Mark As Paid: If you wish to manually write a check for the selected transactions, click on this button. All of the selected transactions will be marked as paid on the Settlement Date. Only use this mode if you are handling the payment manually. Pay: If you want the CCS Payroll program to create a check, ACH
Payment or EFT type of payment to pay the selected transactions, click
on this button. Choosing this option causes CCS to total the selected
transactions and to create a table that the check writing routine will
utilize. You will be asked whether or not you want to print this check
immediately. You can opt to wait, then create other checks, and batch
print them. The stub will show what liabilities are being paid. Void: Use this option to negate any EFT's or other payment options that you have applied to the selected transactioins. You may then process these transactions as if they were new. Refresh List: Force the program to re-fill the List Box control. If you, for example, change the employee range, date range, or other filtering criteria, this button will apply the new criteria to the data and re-fill the List Box accordingly. Cancel: This button closes the form no matter what transactions are checked. Select All: Clicking on this button causes all of the transactions in the List Box to be checked, i.e., marked for processing. Unselect All: Clicking on this button causes all of the transactions in the List Box to be unchecked, i.e., not available for processing. Bank: This button pops up a window into the banking information for the selected Company. It is the same thing as clicking on the Bank button on the Company screen. It is provided on this form redundantly for your convenience. (See Employee Rates Tab for banking information specific to an employee. See Deduction Codes for banking information specific to a Deduction Code.) There is an important distinction to be made here: If banking information is attached to a Deduction Code at the Company Level, the deductions will be added together and a single instrument will be created for the transfer. If banking information is attached to a Deduction Code at the Employee Level, a separate check will be created for each deduction for each employee. Look at the following examples:
Note: The default ODFI (Originating Depository Financial Institution) number defaults to the ACH Processing Company of Georgia. If you will be using an ACH Processor other than the ACH Procssing Co. of Georgia, you will need to override this default setting, Please see the file "ODFISample.dat" in your data directory for further information.
Instructions for Disbursing Federal taxes via PC Filer or Batch Filer To Disburse Federal taxes via PC Filer or Batch Filer, in E/D Codes insure you have already selected the Pay Via (Click the Bank Button for Code 90) of either PC Filer or Batch Filer depending on how you are registered with the IRS. When you go to Disbursements you will select the taxes you wish to pay, at that point the Payment Mode should come up with either PC Filer or Batch Filer as the default, enter the date you want to pay the taxes in the settlement date, ensure the employee range and check date range are correct for the taxes you want to pay. Click Refresh to ensure all transactions are found for the settings you have entered. If you wish to pay all transactions on the screen click Select All then click Pay. When paying using EFTPS you will be shown the path where the file will be saved to. Click OK if you wish to use the default path (or change the path to where you would like to save the file using the browse button). REMEMBER WHERE YOU ARE SAVING THE FILE, THIS IS WHERE YOU WILL RETRIEVE THE FILE FROM USING THE EFTPS PROGRAM. You may get a message that The export file is not empty! Do you want to add new data to the existing data? Click Yes to append, or No to delete existing data before adding any new data or Cancel to abort this export. If you will be sending multiple companies files at one time, click No to delete existing data when creating the first export file, then click Yes to append on all additional companies to be sent in this batch. When you are done processing payrolls and wish to send this file simply open your EFTPS software and use it to "retrieve" the file you created in CCS Payroll. Use this same EFTPS software to send the file. If you do not have the free EFTPS software, call the EFTPS Customer Service at 800.555.4477 or 800.945.8400 or visit EFTPS online at http://www.eftps.gov
|
|
|