|
|
|
|
The COMPANY Form The COMPANY Form allows you to add new Companies or edit existing Companies. Companies cannot be deleted: the Delete mode is disabled when the COMPANY Form is active. Adding a new COMPANY is one of the first things you will need to do when setting up a CCS Accounting Program. Note: A Sample COMPANY (The XYZ COMPANY -- #99) was included for you during the installation of your new CCS Program (assuming you performed a typical setup). The XYZ COMPANY can be very useful in getting to know your way around. Before defining a new COMPANY, you may want to take a look at COMPANY# 99. To experiment with COMPANY 99, simply enter 99 in the COMPANY# field of the Welcome screen or click on "The XYZ COMPANY" under the program group of your start menu. Don't be afraid to experiment using the XYZ COMPANY. You can see how things work or don't work without affecting any real data. The Company Form is accessed in one of two ways:
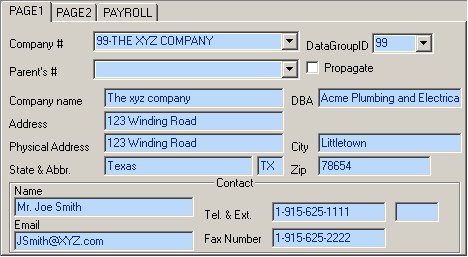
As shown above, the user is viewing the first page of the COMPANY Record for The XYZ COMPANY. Note: You can add or edit any COMPANY regardless of the currently active COMPANY. The COMPANY Form consist of three tabbed pages that contain predefined Controls. Note: All predefined controls can be configured to meet your specific "Business Rules". See Validation Methods for more information on customizing controls. See Importing Data for information on importing initial data. See The Mouse verses the Enter/Tab Keys for information on moving through a form. COMPANY Maintenance: To Add a new COMPANY: 1. Go to the Welcome Screen. 2. Click ADD on the SIDE TOOLBAR
or 3. Complete the COMPANY Form as described below. After the last entry is completed, the COMPANY will be saved automatically.
To Edit an existing COMPANY: 1. Go to the Welcome Screen. 2. Click EDIT on the SIDE TOOLBAR. 3. Enter the COMPANY# you wish to edit in the COMPANY # Column. Press ENTER. If the COMPANY exists it will be displayed in the COMPANY Form. (To search alphabetically by name, see Alpha Search.) Additionally, you can use the RECORD buttons to locate a particular COMPANY. 4. Complete any changes as described below. Tabbing past the last entry control, moving records or clicking ADD or OK on one of the TOOLBARS will save your changes. See Edit Modes for more information on the Edit modes used by most CCS Forms.
The Controls of the COMPANY Form: Note: The values shown below in square brackets represent the default range applicable to each control; however, these ranges can be configured to allow or restrict additional values. See Validation Methods for more information. The COMPANY NUMBER is a two-character alphanumeric value that is used to uniquely identify each COMPANY. CCS Accounting Supports up to 1236 companies (00-ZZ) per data source; however, it is recommended that Company 99 not be used since it is predefined for sample purposes as the The XYZ COMPANY. Company ZZ has special functionality and is reserved for Payroll Service Bureaus. (See Setting Up a Service Bureau for details.) Note: Numbers are used for speed; you may open any existing COMPANY simply by selecting the Company's COMPANY DOCUMENT via the File|Open Command. NOTE: Company #'s are not case sensitive: lower-case entries will be converted to upper case. The PARENT COMPANY is used to associate this COMPANY with a PARENT COMPANY. If a number is entered here, this COMPANY will become a child of the PARENT COMPANY. The PARENT COMPANY must be defined prior to any children. There is no limit to the nesting of Companies. Therefore, a Parent COMPANY may be a Child of another. The data of a Parent COMPANY is updated by changes in a child COMPANY. Note: The CCS Training Program ignores this field. Propagate[Checked or Unchecked] If you have more than one company set up in CCS Payroll, this checkbox allows you to designate one of them as the Template company (master company). You then have the option of making changes to this company and having those changes reflected in every new company that you create. See the Table Form for details. This also allows you to setup Codes, Printing Criteria's & Print Batches in the Template company and once they are setup, they will be automatically imported into any new company that you create after that time. DBA on Check[Checked or Unchecked] Click this check box if you would like the DBA printed on the check face and stubs in lieu of the Company Name. The DATA GROUP ID is used to associate a particular COMPANY to a particular datasource. It defaults to "AUTO" when you add a new company, which is normally the desired setting. When you save the Company with the "AUTO" setting, the program will create a separate datasource for that company. All of the data for this new company will be in a file named "CCSDATA" + the Company Number + ".mdb". Using Company 75 as an example, leaving this control set to "AUTO" would cause a file named "CCSDATA75.MDB" to be created in the \Program Files\CCSWin\ODBC folder (if you accepted the default file locations during installation). The Data Group ID would be changed to "75". (See Data Sources and ODBC Data Sources for additional information.) NOTE: The above logic applies only to the Microsoft Access driver, which is installed by default by CCS Payroll. If you are using MS-SQL, Oracle, etc., the "AUTO" logic is not applicable. NOTE: If you change a Data Group ID for a given company, you must exit completely out of CCS Accounting and restart the program for the change to take effect. Enter the COMPANY NAME. This NAME will appear on the TITLE bar of the main window and on reports such as invoices etc.. EX: Acme Plumbing and Supply Inc. Enter the Company DBA Name. If the DBA Name is inserted here, this will override the Company name on all reports. If it is left blank, only the Company Name will appear. Enter the Company's mailing address in the two address controls. Use the second only if the first is not sufficient. The CITY should be the full CITY name where the COMPANY will receive mail. The STATE can be an abbreviation or the full state name where the COMPANY will receive mail. The state abbreviation will be filled in for you, some reports require the 2 digit abbreviation. This field is also used by the CCS Payroll as the Companies resident state. By default, this state will be used for Suta reporting. If you are using the CCS Payroll Professional version, you may change the Suta state on an employee by employee basis. This is the person that should be contacted on behalf of this company. This is the e-mail of the contact person for this company. The full telephone number of the COMPANY, entered in the format 1-###-###-####. The full facsimile number to be used for the COMPANY, entered in the format 1-###-###-####. PAGE 2 CONTROLS:
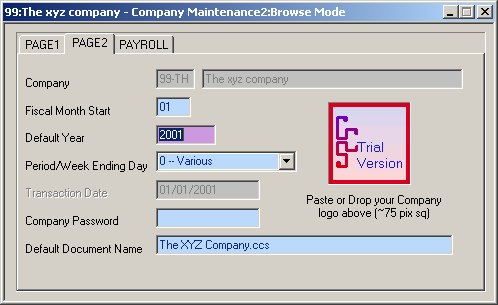
The FISCAL START is used by the A/R, A/P, and G/L modules to compute various date-sensitive items. An entry here of '01' states your Company's fiscal years starts in January. The entry '05' states that the Company's fiscal year starts in May. This field is used for the CCS G/L only. The DEFAULT YEAR is a four-character value between 1940 and 2029 used to help validate date type entries. This entry is used by the PAYROLL, A/R, A/P, and G/L modules to compute various date-sensitive items and to prevent inadvertent entry of bogus dates in various forms. Note: If you create a paycheck using a paycheck date that does not agree with the date you enter here, you may receive a message similar to: The check date you have entered is outside of the default year for this company. Please correct your checkdate or modify the DEFAULT YEAR field in the company form. You may disable this DEFAULT YEAR validation by changing the value (from YES to No) of the preference "Validate paycheck date with Default Year". See Other Preferences below:
From the combo box, select the day of the week that your payroll week ends on. Select 0-Various if the day can vary. If, for example, you pay twice a month, then there is no set Week Ending Date, so you would select 0. If you pay weekly or biweekly, select the day of the week that ends a payroll period. NOTE: The WEEK ENDING DAY is used by the A/R, A/P, G/L, and PAYROLL modules to compute certain date-sensitive items. This value is ignored in all other modules. The TRANSACTION DATE is used by the A/R, A/P, and G/L modules to compute certain date-sensitive items. This value is ignored in all other modules. This password is compared with the PASSWORD entered by the user when they log into a CCS program. The Welcome Screen is used to determine who has rights to view or manipulate a particular Company's data. Note: The trial version of the program does not incorporate COMPANY password protection. Please leave this field blank. The DEFAULT DOCUMENT is used when you enter a CCS program and enter a COMPANY number other than the one shown in the COMPANY# column of the Welcome Screen. When you switch Companies, the COMPANY RECORD for the new COMPANY is located and the DEFAULT DOCUMENT for that COMPANY is loaded. (Documents are the .CCS files). This value will normally default to the "COMPANY NAME" + ".CCS", but can be changed to any name you choose. The extension of .CCS should always be used. This area can be used to save a copy of the company's logo in the CCS Database for later use in most predefined reports as well as some screens. To save your logo here, first read the logo into an image editor of your choice (for instance, MS-Paint which is normally under your programs/accessories folder on your start button.). Then either copy the image (edit/select/copy) via the image editor and paste it in the CCS Program (right click in the logo area and then left click on paste), or click and drag the image from the editor program to the CCS Program. (To click and drag from one program to another, hold down the left mouse button, then "drag" the image to the programs icon down on the system tray and wait until the program responds by restoring itself, then continue to drag the image to the logo area and release the mouse button.)
If this company is an agent for another company, then select one of the following:
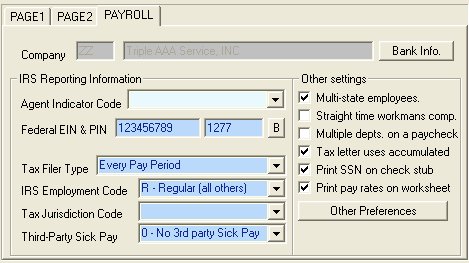
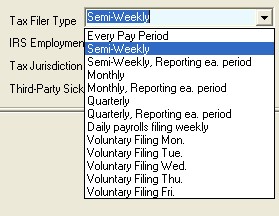
If the company is not an agent, leave this field blank. Enter the Federal EIN for this Company. If you are a Service Bureau setting up Company ZZ, put the submitter EIN for all IRS payroll activity that you carry out on behalf of your clients. This information (Your Service Bureau EIN and Pin) are printed on various forms including the 941 in the "Preparer" Area. You can elect to turn off this reporting functionality via Other Preferences. PIN:[4 digits] Enter the PIN that you obtained from the IRS via the applicable application process. Please note the the "B" button on the right on the Pin. If you will be using Batch filer (Pro. Version Only.) Please click this button and put your Batch Filer ID and PIN assigned to you by the IRS in the dialog that is presented. For more information on EFTPS Batch filer and PC Filer (EFTPS PC-Software), please see the document EFTPS. and also the Disbursements Dialog. Select the proper option from the drop-down box that best reflects how often you report and pay your payroll taxes. This is a required field. These options control how some of the IRS tax forms are calculated (the 941 for instance) as well as other client type tax reports such as the Tax Deposit Slip Sheet. This option also becomes the default deposit schedule for each state; however, this default can be overridden during the printing of each state level form. The options are as follows:
Looking at the choices above, you will notice that some options include the text "Reporting ea. period". This indicates that client type reports (for instance the Tax Deposit Slip Sheet), should use the taxes in the current payroll period only for calculation of the liabilities due and paid; however, the IRS tax forms (the 941 for instance), should still use the primary deposit schedule you have selected here. This is further explained below.
Please see Report Parameters: (RP types) below on how to override this default for your state withholding forms.
Select the proper code from the drop-down box: A = Agriculture, H = Household, M = Military, Q = Medicare Qualified Government Employer, X = Railroad, R = Regular (all others). If your company is under the jurisdiction of a U.S. Territory, select the proper code from the drop-down box: V = Virgin Islands, G = Guam, S = American Samoa, N = Northern Mariana, P = Puerto Rico. Otherwise, leave this control blank. If this company uses an IRS 3rd Party Sick Pay, select "1" from the drop-down box. Otherwise select "0". Multi-State Employees:[Checked or Unchecked] If you as an employer will pay taxes (either withheld from employees or employer taxes) to more than one state, then click this option. See Multi-State Employees for details. (Pro. Version only) Straight time workers' Comp:[Checked or Unchecked] If workers' compensation should be calculated on the regular rate of pay even for overtime pay, then click this option. For example, if you pay worker's compensation at a rate of 2.00 % of an employee's gross wages, regardless of whether they worked regular or overtime, then do not click this check box. However, if the wages an employee earned while working overtime, are to be assessed as if they were earning regular wages, then click this check box. See (W/Comp. Setting Up) Multiple Departments on a Paycheck:[Checked or Unchecked] If you have employees who work in multiple departments during a single payroll period, then click this option. This changes how the paycheck entry screen is laid out, and allows the entry of both a different department and a different rate for each earning line item within a single paycheck There is no limit to the number of departments used on a single paycheck. When this mode is selected, certain reports (The Payroll Recap Report for instance), fractionalize the deductions into each applicable department, based total earnings in a department verses the total earnings on the paycheck. For instance, if an employee is coded as earning $100.00 in department 001, and $200.00 in department 002, and has $30.00 in federal withholding, then the Payroll Recap will report the employees wages in two departments. In department 001, the report will show $100.00 in wages and $10.00 in fed. withholding, while department 002 has $200.00 in wages, and $20.00 in fed. withholding. Professional Version only. Can be purchased separately for the CCS Express version. Tax Letter Uses Accumulated:[Checked or Unchecked] When the Tax Deposit Slip Sheet is printed, it can be forced to recalculate the liabilities that are owed based on the taxable wages in the reporting period times the applicable tax rates. When the recalculate mode is used, the amount of taxes shown on this report, may differ as compared to the sum of the values for the individual paychecks due to rounding or entry errors on the paycheck. Generally, you will want to CLICK this check box, to disable the recalculation and simply show the exact amount of taxes as previously calculated during paycheck generation. This will insure this report matches the other tax reports that are based on values calculated during paycheck generation. When this option is checked, the Tax Deposit Slip Sheet prints a second page of all liabilities due, paid and unpaid. Note: The Tax Deposit Slip Sheet along with many other reports can be further configured via Other Preferences. Payroll Service Bureaus should always click this option.
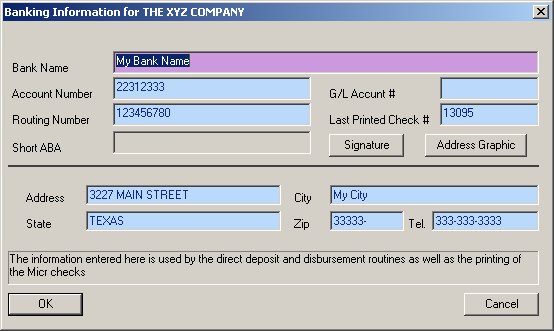
Bank Info Button: Clicking on this button opens up a window that allows you to input information required for Direct Deposit, electronic funds transfers and MICR check printing:
Enter the name of the bank that will appear on paychecks for this Company. Enter the bank account number for this company. Use only numbers, spaces and dashes. Enter the bank routing number for this company. The bank routing number is always a 9 digit number. If you are using the CCS General Ledger module, or exporting to a 3rd party G/L, enter the G/L Account # for this bank account. This number represents the last printed check on this bank account. You can modify this value if you choose, which will cause a change in the next printed check. Clicking on this button brings up the following dialog:
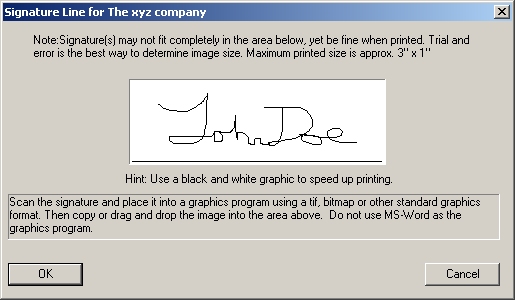
If you want a signature printed on paychecks, scan in an image of the signature into any graphics program (Paint which comes with Windows works well) and create a graphics image file. (Do not use MS-Word, it is not a graphics program.) Then either paste in or drag and drop in the signature image in the space provided on the form. The graphic should have a resolution of no less than 72 dpi and no more than 600 dpi. 200-300 dpi is the recommended resolution. Very large resolutions can cause the program to appear as though it is locked up, as it attempts to reformat the image. If you accidentally paste a very large resolution graphic into this area, then expect to wait several minutes for the screen to refresh, or change from one company to the company with the large graphic. To remove such an image, right click and choose Cut then click OK on the bottom of the dialog. Note: If you require two signatures on a check, create an image of one signature on top of the other, with a line separating them. The check printing routine will adjust itself accordingly. Hint: To achieve a good scan of the signature at the proper size, please use a bright white sheet of paper with one or more signature lines drawn on the paper. Use a black ball-point pen or black fine tip felt marker. The signature line should be of the same size as you would expect it to appear on the printed check. Scan the image into your graphics program using no more than 600dpi. (200-300 is plenty). When you copy the image, select enough white space (canvas area) around the signature (in your graphics program) to prevent the signature from being "Expanded" when it is printed. For instance, if you copy (from your graphics program) and paste (into the CCS Program) a very small portion of white space around the signature, the program will be forced to increase the size of the signature to fill the signature area on the printed check; conversely, selecting a very large amount of white space around the signature graphic will cause the signature to be reduced in size when printed. Note: You must use the right mouse button to copy, cut or paste within the logo and signature areas. Using CTRL-C for instance will not work in this case.
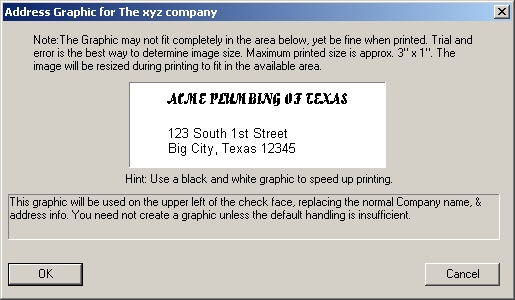
Clicking on this button brings up the following dialog:
If you place a graphic in the box provided (in the same manner as described for the signature graphic), this graphic will be used in lieu of the standard text lines on the upper left corner of all paychecks for this Company.
Enter the company bank address . Enter the company bank city. Enter the company bank state. Enter the company bank zip code. Enter this company's bank telephone number.
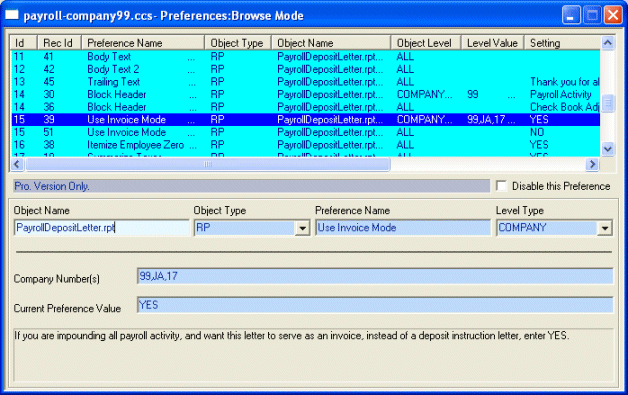
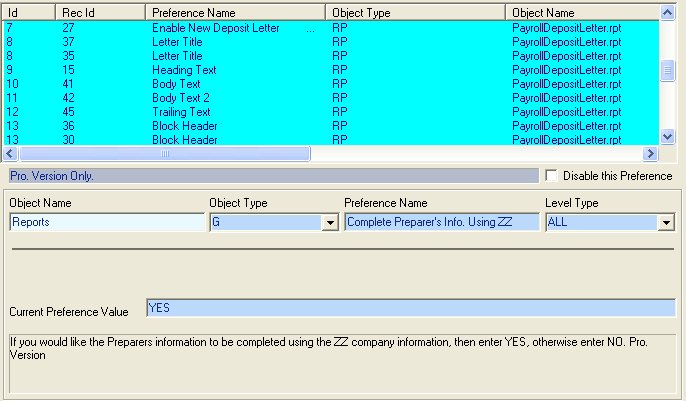
Other Preferences allow you to further tailor the CCS Accounting Programs to fit your requirements. Many Reports and functions within the CCS Accounting Series can modified to various degrees via preferences. The image above highlights the "Use Invoice Mode" for the "Payroll Deposit Letter". This option has been set to "YES" for Companies 99, JA and 17 only. For all other Companies, this preference is set to the default of NO. This is further explained below.
This is the Object (process or item within the program) name that the preferences is applicable to. Generally when setting preferences, you will simply select one of the defined preferences (by clicking on a line item within the upper listbox), and then changing the values within the preference. You will only change the object name if you are defining (adding) a new preference for a report that does not have preference defined. This is discussed below: Currently there are two different preference types used by the CCS Accounting Series. These are General preferences and Report Parameters. General preferences are used throughout the CCS Accounting Series to alter the behavior of the program. Those items within the CCS Programs which are affected by Preferences, monitor the applicable Preference settings during or prior to their processing and react accordingly based on the preference settings. For instance. The preference "Propagate new batches" changes how batch "Batch Reporting" reacts. When the program is started, it looks to see if there are any new "Batches" defined in the template company. If found, the program checks this setting. It then reacts in one of two ways. If the current company already has one or more batches defined and the "Propagate new batches" is set to YES, then the new batches are added to the Companies current batches. If this option is set to NO then, new batches are not added unless the current company does not have any existing batches. RP types are discussed in detail below: This is the Name assigned to this preference. Generally when setting preferences, you will simply select one of the defined preferences (by clicking on the upper listbox), and then change the values within the preference. You will only change the preference name when you are defining (adding) a new preference for a report that does not have preference defined. This is discussed below: Level Type:[ALL, COMPANY, USER, WORKSTATION] There are four different levels at which a preference is applied, they are "All", "Company", "User", "Workstation". Changing the Level, changes the layout of the preference dialog. For the image above, the level "Company" has been selected. This caused the program to display an entry line for you to enter a list of Companies (separated by commas) in the Company Number(s) area. Had the level "User" been selected, the program would have presented an entry line for you to enter a list of users (Windows login names), that this preference is applicable to. When the Level "All" is selected, this entry area is not visible, as the preference applies to all Companies, all users, and all Workstations. You can have multiple preferences of the same object and preference name. Referring back to the image above, The preference "Use Invoice Mode", which applies to the "PayrollDepositLetter.rpt", has been set to "YES" for Companies 99, JA and 17 only. If you notice below that line, there is another preference having the same preference name and same object name; however, the level for that preference is set to "ALL". This causes the program to use the "Invoice Mode" for companies 99, JA and 17, while using the deduction mode for all other Companies. You can define as many preferences as required to fully describe your requirements, including having multiple preferences at the same level for a particular preference name/object. Preferences have the following Level Precedence, from highest to lowest. "Workstation", "User", "Company", "All". For example if a particular preference has been given a level of "Workstation", then the "Workstation" preference will superseded the same preferences defined for the "Company". (The workstation name is the name given to the computer by Windows). When you change an existing preference from "All" to any other level (Company for instance), the program will create a new "All" preference when you exit the dialog. This is because an "All" preference must always exist, so that the program knows how to react for all processes that use preferences, which are not otherwise specifically defined. For example, the first time you enter the "Other Preferences" area, a list of preferences will be displayed, all of them will be set to the "All" level. This of course means that each of these preferences are applicable to all companies, all users, and all workstations. If you want to change the setting for a preference, but only want it to apply to Company 10, simply change the level to "Company", and enter 10 in the "Company Number(s) entry area. Then click Save. At this point, when you exit the dialog you will have two preferences of the same name, but at two different levels. One at the Company Level and another at the "All" level. If you need multiple preferences of the same name/object at the same level, then click add and enter a new preference using the exact preference and object names. Hint: tabbing through an existing preference, then clicking ADD, and then pressing the F3 key will duplicate the entries for you automatically.
Company Numbers(s):[] or Workstations:[] or Users:[] This area is where you enter a list of Companies, Workstations or Users separated by commas, for which this preference is to be applied. The name of this entry area changes as applicable to the Level you have selected. If the "All" level is selected, this entry area is not available.
This is where the setting for this preference is entered. For "YES/NO" types, simply type in a YES or NO (case insensitive -- Yes, YES and yes are all valid). For text or number types, simply type in the values that should be used exactly as they should appear on the report or be used in the process. For instance if the preference is defining the title of a report, enter your title exactly as you wish it to appear. On the bottom of the preference dialog is a text area that describes where and when a particular preference is used (for CCS defined preferences), and often the valid entry choices that are available. This area is the "Help" topic for the particular preference. Please read this help text, when changing or setting up preferences.
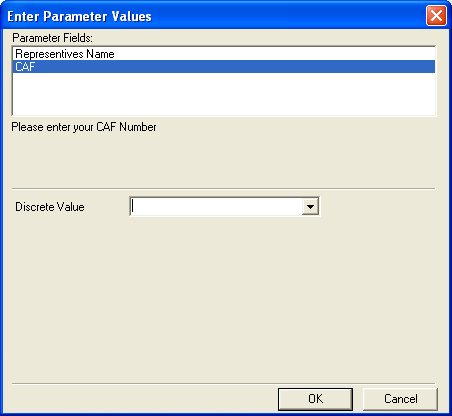
Most all reports generated by CCS are via the Crystal Reports reporting engine. Some of these reports present a parameter dialog, just prior to the report being printed. This dialog allows you to further define the characteristics of the report being printed. See Below:
The Parameter Values dialog as displayed for the PowerOfAttorney2848.rpt (Power of Attorney Report). Hint: You can determine the exact name of a report by previewing a report and looking at the title bar on the top of the report. Note: The default value for CAF is blank. This allows you to enter your CAF to be printed on the report. Since the your CAF should most likely be set to the same value, anytime you print power of attorney letter, you could create a preference to fill in this value for you. To define this preference. Click "ADD" on the far right hand tool bar (while located in the Preferences Dialog of course). Then enter the following:
Object Name: PowerOfAttorney2848.rpt Object Type: RP Preference Name: CAF Level Type: ALL Current Preference Value: Your CAF number. Click Save on the far right hand toolbar. Now when you print the Power of Attorney letter, this value will not be requested from you and will always be set to what ever value you entered in the preference. Note: If you create a preference for the "Representatives Name" as well, then the parameter box will not be displayed prior to printing, as all values will be known by the program at print time.
You can define a RP preference for any report that displays the Parameter dialog prior to printing; keep in mind however, that doing so causes the defined parameters to no longer be requested from the the user prior to printing the report. The value is always obtained from the preference if a preference exists. For instance, if you create a preference to set the "Period" to "YTD" for the "Period Totals" report, then the Period Totals report will no longer stop an ask for the "Period" you want to report on (for the rightmost column of this report.) The YTD mode will always be used. This is a very acceptable use for a preference if you will always (or almost always) want this report printed in this mode. For those times you want the reporting engine to ask you for the mode, you can disable the preference temporarily by clicking the "Disable this Preference" in upper right hand area of the Preferences dialog.
You can also complete Reporting parameters via the Parameter tab of the CCS Reports Criteria Dialog.
CCS Software can often add custom general preferences for you, that can alter the processing within a specific area of the program.. Please call or e-mail us for a price quote on a preference you would like added.
Note: If you used the Add mode and not the Define mode to create a COMPANY you will need to click CANCEL or press ESC when you are done adding COMPANIES. This is necessary because, once you start the ADD mode anywhere in the CCS Training Program, a new, blank form is automatically created for you after each save until you cancel the Add mode or close the Form. Note: In any CCS Form it is not necessary to click the EDIT to start the Edit mode. Simply typing new data in a control will initiate the Edit mode. Note: If this is a new COMPANY, then CCS Accounting will display the "Save As" dialog the first time you open the COMPANY (in the Welcome screen). Simply click SAVE, and a Default Document will be created using the value you specified above in the DEFAULT DOCUMENT NAME column.
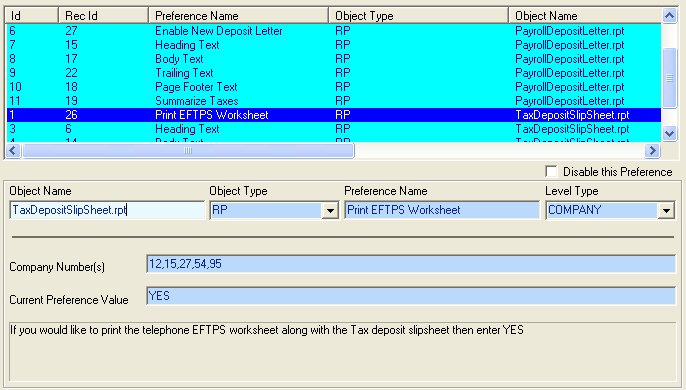
Preferences Continued -- How do I get my Service Bureau name to print as the Preparer on the tax returns. Please open the Company
Form and locate the "Complete Preparer's Info. Using ZZ".
If you wish to set
this option to NO, then simply change the current value to "NO"
In the case of this preference, this setting determines whether or not the information in Company ZZ is used on many of the federal and state forms as the "Preparer" or "Submitter"
 You can configure preferences on a Company
by Company basis. by changing the level type to COMPANY then,
entering any companies separated by commas in the company line.
 Feel free to browse the list of preferences,
each one is explained by a set of comments on the bottom of the dialog.
|
|
|