|
|
|
|
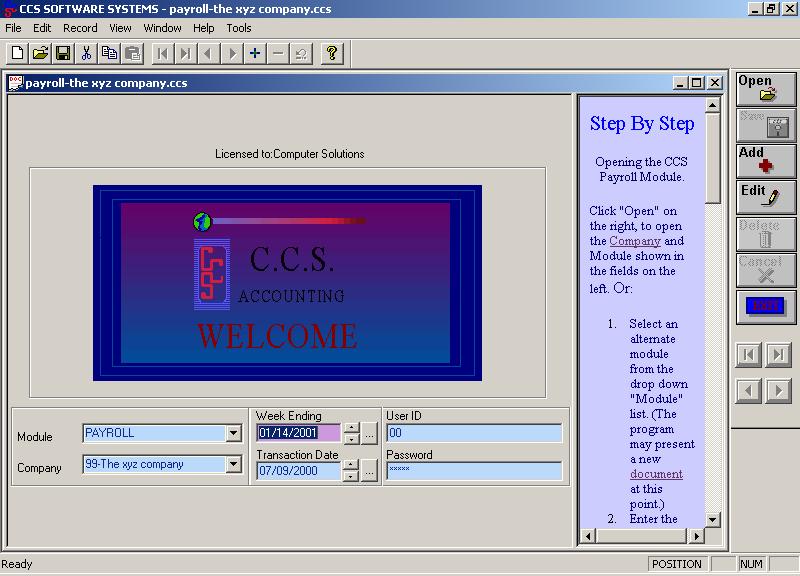
The CCS Accounting Welcome Screen
When you run the CCS Accounting program, the Welcome Screen is the first screen you will see. The Step By Step window is available as a guide to first-time users. This window can be sized in the normal Windows interface manner by 'grabbing' the left edge of the window and dragging it to the left or to the right. As shown above, the operator is prepared to open up the PAYROLL module for COMPANY #99. Once the COMPANY is opened, the TITLE bar will display the COMPANY number (99 in this case) along with the COMPANY's name. By clicking the OPEN button on the SIDE TOOLBAR, COMPANY 99's data files will be opened and the HOME MENU will be displayed.
Controls of the Welcome Screen: Getting Started: The Module Combo Box allows you to select which CCS Module (program) you wish to use. NOTE: You can only open those modules that have been installed on your computer (or network path). Each module must be purchased separately. The COMPANY NUMBER is a two character alpha-numeric value that is used to uniquely identify each COMPANY. CCS Accounting supports up to 1236 companies (00-ZZ) per data source. However, it is recommended that Company 99 not be used since it is predefined for sample purposes as the XYZ COMPANY (99). Company ZZ has special functionality and is reserved for PayrollService Bureaus. New Companies: Creating New COMPANIES is very easy: 1. Enter a new COMPANY# in the COMPANY# column of the Welcome Screen. 2. Since the CCS Accounting program will be unable to locate the COMPANY you have entered, the message "COMPANY xx was not found -- Do you want to Define it?" will be displayed. 3. Click on "YES". The COMPANY DEFINE mode will be started, allowing you to enter the information needed to create the new COMPANY. (See The COMPANY Form for more information on Adding and Editing Companies.) Once the COMPANY record is created, you will be returned to the WELCOME screen to complete the remaining controls (Week Ending, Transaction Date, ID, and Password). Upon completion of these controls, the new COMPANY will be Opened. (All needed data tables for the new COMPANY will automatically be created and initialized.) As the CCS Accounting Program Opens the new COMPANY, it will notice that a COMPANY DOCUMENT also needs to be created for the new COMPANY. The program will display the SAVE AS dialog with a File name set to the value you entered in the DEFAULT DOCUMENT NAME, and the current USER DIRECTORY. At this point all you have to do is click the SAVE button, and a New COMPANY DOCUMENT will be created and saved. Existing Companies: When you first start any CCS Accounting program, the Welcome screen is displayed, and all of the controls will be filled with the values you last entered during the previous startup. The cursor will be located in the Week Ending control. If all of the values are correct, simply click OPEN on the SIDE TOOLBAR All tables associated with the COMPANY will be checked to see if they exist and if they are current. (If they do not exist, they will be created and initialized). If you need to change some or all of the values in the WELCOME screen, simply move to the desired control(s) and enter the correct value(s). Note: Tabbing (or pressing ENTER) while located in the PASSWORD control will also OPEN the COMPANY. Switching Companies: While in the COMPANY# control of the Welcome screen, you may enter any COMPANY Number between 00 and ZZ (whether or not it exists). The CCS Accounting program will first attempt to open the COMPANY record in the COMPANY Table. (If the COMPANY does not exist, the Define Mode prompt will be presented as described above in New Companies.) If the COMPANY exists and the Company's default DOCUMENT can be located, it will be loaded and become the new WELCOME screen. Clicking OPEN at this point will open the newly selected COMPANY. Note: When you switch COMPANIES in this manner, both the newly opened COMPANY and the original COMPANY are loaded and available until one of them is closed. There is no limit to the number of Companies you can open simultaneously. Switching Active Companies:When you have multiple Companies open, there are two ways to switch between them: 1. Via the WINDOW menu (at the top of the screen). 2. By clicking the EXIT button on the HOME MENU to redisplay the WELCOME screen and changing the COMPANY#. Some of the CCS Accounting modules rely on a Week Ending Date to determine which period is active and which day and date is to be considered the last day of the period. Some Companies may choose to have a period end on Saturday, while others might prefer Sunday (or any other day for that matter). By entering a date representing the last day in your accounting period (or payroll period) the program will be able to determine which period you plan to work with and how to calculate certain date sensitive formulas. Enter a date in the MM/DD/YYYY format that will represent the desired Week Ending Date. The spinner to the right of the date cycles you through period ending dates: clicking on the up arrow advances you to the next period ending date while clicking on the down arrow moves you to the previous one. The button with the three dots pops up a calendar for your convenience. NOTE: If you are going into Company 99, the sample company, and want to see sample payroll data, use one of the following dates: 1/4/04, 1/11/04, 1/18/04, 1/25/04 or 2/1/04. More About Date Ranges: CCS Accounting does not HARD WIRE date ranges (or any other range for that matter) within the program code. Valid ranges and acceptable values are defined by the VALIDATION METHODS. Since Validation Methods are user changeable, you may set any date range to a value that best suits your needs. The Transaction date represents the current date. This is used in lieu of the system date by many modules within the CCS Accounting Series. Enter a date in the MM/DD/YYYY format that will represent the default current date. The spinner to the right of the date cycles you through period ending dates: clicking on the up arrow advances you to the next period ending date while clicking on the down arrow moves you to the previous one. The button with the three dots pops up a calendar for your convenience. Note: The CCS Training Program presently ignores this column. The User ID is used in conjunction with the password to perform security checks and to implement system and form level access. Enter any 2 character (alphanumeric) values. This is a required field. Note: The CCS Training Program presently ignores this column. The Password is a 10 character case sensitive alphanumeric control used to implement system and form level access. Enter the Password assigned to you by the system administrator to Open the COMPANY. Each Password is matched against a Password table and given a rating between 0 and 25. This level is then used in various areas of the CCS Accounting series to determine who can access data managed by the program and to what extent that user can manipulate the data. Note: The trial version does not implement password protection; the field is, for the most part, ignored. There is, however, one exception: In order to change the values of any Validation Method, a user must have a Level greater than or equal to the value set in the PASSWORD LEVEL of a particular Validation Method. As shipped, the PASSWORD LEVEL in each Validation Method is set to either 10 or 25, depending on its role within the program. If you enter the PASSWORD RISKY (in all caps) in the PASSWORD control of the Welcome screen, you will receive a LEVEL of 10. This level will allow you edit Validation Methods with levels of 10 or less. Password protection is essentially non-existent in the trial version. Registered versions of the program will support full password protection. Clicking Tab or pressing ENTER while in the PASSWORD control will cause the data to be validated. If the validation is successful, the COMPANY and its associated tables to be opened and you will be taken to the HOME MENU.
|
|
|