|
|
|
|
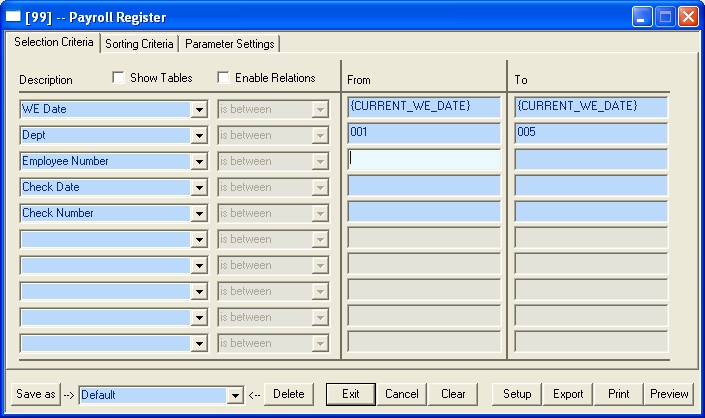
Reports Criteria Entry/Edit The Reports Selection Criteria Entry/Edit Form provides a very powerful and flexible means of determining what records will be printed for a selected report. This dialog is presented when you click the Criteria button on the Reports Dialog. Click on an area and press F1 to select help for that topic. If you enabled the check box at the bottom of the Reports menu that sets "Current Payroll period Only" as the default (if applicable), be aware that using criteria ignores that setting. When you first bring up the criteria box it will (if applicable) fill in the first five Descriptions with the 5 most useful sort criterion for this report. After you have used criteria for a particular report, your selected criteria will show up on the top of the list. These can be changed by clicking any of the drop down boxes under the description column, or you can simply start defining the criteria you desire on the sixth line. If you don't fill in any values for a line of criteria, the entire line will be ignored. For example: If you filled in the From & To for WE Date (weekending date), then jumped down a couple of lines and defined a Check Number range, (skipping over employee number perhaps) only the week ending date & the Check Number would be taken into consideration when selecting the records to print on this report. If the default criterion shown on the screen aren't what you are looking for, simply click the Clear button and you can start with a completely blank screen. If you need more advanced capability yet, see Show Tables below. NOTE: To Print or Reprint a check you must enter the program using the WE Date (The Week ending date entered at the Welcome screen), that the Check was created in. Note: The terms WE Date, Weekending, Payperiod and Payroll Period are synonymous, and always refer to the work period irregardless of it's duration (Weekly, Monthly etc.)
The example is showing the Criteria to print the Payroll Register for the current Payperiod only, and additionally to print only those employees in departments 001-005. The definition of two selection filters have been created. In CCS, each filter is "anded" to the other filters. In other words, the data for a specific record will appear on the report if and only if it passes through every filter that you create. The first filter states that only those records for the current Payperiod (this is defined by the week ending date you entered at the Welcome Screen) should be printed. The second filter states that only employees having Paychecks in DEPARTMENTS 001 through 005 will be printed. NOTE: Some reports have the WE Date (weekending date) preset, if this is the case you will not be allowed to change the WE Date, the Relations field will be grayed out and say "is preset". NOTE: If the report you wish to print allows setting of the weekending date, and you wish to see the report for the current Payperiod only, just type a "C" in the FROM and the TO fields, the value {CURRENT_WE Date} will be filled in for you.
Show Tables (Advanced Feature) Skip down to Description if you do not wish to use this feature. If you are unable to select the report you desire with the fields and choices available you may click the SHOW TABLES checkbox and additional choices will be available to you. These choices will be associated with a particular table/module (see prefix table below). If you don't need this advanced feature at this time, please leave it unchecked, this will make defining criteria much easier. Tables that are specific to one module are preceded by initials denoting the module. Tables that are used by multiple modules have no such prefix. For example, the EMPLOYEE table is used by the Training, Payroll, and TimeKeeper. So it has no identifying prefix. CRAFT, however, is used only by the Payroll module, so the Craft table is named PAY_CRAFT.
If you have selected the Show Tables mode, then complete table names will be displayed. Some of these table names utilize prefixes that indicate the modules. The following is a table of these prefixes.
Note: You may notice that some columns seem to appear in more than one table. In most circumstances, it makes no difference which table you select when you encounter this situation: the tables are linked in such a manner that the data in each of the like columns will be identical. For example, the Training Requirements report contains five tables. Three of these tables contain the EMPLOYEE_NO column. The selection results will be identical regardless of whether you choose the EMPLOYEE_NO column from the EMPLOYEES, TR_EMPLOYEES_TAGS, or TR_STATUS table. There are, however, some rare instances where the table you choose will affect the end result. This occurs when the report contains sub reports. One column may be used by the main report, while a second column is used by an internal sub report. If you encounter a case where the selection criteria you have defined are not being applied as you expected, see if the column exists in one of the other tables used by the report and use it instead in your selection filter.
The Description drop down boxes contain only the fields that are available to use in selection criteria for a particular report. Pick one of the choices from the list and press <Enter> or <Tab> or use the mouse to move on to the next cell. Important: A Report does not have to print the data from a particular field (Description) in order for you to use it in the sorting or selection criteria. For example, the Paycheck Register report does not print the EMPLOYEE'S union number; however, you can still use the union number as a filtering field.
The Enable Relations checkbox allows you to select the relational operator that will be used by the selection logic. Many times the default "is between" will be sufficient for your needs. If you need additional choices, click on the Enable Relations checkbox and the following choices will be available: is less than is less than or equal to is greater than is greater than or equal to is equal to is between is like is not like is null is not null This operator is combined with the table, column, and range columns to form the expression that is sent to the ODBC driver. As an example, when you select "is greater than", the value of the column in the datasource must be greater than the value you enter in the FROM or it will be excluded from the selection. Between(Enable Relations) When you select between the value in the selected column in the datasource must be between the From and the To(inclusively) or it will be excluded from the selection. Null, Not Null(Enable Relations) Some columns in the data source may not contain any data whatsoever. For instance an EMPLOYEE'S termination date may be empty. This is not the same as set to zero: it means nothing, blank, or in ODBC terms NULL. To select records for columns that are empty, use the Null operator. To select records for columns that are not empty, use NOT NULL. Note: Character fields may be blank but not NULL. For instance the second address line in an EMPLOYEE record may be displayed as empty, but be stored as a series of spaces and, therefore, not considered NULL by the driver. Use >= 0 (greater than or equal to the digit zero) to weed out space-filled columns. Like Use the Like operator to find values in a column that match the pattern you specify. For pattern, specify the complete value (for example, Smith), or use wildcard characters such as "*" or "?" to find a range of values. Here are some examples, assuming you use the Like relationship on the EMPLOYEE Name column: Jo* will match all EMPLOYEES with the name Jones, Johnson, Joiner etc. but not Jackson. ?ean will match EMPLOYEES with the name Dean or Bean but not Deen. Entering * alone will select all EMPLOYEES in the database. Note: The available wild cards are defined by each ODBC driver. You many wish to consult the driver manager help for more information on the Like operator. Most ODBC datasources support the * and ? wildcards. (CCS translates these two wild cards for you if the current driver supports them but incorporates a different syntax.) The following is an excerpt from the Microsoft Jet (Access) ODBC driver online Help.
Used with all operators except for Null and Not Null. This value is the value the data from the data source is compared against. If, for example, you specify the description Hire Date, a relation of "is greater than", and a From 1/10/1999, then only EMPLOYEES who where hired after Jan. 10th 1999 will be included in the report. Payroll Week Ending Date: There is a special feature associated with this field (Payroll Module only): If you select the WE Date field and you enter the letter "C" the program will automatically fill in {CURRENT-WE-DATE}. NOTE: When you use the same date for a FROM as you used for the Week Ending date in the Welcome Screen, this combination triggers the program to ask you whether you want to always use the current Week Ending date as a parameter instead of the actual date that you typed in. Answering Yes causes the program to substitute the current Week Ending date whenever this Criteria set is selected. Used only with the Between operator. Ending Range specifies the THROUGH side of a FROM-THROUGH range required by Between. For example, if you specify the Description Hire Date, a relation of Between, a FROM of 1/10/1999 and an Ending Range of 1/25/1999, then only EMPLOYEES who where hired on or after Jan. 10th, 1999 and on or before Jan. 25th, 1999 will be included in the report. See Showing your selection criteria on the heading of the report (below), for information on how to control which columns of you selection criteria will be displayed when printing. ************************************************************************************************************************ The Sorting Criteria Tab allows you to determine how the data is sorted before it is previewed or printed. It operates as follows: select the Description. Then select whether you want the data to be presented in Ascending (AZ) order or Descending (Z-A) order. The design of the report determines which sort fields may be available for you to alter. There are three basic categories:
You should avoid defining a criterion that would have no effect on the output. For example, if your first sorting criterion was EMPLOYEE #, then defining a second criterion on NAME would be meaningless: an EMPLOYEE # is unique, so there would only be one EMPLOYEE NAME for each EMPLOYEE #. However, defining a second criterion on Check Date would have an effect. ************************************************************************************************************************
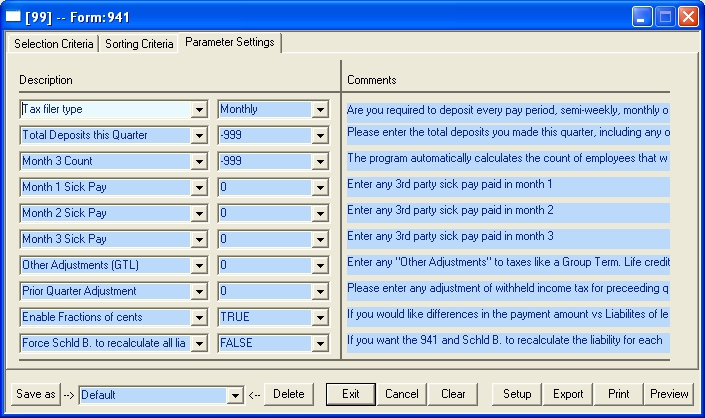
Parameter tab as used by the 941 Form.
Some reports require additional information in-order to prepare and print. This information is requested just prior to printing, by the Crystal Reports Parameter dialog (see below) The CCS parameter tab allows you to complete this information and store it, instead of reentering each time the report is run. Depicted above is an example of the 941 form parameter tab with values completed by the the user. The parameter dialog below shows the Crystal Reports Parameter dialog for this same report. Note the same values are seen on both dialogs. Note: The dialog shown below is as if no values had been provided by the CCS parameter tab, for if they had been provided, the Crystal Reports Parameter dialog would not be displayed.
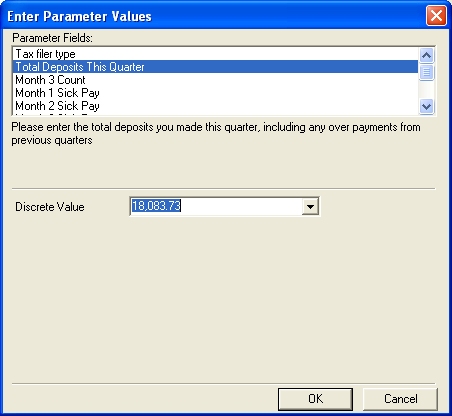
Parameter Dialog from Crystal Reports just prior to printing the 941 Form.
To enter a value for a particular parameter, simply choose one of the defaults from the drop down box. Note: Only the 2nd column requires any entry. The name (description) and comments are read-only. Any values you provide in the CCS Payroll Parameter tab, will not be prompted by the Crystal Reports Parameter dialog. If all values are provided via the CCS parameter tab, the Crystal Reports Parameter dialog will not be displayed. Therefore, if you complete all prompts in the CCS parameter tab, and use this criteria during a batch report, the report will print without further prompting. As shown above, these entries will cause the report to print using a "Tax filer type" of Monthly, Month 1, 2 and 3 sick pay will be set to zero, other adjustments and GTL will be set to zero, Enable Fractions of cents will be enabled, and forcing a recalculation of liabilities will be disabled. Note the two entries of -999. This tells the CCS Payroll to calculate the value and use the calculated value in the reporting process. In the case of this particular printing of the 941 for this sample company, that value is calculated to be $18,083.73 which will be used for Total Deposits this Quarter. If this calculation capability is available, then -999 will be shown as a option in the drop down box. Note: The values you enter here, override the values you may have entered in the Other Preferences Area of the Company form. ************************************************************************************************************************ After you enter the selection, sorting and parameter information, choose one of the output options. Save As -->: Type in the name that describes the criteria you are creating. For example, if you wish to create a criteria to print a report for the current pay period for department 010, you might name the criteria "Dept 010 Current". After you type the name you desire, click the Save as button. Note: Exit, Print, Preview, Export or selecting another Criteria from the drop down box, all save the Criteria before continuing, so you need not click "Save As" if you are not changing the name of the Criteria Set. <--Delete: Use this button only if you wish to delete a particular named criteria. Select the named criteria from the drop down box and then click the <--Delete button. The Exit button saves the entered selection criteria and closes the Reports Criteria. The next time you select this report, the newly defined criteria will be the default. Cancel: The Cancel button cancels the changes to the selection criteria and closes the Selection Dialog without printing the report. Clear: Use this button to completely clear the criteria screen. This command presents a Printer Setup Dialog, allowing you to specify the printer and its connection. The Export button Presents the Crystal Reports Export Dialog, allowing you can specify an export format (such as ASCII, Excel, HTML etc.) and a location (such as disk file, mail etc.) for the selected report. The Print button prints the selected report to the printer. The Preview button prints the report to the screen.
The report is printed as defined. While you are previewing the report,
you can click the Examples: #1 -- If you wanted to print a report for employee 1916 in the current payroll period only, set the description to WE Date, and type "C" in both the FROM and TO. Now set another Description to "Employee" and type 1916 in both the FROM and the TO fields. Type "One Emp-Current Payperiod" in the Save As field and click the "Save As" button. You will be asked if yo wish to save these settings as One Emp-Current Payperiod, click yes. Next time you wish to print this report for a single employee, choose the report from the report menu and click Criteria. Now click on the dropdown box where you named the criteria and choose the criteria "One Emp-Current Payperiod". Change the employee number in the FROM & TO fields (as needed) and click Preview. #2 -- If you wanted to print a Payroll Register report for all paychecks having check dates from 1/1/2001 to 1/31/2001 sorted alphabetically you would choose the Payroll Register from the report menu, click Criteria, click on Enable Relations, choose a Description of "Check Date" and fill in the FROM with 01/01/2001 and the TO with 01/31/2001. Now click on the Sorting Criteria Tab and in the Description drop down box choose "Name". Give the Criteria a name, (type any name in the drop down box next to "Save As") then click the "Save As" button. Confirm that you wish to save these settings with this the new name (click Yes). Now click Preview or Print. #3 -- If you set your Salary employees up in a different Crew (or Craft/Class/Department for that matter) than your Hourly employees you will have an easy way to sort them separately and print different reports for them. Using the XYZ Company (company99) choose the Description of WE Date and type "C" in both the FROM and TO fields - this will set the criteria to look at those paychecks in the current Payperiod only. Then on another line choose "Crew" for the Description (use the drop down box) and fill in 100A in the FROM and 500X in the TO field. If you wish this report to be sorted by the Employee's Name click on the Sorting Tab and choose "Name" from the drop down box. Then, name this criteria if you wish (in the Save As --> field). Click Preview, Print or Export to output the report.
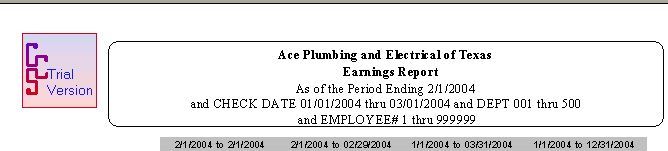
Showing the selection criterion on the heading of the report:
The image above depicts the heading area of a sample Earnings Report which has been selected using particular Week ending (Period Ending) date, a check date range, department range and employee range.
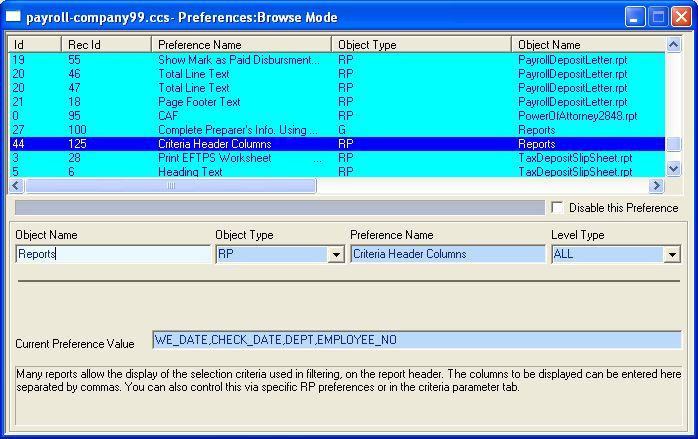
There are several factors that combine together to control how the selection criteria you have used to filter your report is displayed within the header of the report you are printing. The first and most obvious is the whether you have used criteria or have simply printed or previewed the report without adding additional selection information. Often, the CCS reporting engine will still have used some filter criteria in order to generate the report in it's default state. For instance, when you do not use criteria to print a check register, the check register will be printed for the current payroll period only. This selection information (for the period ending) will then be displayed within the heading of the report. The second aspect of controlling the display of the selection criteria printed on the top of the report is via the "Other preference" Criteria Header Columns -- See image below:
This preference is considered a global preference as it apples to all reports that have a standard heading as shown above. Forms such as the 941, do not have a report heading. In an effort to insure the selection criteria that is displayed in the heading of the report is meaningful to the end user, the columns that are to be displayed can be specifically stated. The preference value as shown (and distributed) is set to WE_DATE,CHECK_DATE,DEPT, EMPLOYEE_NO. These four columns are the only selection columns that will be displayed even if your selection criteria contains other fields of information. You can change which columns to be displayed in one of three ways. 1) You can modify the global preference shown above and simply edit the columns. For instance if you add the text ,CODE then any report that has CODE (or CD) as a selection criterion, will display this filter within the heading of the report. Please note the the CCS reporting engine may also use the fields you have chosen in order to generate the report. If this is the case you will see both your criteria and the CCS reporting criteria within the heading. Note: You may enter more than four columns; however; it is possible not all columns will be displayed in the heading. Please see the notes below on complex criteria:. To determine the true name of a database column, click show tables while in the selection tab of the criteria dialog. 2) You can create a report specific preference. To do this, simply click the ADD button (right hand tool bar) and add a new preference for the specific report you wish to control. For the Object name, enter the exact report name as shown on the disk drive. (You can determine the name of the report by previewing the report and looking at the title bar for its name.) Note: Enter only the report name, not its directory path. Hint: If you select the global preference shown above, enter through it. You can then use the F3 key to copy this information while creating the new preference. Please see the image below:
Note how the Object name has been changed to PayCheckCodeSummary.rpt. This preference will control the display of selection criteria for the Code Summary report only. In our example, we have removed the column CHECK_DATE and added CODE to the list of columns. When the Code summary report is filtered with one or more of these specified criterion, the criteria used to select the report will be shown in the heading. A report specific preference overrides the global preference.
3) The third way to control the display of the selection criterion used to filter a report is within the Parameter Tab of the criteria dialog. Any report that supports the display of the selection criterion in the heading will allow you to specifically set the display of this criterion via the "Criteria Header Columns" parameter. By entering one or more selection columns in the parameter tab, you can control the display of selection criterion on a very specific basis. The columns you enter in the parameter tab, override both types of preference settings.
A couple of things to be aware of when using complex criteria. Due to limitations in the Crystal Reports API, only the first 256 characters of your selection criteria used by the actual SQL query can be used when determining which information will be displayed. Therefore, if you have entered several lines of criteria to produce a report, you may find that some of these selection items are not shown in the heading of the report, even though you have stated that they they should. This is a display limitation only, and does not affect the actual generation of the report. Secondly, the order you enter the selection columns in the preference or parameter tab, is the order they will appear on the heading, regardless of which order you have used in the criteria tab.
|
|
|