|
|
|
|
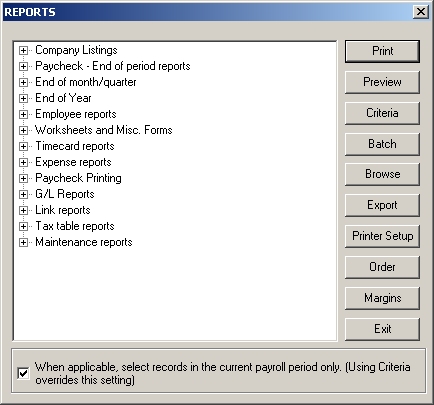
Reports Dialog
NOTE: If you want to use Company 99, the sample company, in order to run sample reports with data, use one of the following dates in the Week Ending textbox of the Welcome Screen: 1/4/04, 1/11/04, 1/18/04, 1/25/04 or 2/1/04. The reports dialog allows you to configure your printer and select a report to print, export, or preview. Click on a button for an explanation of what it does.
The List Control consists of categories of reports in a tree structure as shown above, each of which contain all the predefined reports that are available for that category for all the currently running modules. Click on a '+' to open up that category. As pictured above, the user has opened up the Paycheck Printing category. Click on a '-' to close that category. Each time you open a COMPANY, the list is updated to include the reports available for that COMPANY. You can print a report for any COMPANY that you have open during the current session, whether or not it is the currently active COMPANY. Thus, for example, you can print a report for COMPANY 00 while entering EMPLOYEES for COMPANY 99. Reports for each COMPANY are preceded by the Company Number. In the above example, the user only had COMPANY 99 open when he or she opened the Report form. Incorporating Custom Reports: You may also create your own Custom Reports using Seagate Crystal Reports Generator version 8 or 8.5. Once created and properly defined, CCS will incorporate your reports into the Available Reports listing (pictured above) and treat them as if they had been pre-defined by CCS. You would, therefore, be able to control filtering, sorting, and exporting of your report via the Criteria button exactly as if it had been a CCS Available Report. To incorporate a Custom Report into the CCS menu, follow these steps:
NOTE: You must create a CustomReportsList.txt file for every CCS module to which you add Custom Reports and place it in the appropriate folder as explained above. See Data Sources for further information regarding CCS data. NOTE: If, as you define your Custom Report, use 1st create and use Company 00 tables as your data source for the report, CCS will substitute the data for whatever Company is active when you run the report via the CCS Accounting module. Let's say, for example, that you have created Companies 11 through 15. When you create your Custom Report, you have two options for Data Sources:
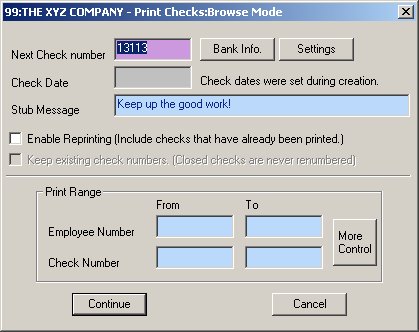
The Print button prints the selected report to the printer. The report is printed as defined; no additional selection criteria, sorting information, or printer setup is requested or utilized. If you have opted to print paychecks, the following dialog appears:
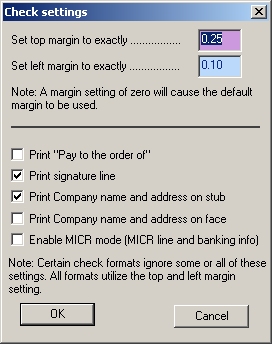
Enter the number of the next check to print. Enter the date to print on the checks. NOTE: The program has a safety feature to insure that payroll checks are assigned to the proper payroll period. If you want a message to be printed on the stubs of all of the checks in this print job, enter it here. If you check this checkbox, then all checks in the run will be printed, even those that have already been printed. If you leave this checkbox unchecked, checks that have already been printed will be omitted from the run. The default value for this checkbox is unchecked. This checkbox does not retain its setting from print job to print job. You will have to check it each time before printing a check run if you want to be able to re-print checks later on. Bank Info: Clicking on this button takes you to the bank form that you access from the Company form. It is provided here only for convenience. Settings: Clicking on this button takes you to the following: Set Top Margin To Exactly: [.01 - 9.99] Enter the distance in tenths of an inch from the top of a check to the first line of print. If you enter a 0.00, the default setting will be used. This default setting is often set to high to allow better control of the check printing job. If the offset from the top is incorrect in your situation, enter the proper measurement. Whatever you enter here will become the new default top margin. This setting can be set different on each workstation. Set Left Margin To Exactly: [.01 - 9.99] Enter the distance in tenths of an inch from the left of a check to the left most character position to be printed. If you enter a 0.00, the default setting will be used, this default setting is generally fine. If the offset from the left is incorrect in your situation, enter the proper measurement. Whatever you enter here will become the new default top margin. This setting can be set different on each workstation. Important: If you will be printing the MICR line on your checks, the placement of this line dictates the positioning of the entire check, for it must be positioned correctly. You should obtain a MICR line ruler or gauge if you are unsure as to the proper placement of the MICR line. Check box if the "Pay to the Order of" is to be printed on check, or leave blank to be excluded. See *Note below. Check box if the signature line is to be printed on check, or leave blank to be excluded. See *Note below. Print Company name and address on stub Check box if the company name and address on stub is to be printed on check, or leave blank to be excluded. Print Co Name & Address on Face This check box allows you to add a company name & address on the face of the check in either a text or graphic format. If you want to use a graphic format, scan an image of the information you wish to place on the check into any graphics program using a tif, bitmap(bmp), or other standard graphics format and create a graphics image file. Then either paste in or drag and drop in the graphic image in the space provided on the form on the Bank form. Because of differences in resolution, the proper size of the image can only be determined by trial and error. NOTE: DO NOT use MS - Word as the graphics program. (Paint which comes with most Windows versions, works well for this process.) Enable MICR mode(MICR line & banking information) This check box allows you to print the MICR line (account #, Routing# & check#) and the banks name and information.
*Note: Certain check formats ignore some or all of these settings. All formats utilize the Top and Left Margin setting.
The Preview button prints the report to the screen.
The report is printed as defined; no additional selection criteria,
sorting information, or printer setup is requested or utilized. From
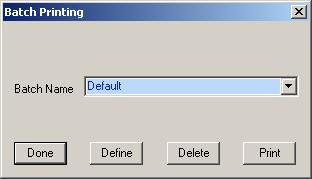
the report preview screen you can click the The Criteria button presents the Reports Selection Criteria Dialog, where you can enter selection and sorting criteria. The criteria you enter determines which records will be printed and in what order. From the Criteria Dialog you can specify an output option (print, preview or export) for the report. Batch: Not available in Express version This button allows you to create lists of reports that will print sequentially, saving you the tedium of selecting and printing each report separately. The following dialog appears:
As pictured above, the user has created a batch print job named Default and is prepared to manipulate it: --Done: Exit the dialog. --Define: Each batch print job is assigned a name. If you want to create a new set of reports to batch print, enter a name for the new batch print job in the combo box and then click Define. If you want to edit an existing batch print job, select it in the combo box and then click Define. In either event, you will see a dialog that allows you to select the reports that you want to assign to the selected batch print job. For each report, you can
--Delete: Delete the entire batch print job selected in the combo box. --Print: Print all of the reports selected for the batch print job named in the combo box. This button gives you access to user-created Custom Reports that have not been incorporated into the CCS Available Reports window (see Incorporating Custom Reports for details). Clicking on this button opens an Open File Dialog where you select the report to be printed. To create your own Custom Reports, you will need to obtain a copy of Crystal Reports version 8 or 8.5, available at most software dealers. CCS Prints all unincorporated Custom Reports as defined, with no additional selection criteria or sorting information added to the report. To change the selection criteria of a custom report, you will have to edit the report via your report generator software and save it (or a copy) back to disk. NOTE: Incorporated Custom Reports have all of the sorting, exporting, and filtering flexibility that CCS pre-defined reports have. See Incorporating Custom Reports for details. The Export button Presents the Crystal Reports Export Dialog where you can specify an export format such as ASCII, Excel, HTML etc. and a location such as disk file, mail etc. for the selected reports. This command presents a Printer Setup Dialog, which allows you specify the printer and its connection. This command takes you to the CCS Products web site where you can order replacement checks and forms.. This command allows you set a specific top and left margin for the selected report. This is most useful when printing to preprinted forms which require exact character placement. Please see the the discussion above on margins for more information on how margins are utilized by the reporting engine.. The Exit button closes the Reports Dialog.
The best way to find out what a report has to offer is to print or preview it; therefore, these help pages will not attempt to discuss individual reports. To print or preview a report, select the desired report by clicking on the report in the list control, and click on Print or Preview.
|
|
|