|
|
|
|
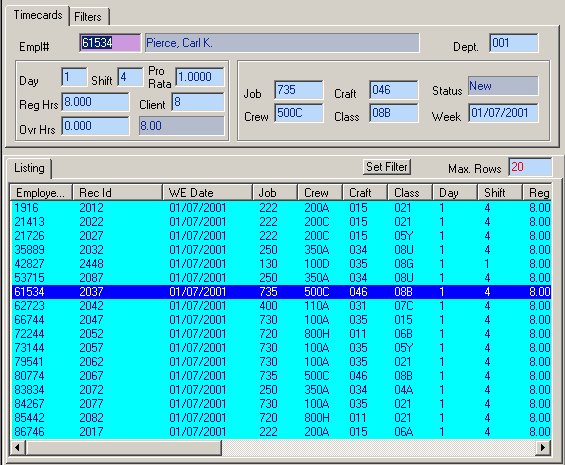
Timecards Entry/Edit Form The TIMECARDS Entry/Edit Form allows you to View, Add, Edit or Delete TIMECARDS.
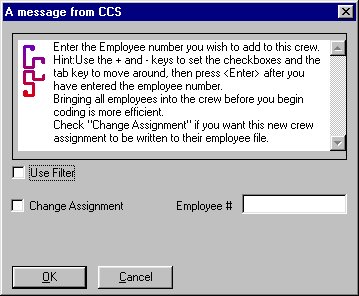
As shown above, the active COMPANY is "The xyz company #99". The user is viewing (Browse mode) the TIMECARDS for Day 1 of the Week Ending 01/07/2001 for Employee # 61534 (Pierce, Carl K..). NOTE: Paychecks can be created using Timecards, as explained below, or they can be created without using timecards (See Paychecks Without Timecards for details.). Note: When you select a TIMECARD from the LIST control (click on a line) in the lower portion of the Form, the associated TIMECARD data will be displayed in the top portion of the Form. Clicking on a Column heading will sort the list by that Column; clicking again on the column header will toggle the sort order (Ascending vs. Descending). For example, if you wanted the above data sorted by Name, click on the Name column header and the data will be alphabetized from A to Z (Ascending). Click again on the Name column header and the data will be seen from Z to A (Descending). Note: Although this form contains predefined controls, they may be configured to meet your specific "Business Rules." See Validation Methods for more information on customizing controls. See The Mouse versus the Enter/Tab Keys for information on moving through a form. See Importing Data for information on importing initial data. A TIMECARD can be manually entered or it can be created by CCS TK from external clock data during the upload process. NOTE: If you are switching over from the Protym Systems and want to use the Protym import, please contact CCS for further information before you begin your set up procedures. If an external clock is used, timecards are created as follows: 1. Each punch in and out for one employee for one day is examined. 2. The total time clocked in is calculated from these punches. 3. A TIMECARD record is created that amasses all of the time for the employee as long as there is no possibility for the regular and overtime PAY RATES to change. CCS TK recognizes the potential for a PAY RATE change if any of the following factors change during a given day: 1) SHIFT, 2) CLASS, 3) CRAFT, 4) JOB. If any of these four factors change, CCS TK creates a separate TIMECARD for that employee for that day. Thus, an employee who worked two different shifts or who changed CLASS assignment during a day would have multiple TIMECARDS for that day. In summary, a TIMECARD represents the total regular and overtime hours for one employee for one day, one shift, one class, and one craft, one job. Note: If, for instance, an employee changes from one CLASS to another CLASS in a given day, CCS TK will create a separate TIMECARD for each CLASS even if the PAY RATES are identical. The potential for a PAY RATE change exists, so separate TIMECARDS are created. TIMECARD Overview: The Timecard Form is is divided into two sections: the upper section and the lower section. The upper section contains up to three tabs: Time Cards, Codes (TK Module only), and Filters: Time Cards: This tab contains the data for the TIMECARD that is highlighted in the LIST control. If you need to make manual changes to the data of a single TIMECARD, you would do so here. Codes (TK Module only): Each TIMECARD is distributed to up to five user-defined CODES. This tab reflects the distribution for the currently selected TIMECARD and allows for the distribution to be modified. As explained below, this tab works in conjunction with the Distribute Tab to assign hours to costing CODES. Filters: Settings are available on this tab to filter the data so that the bottom section contains a user-defined subset of the TIMECARD data. The lower section contains up to three tabs: Listing, Detail (TK module only), and Distribute (TK Module only): Listing: This tab contains the LIST control that shows the currently selected subset of TIMECARD records. Detail (TK Module only): This tab shows the DISTRIBUTION detail for a single TIMECARD. When you click on this tab, the upper section of this form automatically switches to the Time Cards Tab. Thus all of the data that pertains to a single TIMECARD is displayed. Distribute (TK Module only): This tab shows how the TIMECARDS are distributed across user-defined costing areas. When you click on this tab, the upper section of this form automatically switches to the Codes Tab. TIMECARDS Maintenance: To Add a new TIMECARD: NOTE: TIMECARDS are normally brought into the program by UPLOADING data from the external clock. You are, however, able to add TIMECARDS manually as explained below. 1. Select Maintenance|TIMECARDS from top menu bar or go to the Home Menu and click the "TIMECARDS" button. 2. Click ADD on the SIDE
TOOLBAR or 3. Complete the form as described below. After the last Entry is completed, the record will be saved automatically. Note: If you used the Add mode and not the Define mode to create a TIMECARD, you will need to press the ESC key or click CANCEL when you are done adding TIMECARDS: Once you start the ADD mode anywhere in the CCS Programs, the ADD mode is automatically reinstated for you after each save until you cancel it or close the Form. 1. Select Maintenance|TIMECARDS from top menu bar or go to the Home Menu, and click the "TIMECARDS" button. 2. . Locate the desired TIMECARD record by any of the following methods:
3. Complete any changes needed as described below. Tabbing past the last entry, changing records, or clicking ADD or OK on one of the TOOLBARS will validate and save your changes. To Delete an existing TIMECARD: 1. Select Maintenance|TIMECARDS from top menu bar or go to the Home Menu and click the "TIMECARDS" button. 2. Locate the desired TIMECARD by following the instructions in Edit Timecards. 3. Click the DELETE button on the SIDE TOOLBAR or After you complete any of the above entries, the TIMECARD will automatically be validated and saved. Click OK on the SIDE TOOLBAR when you are ready to close the TIMECARDS form. See Edit Modes for more information on the Edit modes used by most CCS forms.
The Controls of the TIMECARDS Form: Note: The values shown below in square brackets represent the default range applicable to each control; however, these ranges can be configured to allow additional values (or restrict values). See Validation Methods for more information. Upper Section: Time Cards Tab: The data in this tab is normally filled out during the process of creating TIMECARDS from the external clock data (see TK Utilities for details). Should you, however, manually add a TIMECARD, then you must input the data as described below. The EMPLOYEE NUMBER associated with the currently selected TIMECARD record. NOTE: Unless you are adding a TIMECARD manually, changing the EMPL# does not reassign the selected TIMECARD to a new EMPLOYEE. Instead, it initiates the process for locating a specific TIMECARD (see Edit Timecards for details). The EMPLOYEE NAME associated with the selected TIMECARD is displayed here for your information and convenience. REC#:[Read Only] The record number assigned to this row in the TIMECARD table is displayed here for your information. The DAY of the current Week Ending represented by this TIMECARD. The SHIFT within the DAY of the current Week Ending represented by this TIMECARD. NOTE: SHIFT 4 is Holiday; SHIFT 5 is Passive. If the time being entered is a rate other than reg and overtime (1.5 times reg.) then enter the multiplier to be applied against the base pay rates to calculate both pay and billing rates. The number of REGULAR HOURS for the current DAY. Note: You can enter regular and overtime using the minute syntax HH:MM (military time) as well as a end time - start time: Some Examples are 12:30 which will be converted to 12.5 20:15-8:30 This will be converted to 20.25-8.5 = 11.75 which will be converted to regular (8) and overtime (3.75) if applicable. Client:[1-999999] If you track time on a per client basis, then enter the Client Code associated with this timecard. Leave it blank if separate Client billing is not used. The number of OVERTIME HOURS for the current DAY. NOTE: To the right of the OVR. HOURS control is an unlabelled, read-only control that shows the total # of hours worked for this TIMECARD (i.e, REG. HOURS + OVR. HOURS). See Reg. Hours above for more details. The JOB the EMPLOYEE was assigned to for this TIMECARD. The CREW the EMPLOYEE was assigned to for this TIMECARD. The CRAFT the EMPLOYEE was assigned to for this TIMECARD. The CLASS the EMPLOYEE was assigned to for this TIMECARD. The STATUS of a TIMECARD is a flag that is maintained by CCS TK. The options are as follows:
The Week Ending date for the selected TIMECARD.
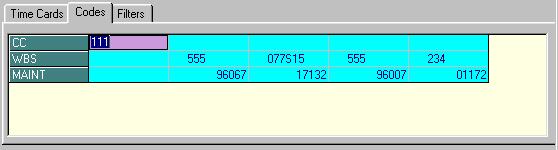
NOTE: The Codes Tab is available only from the TimeKeeper module. The Codes Tab contains a grid that shows up to five user-defined cost breakdown CODES for the TIMECARDS of the group currently being displayed in the Distribution Tab (as well as any defaults CODES if the Use Default Coding is checked). As pictured above,three costing categories (rows) have been defined: CC, WBS, and MAINT. Furthermore, in the above example, the user has created five different sets of these three CODES (columns). If, for example, the EMPLOYEES in the grouping displayed in the Distribution Tab might work on five different TASKS during the course of a week, their time might need to be distributed to five different sets of CODES. Column 1 might represent the codes to be used in TASKA; Column 2 might represent TASKB; etc. All of the distribution detail is completely definable by the user. TASK is defined as any distinct entity that you wish to create. Examples might include JOB, Project, Work Assignment, work done in a certain location, etc. Switching from TASK to TASK may or may not involve different costing categories. TIP: Use the AutoCode feature for CREWS or JOBS to automate the assignment of CODES. This tab is used in conjunction with the Distribute tab to distribute TIMECARD hours to the user-defined CODES. Whenever the user clicks on the Distribute tab in the lower section, the program automatically flips to this tab in the upper section. Each column in the Codes grid corresponds to a Reg. and Ovr. pair of rows in the Distribute tab. For details, see Distribute Tab.
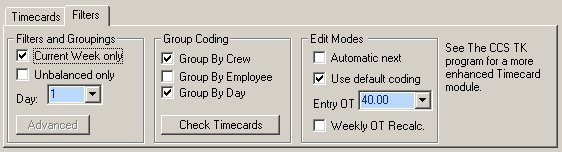
This tab contains controls that allow you to create data subsets to work with in the lower section of this form. In the example pictured above, only TIMECARDS for Day 1 of the current Week Ending will be shown. They will be grouped by CREW as well as by DAY. Checking or unchecking Controls causes a new subset of data to be derived. Current Week Only:[Checked or Unchecked] Whether to display current Week Ending TIMECARDS or to display all TIMECARDS. Unbalanced Only:[Checked or Unchecked] Whether to display only those TIMECARDS that are unbalanced, i.e., that haven't yet been coded completely, or whether to display both Balanced and Unbalanced TIMECARDS.. Determines which day's TIMECARDS of the currently selected Week Ending to display. Advanced Button: This is an add-on feature: If you need more filtering choices than those provided by the Filter Tab, clicking on this button will bring up a Filtering Criteria window to allow you to create sophisticated filters using a wide variety of the available TIMECARD options. You could, for example, opt to view only the unbalanced TIMECARDS for JOB 333. Contact CCS for details. Group by Crew:[Checked or Unchecked] Whether or not to show the data by CREW. If this option is checked, an entire CREW's data will be displayed in the Distribute Tab. Group by Employee:[Checked or Unchecked] Whether or not to show the data by EMPLOYEE. If this option is checked, a single EMPLOYEE's data will be displayed in the Distribute Tab. Group by Day:[Checked or Unchecked] Whether or not to show the data by DAY. If this option is unchecked, data for an entire week will be displayed in the Distribute Tab. Clicking this button causes the program to recalculate all open TIMECARDS. Two things are examined:
Automatic Next:[Checked or Un-checked] When you are entering coding in the Distribute Tab (TK Module only), you will be moved to the next data grouping automatically when you finish the current one. If, for example, you have Group By Crew checked, and you are working on CREW 1301, when you finish distributing the final timecard in the Distribute Tab, you will automatically be taken to CREW 1302 (or whichever one is next numerically). Use Default Coding:[Checked or Unchecked] As you assign coding during the normal distribution process (Distribute Tab) (TK Module only), CCS TK statistically analyzes how static the CODING assignments are and retains this variability as percentage of times changed in the CREWS table. If Use Default Coding is checked, and the CODING for the subject CREW is historically stable, the program will automatically display the CODES for the CREW of the currently selected TIMECARD in the Codes Tab. If this control is unchecked (and there is no Auto Coding for the CREW), the Codes Tab will be empty. NOTE: CODES assigned to CREWS via Auto Coding always take precedence over defaults. Entry OT:[Select from list] The Entry OT defines how overtime is calculated per timecard as timecards are created. The choices are as follows:
Weekly OT Recalc[Checked or unchecked] The Weekly OT Recalc recalculates all open timecards based on a 40-hour week irrespective of the payroll period of the employee. The program intelligently determines what timecards belong to what week based on the Day and Week Ending fields of the open timecards. It then analyzes one week's timecards for each employee, automatically moving hours to overtime as required. This recalculation occurs whenever you click on the Check Timecards button. NOTE: If you have a pay period of a week or more, you should close out both your paychecks and your timecards at the same day. If you have a daily pay period (such as a temp agency), then close out your paychecks daily, but close out your timecards weekly so that weekly overtime calculations can be maintained accurately by the program. NOTE: If you are working with a daily pay period, we recommend that you utilize a standardized method for assigning Days. You might, for example, designate Monday as 1, Tuesday as 2, etc. across the board. Then, during Timecard creation, be sure to use the proper Day number. Such a process will insure that CCS Payroll can accurately calculate overtime.
Lower Section: This tab contains the LIST control showing the TIMECARD data for the currently selected Week Ending, filtered by the settings in the Filter Tab.
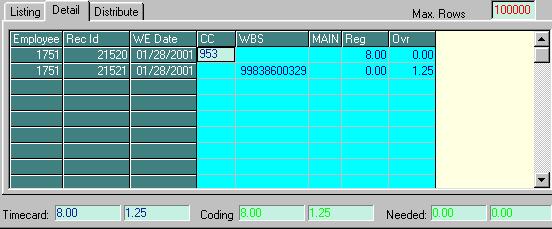
NOTE: The Detail Tab is available only from the Timekeeper module. This tab serves as a convenient area for the display and modification of the data for one TIMECARD. Clicking on this tab causes the Upper Section to move to the Time Cards Tab to facilitate these processes. As pictured above, the CODING for the TIMECARD selected in the Listing Tab (EMPLOYEE # 1751, Week Ending Jan. 28, 2001) is displayed. The Employee's Name shows in the lower left-hand corner of your screen (not pictured above). Three coding categories for costing distribution have been previously defined (as pictured above): CC, WBS, and MAINT. This employee's Regular Time (8.00 hours) has been distributed to CC 953; his or her Overtime (1.25) was distributed to WBS 99838600329. The controls along the bottom of the form indicate that this card is BALANCED, i.e., that it has been completely distributed. The Timecard controls show that the employee clocked in for 8.00 regular hours and 1.25 overtime hours. The Coding controls show that a total of 8.00 regular hours and 1.25 overtime hours have been distributed to costing CODES. The Needed controls show that 0.00 regular hours and 0.00 overtime hours remain to be distributed. CCS TK automatically updates these bottom controls as you distribute data. Distribute Tab (TK Module only):
NOTE: The Distribute Tab is available only from the Timekeeper module. This tab shows one subset of the data that you defined in the Filter Tab. As pictured, you are working on Day 1 of the current Week Ending (01/28/2001) with the data grouped by CREW. You are currently working on CREW 1302. With the FILTERS defined in this manner, you can distribute the hours to the user-defined cost CODES on a crew by crew basis. (See Filter Tab for additional filtering options.) The dark green section on the left side of the grid shows the TIMECARD data that was uploaded from the external clock(or entered manually via the TIMECARD entry form). When the TIMECARDS are first created by CCS TK, they are undistributed. So your task is to distribute the hours into the various costing entities that have been defined for your company. The data for this distribution is entered in the light turquoise section on the right side of the grid. This distribution is done in conjunction with the Codes Tab, a picture of which is repeated below: CODES TAB (Repeated)
Whenever you click on the Distribute Tab, the Upper Section of the screen changes to the Codes Tab. If no CODES are entered in the Codes Tab section, you must enter the appropriate user-defined costing CODE(S) first. CCS TK allows for up to five different categories of CODES (rows). However, these can be applied in an infinite number of combinations (columns). As pictured above, three CODE categories have been defined: CC, WBS, and MAINT. There are five columns pictured above. Each column represents a possible CODE assignment for an entity. For illustrative purposes, let's say each column above represents five different TASKS. The CREW whose TIMECARDS we are distributing works on all five of these TASKS at various times. Thus in any given day, you need to be able to parse out the hours (or the expense represented by these hours) to the relevant TASK Coding. Posting the appropriate amount of hours to the proper columns of the Distribute Tab accomplishes this task in a very efficient manner. The columns in the CODES tab relate to the columns in the Distribute tab on a 1:2 basis. That is, every column on the Codes tab is tied to a set of Reg. and Ovr. Columns on the Distribute tab. CCS TK keeps track of this relationship: if you, for example, move to the third column of the Distribute tab, the program would automatically move the highlight in the Codes tab to the second column. Distributing New Timecards (TK Module only) The majority of your time will be spent in the Distribute Tab distributing new TIMECARDS. Every possible measure has been taken to make this data entry task as efficient as possible. For illustrative purposes, let's continue with the data entry that is shown in the Distribute Tab, above. Each pair of columns in this tab has been set up to represent a TASK; the CODES for the TASK are already entered in the Codes Tab. A hypothetical set of steps is shown below, covering the most commonly occurring situations. The example assumes that the EMPLOYEES are working on up to five different TASKS, each of which require a different set of CODES. NOTE: <Enter> and <Tab> can be used interchangeably; <Shift> <Tab> moves back one cell.
|
|
|