|
|
|
|
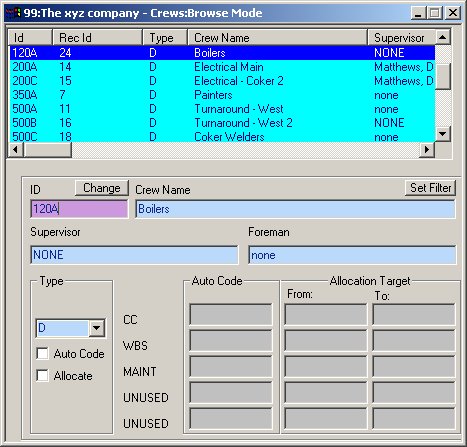
CREWS Entry/Edit Form The CREWS Entry/Edit Form allows you to View, Add, Edit or Delete CREWS.
As depicted above, the active COMPANY is "The xyz company #99". The user is viewing all of the existing crews for this company (Browse Mode) and has currently selected CREW 120A, which has been named "Boilers." Note: When you select a CREW from the LIST control in the upper portion of the Form (by clicking on a line), the associated CREW data will be displayed in the bottom portion of the Form. Clicking on a Column heading will sort the list by that Column; clicking again on the column header will toggle the sort order (Ascending vs. Descending). For example, if you wanted the above data sorted by crew name, click on the Crew Name column header and the data will be alphabetized from A to Z (Ascending). Click again on the column header and the data will be seen from Z to A (Descending). Note: This form contains controls with predefined labels and validation routines. However, these controls may be configured to conform to your specific "Business Rules." See Validation Methods for more information on customizing controls. See The Mouse verses the Enter/Tab Keys for information on moving through a form. See Importing Data for information on importing initial data. A CREW is a company-defined grouping, generally used to delimit groups of employees under the same supervisor and foreman. Often the employees belonging to a given crew have similar crafts (or professions) with varying degrees of skill (classifications). For instance an "Electrical Crew" may be comprised of a foreman, a journeyman, and several helpers. CREWS may also be broader in scope. You might, for example, group employees working at a particular location into a CREW even though they may or may not all be of the same skill, trade or profession. How you set up your CREWS is entirely up to you; however, careful consideration of these assignments is important for two reasons: (1) You will be able to make better use of the tools available via the CCS Accounting series. For example, the CCS Timekeeper program, allows coding of hours worked by Crew; the CCS Training Program allows assigning Training requirements by Crew; etc. (2) You will be able to create more meaningful reports. CREWS Maintenance: To Add a new CREW: 1. Select Maintenance|CREWS from top menu bar or go to the Home Menu, click the "Codes" button, and then "CREWS" button on the Codes Menu. 2. Click ADD on the SIDE
TOOLBAR or 3. Complete the form as described below. After the last Entry is completed, the record will be saved automatically. To Edit an existing CREW: 1. Select Maintenance|CREWS from top menu bar or go to the Home Menu, click the "Codes" button, and then "CREWS" button on the Codes Menu. 2. . Enter the CREW NUMBER you wish to edit in the CREW NO. Control. Press ENTER. If the CREW exists it will be displayed in the CREWS Form. (To search alphabetically by name, see Alpha Search.) Additionally, you can use the RECORD buttons to locate a particular CREW or select the CREW from the LIST control in the upper portion of the Form. 3. Complete any changes needed as described below. Tabbing past the last entry, moving records or clicking ADD or OK on one of the TOOLBARS will validate and save your changes. To Delete an existing CREW: 1. Select Maintenance|CREWS from top menu bar or go to the Home Menu, Click the "Codes" button, then "CREWS" button on the Codes Menu 2. . Enter the CREW NO. you wish to delete in the CREW NO.. Press ENTER. If the CREW exists it will be displayed in the CREWS Form. Additionally, you can use the RECORD buttons to locate a particular CREW or select the CREW from the LIST control in the upper portion of the Form. 3. Click the DELETE button on the SIDE TOOLBAR or See Edit Modes for more information on the Edit modes used by most CCS forms. The Controls of the CREWS Form: Note: The values shown below in square brackets represent the default range applicable to each control; however, these ranges can be configured to allow additional values (or restrict values). See Validation Methods for more information. CREW #.:[1 to 4 alphanumeric characters] The CREW NO. is used to uniquely identify a CREW. This will be the value used to represent a particular CREW throughout the program. If, for some reason, you need to change the CREW # for an existing CREW, click on the CHANGE button. A dialogue window will appear asking you for the new CREW #. After validation, the program will change the CREW # for you and update all related tables. CREW NAME:[1 to 30 alphanumeric characters] The CREW NAME is used to describe the CREW. This name (or description) will appear on most reports pertaining to CREWS SUPERVISOR:[1 to 30 alphanumeric characters] The SUPERVISOR is the person in charge of this foreman and associated crew. There may also be other crews assigned to this individual. This information appears on various reports, including the "Crew Sheet Report" in the CCS TK module. FOREMAN:[1 to 30 alphanumeric characters] The FOREMAN is the person in charge of this crew. Typically, a foreman will only have one crew. This information appears on various reports, including the "Crew Sheet Report" in the CCS TK module. .TYPE:[D,W,C] The TYPE describes the cost coding method that will be used for the highlighted CREW in the CCS TK module. Enter D for daily, W for weekly, or C for combined. A daily CREW's hours are coded by the day, a weekly CREW's hours are coded by the week, and a combined CREW's hours are a combination of both. If, for example, you wish to have the coding applied to an entire week's worth of hours for this crew, enter W. (If you are not using the TK module, simply enter D for daily crew.) This concept is described in greater detail in the Timecards entry/edit Form. AUTO CODE:[Checked or Unchecked] NOTE: The labels to the right of this control (CC, WBS, MAINT, UNUSED, and UNUSED in the example above) are created and maintained by the System Administrator. They are the names chosen for the coding categories that have been defined in this example. See Validation Methods for more information on creating these labels. This control either enables or disables the auto coding feature. If this control is checked, the five controls to the immediate right are enabled (i.e., available for data entry); if this control is not checked, the controls to the right are disabled (i.e., not available for data entry). Auto Coding allows you to assign values to as many as five coding categories. Clock time will automatically be distributed to these categories whenever timesheet data for an auto-coded crew is uploaded from the clock. This distribution can be seen and edited in the Distribute tab of the Timecard (see Timecards entry/edit Form for details). The distribution is also an integral part of certain reports (see Billing Edit Report as an example). The ultimate purpose of this coding is to allow the invoice dollars to be placed in specific General Ledger lines during the GL Export process. In the example pictured above, the system adminstrator has defined only three coding categories; labels were created for each during the definition process. (UNUSED is the default label if no user label is defined.) Using the categories defined in this example, suppose you wanted the clock time for Crew # 1300 to be distributed to Cost Center 111 by default. You would check the Auto Code control for this crew and enter '111' in the CC control. From that point forward, any time brought in to this program from the clock would automatically be distributed to that category (CC). If you wanted clock time distributed to a specific WBS, then you would place the appropriate value in WBS ('22222222222' for example). Time for Crew 1300 would, from then on, be distributed to WBS 22222222222 combination of coding categories can be used. The table below gives a few examples: TABLE 1 Coding Category Distribution Examples
ALLOCATE:[Checked or Unchecked] NOTE: The labels to the right of this control (CC, WBS, MAINT, UNUSED, and UNUSED in the example above) are created and maintained by the System Administrator. They are the names chosen for the coding categories that have been defined in this example. See Validation Methods for more information on creating these labels. This control either enables or disables allocation. If this control is checked, the ten controls to the far right are enabled (i.e., available for input); if this control is not checked, the controls to the far right are disabled (i.e., not available for input). Allocation is a very powerful process that allows you to spread the labor cost of a specific crew across a range of coding categories. Using the categories defined in this example, let's say that Crew # 1234 is comprised of fire fighters that are responsible for a specific area of your operation. Several tasks, representing a range of Cost Centers (CC), are performed in this area on a daily basis. So you need to allocate the cost of these fire fighters proportionally to each CC. The Allocate feature handles this tedious routine automatically as follows: Using the categories defined in this example, suppose you Auto Coded CC for this crew as '222'. Tasks in CC's 110 through 120 occur in their area of responsibility, so you enter '110' in the From control and '120' in the Through control for CC. The CCS TK program would then proportionally allocate the cost for Crew 1234 to CC's according to a formula that is explained below. These allocations show up in several reports (see the Billing Edit Report as an example). More importantly, however, they allow you to capture very precise costing information when the costing data is transferred to the General Ledger. Note: A crew cannot be Auto Coded to an entity that is also being used as an Allocation entity. CCS TK will find this error during the allocation process, stop the process, and report the error to you. ALLOCATION FORMULA: CCS TK allocates costs as follows (continuing with the CC example discussed above): Allocated Amount = Total Crew Dollars * (Total CC Hours / Grand Total CC Hours): TABLE 2 Allocation Formula Variable Definitions
Using our example parameters above (Crew 1234, From CC 110 Through CC 120), here is an example for Monday of the current week ending, with sample numbers: - Crew 1234 worked 100 hours on Monday @ $8.00 per hour. So the Total Crew Dollars is $800. - The total hours worked by all employees assigned to jobs from CC 110 through CC 120 for that same Monday are calculated by the CSS TK program. Let's say that that total is 1000 hours (Grand Total CC Hours). - The total hours worked by all employees assigned to jobs coded to CC 110 would then be calculated by the program. In this example, the total adds up to 100 hours (Total CC Hours). - The percent of the Grand Total CC Hours that were coded to CC 110 would then be determined by dividing the Total CC Hours by the Grand Total CC Hours (100 / 1000 = .10, or 10 %). So the amount of Crew 1234's labor cost that would be allocated to CC 110 for Monday would be $80 ($800 * 10%). - The program would repeat this process for every CC within the established range. Any combination of the five categories can be used for allocations. (See Table 1, above, for examples.) NOTE: Wildcards can be used in the Allocate controls. The Allocation From Through range takes precedence over the Auto Code entries during the allocation process. If, for example, Crew 1234 were Auto Coded to go to CC 100, but were allocated across CC's 110-120, the detail records for all of the timesheets for this crew would reflect a distribution to CC 100. However, when the allocation routine ran, the actual cost would be assigned proportionally to CC 110 through CC 120.
After you complete the above entry, the CREW will automatically be validated and saved. Click OK on the SIDE TOOLBAR when you are ready to close the CREWS form. Note: If you used the Add mode and not the Define mode to create a CREW, you will need to press the ESC key or click CANCEL when you are done adding CREWS. This is necessary because, once you start the ADD mode anywhere in the CCS Programs, this mode is automatically reinstated for you after each save until you cancel it or close the Form.
|
||||||||||||||||||||||||||||||||
|
|