|
|
|
|
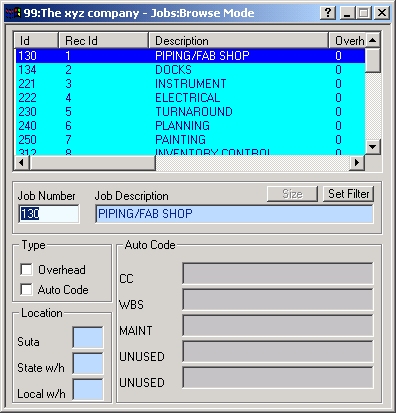
JOBS Entry/Edit Form The JOBS Entry/Edit Form allows you to View, Add, Edit or Delete JOBS.
As shown above, the active COMPANY is "The xyz company #99". The user is viewing (Browse mode) JOB 130, which has been defined with a description of "PIPING/FAB SHOP". Note: When you select a JOB from the LIST control in the upper portion of the Form (by clicking on a line), the associated JOB data will be displayed in the bottom portion of the Form. Clicking on a Column heading will sort the list by that Column; clicking again on the column header will toggle the sort order (Ascending vs. Descending). For example, if you wanted the above data sorted by Description, click on the Description column header and the data will be alphabetized from A to Z (Ascending). Click again on the column header and the data will be seen from Z to A (Descending). Note: This form contains controls with predefined labels and validation routines. However, these controls may be configured to conform to your specific "Business Rules." See Validation Methods for more information on customizing controls. See The Mouse verses the Enter/Tab Keys for information on moving through a form. See Importing Data for information on importing initial data. A JOB is a company-defined grouping mechanism generally used to delimit specific tasks of a larger project. The scope of a JOB, however, is completely up to the user. You may use it to differentiate entire locations, entire projects, discrete tasks within a project, etc. For example, a housing contractor may use the JOBS field to delimit each house under construction or further delimit the construction portions of each house into several smaller JOBS. JOBS 210-219, for instance, may represent the construction of a house located at 1501 Pecan St.. JOB 201 may represent electrical at 1501 Pecan St., while JOB 202 may be represent the plumbing etc. Often CREWS are used for this sub-grouping of skills or employee groups within a JOB; however, the JOB may be used in any manner that best suits your job costing requirements. Many reports are available in the CCS TK (TimeKeeper) module that group and subtotal on the JOB. Once JOBS are defined, you can assign employees to a particular JOB by entering the JOB NO. into the Employee record via the Employee entry/edit form.
JOBS Maintenance: To Add a new JOB: 1. Select Maintenance|JOBS from top menu bar or go to the Home Menu, Click the "Codes" button, then "JOBS" button on the Codes Menu 2. Click ADD on the SIDE
TOOLBAR or 3. Complete the form as described below. After the last Entry is completed, the record will be saved automatically. To Edit an existing JOB: 1. Select Maintenance|JOBS from top menu bar or go to the Home Menu, Click the "Codes" button, then "JOBS" button on the Codes Menu 2. . Enter the JOB NUMBER you wish to edit in the JOB NO. Control. Press ENTER. If the JOB exists, it will be displayed in the JOBS Form. (To search alphabetically by Job Description, see Alpha Search.) Additionally, you can use the RECORD buttons to locate a particular JOB or select the JOB from the LIST control in the upper portion of the Form. 3. Complete any changes needed as described below. Tabbing past the last entry, moving records or clicking ADD or OK on one of the TOOLBARS will validate and save your changes. To Delete an existing JOB: 1. Select Maintenance|JOBS from top menu bar or go to the Home Menu, Click the "Codes" button, then "JOBS" button on the Codes Menu 2. . Enter the JOB NO. you wish to delete in the JOB NO. Control. Press ENTER. If the JOB exists, it will be displayed in the JOBS Form. Additionally, you can use the RECORD buttons to locate a particular JOB or select the JOB from the LIST control in the upper portion of the Form. 3. Click the DELETE button on the SIDE TOOLBAR or
See Edit Modes for more information on the Edit modes used by most CCS forms. The Controls of the JOBS Form: Note: The values shown below in square brackets represent the default range applicable to each control; however, these ranges can be configured to allow additional values (or restrict values). See Validation Methods for more information. JOB NO.:[1 to 3 numeric characters] The JOB NO. is used to uniquely identify a JOB. This will be the value used to represent a particular JOB throughout the program. Description:[1 to 25 alphanumeric characters] The JOB DESCRIPTION (or NAME) is used to describe the JOB. This description will appear on most reports pertaining to JOBS. Overhead:[Checked or Unchecked] Checking the Overhead control flags this JOB as overhead. All labor and expense entries against this JOB will be treated as overhead. This overhead designation is generally used for staff, management, etc. The cost and expenses of an overhead job are allocated into other non-overhead jobs. The allocation process is discussed in detail in the Perdiem and Expense Form. AUTO CODE:[Checked or Unchecked] NOTE: The labels to the right of this control (CC, WBS, MAINT, UNUSED, and UNUSED in the example above) are created and maintained by the System Administrator. They are the names chosen for the coding categories that have been defined in this example. See Validation Methods for more information on creating these labels. This control either enables or disables the auto coding feature for the highlighted JOB. If this control is checked, the five controls to the immediate right are enabled (i.e., available for data entry); if this control is not checked, the controls to the right are disabled (i.e., not available for data entry). See the Crews Form for complete details. After you complete the Above Entry, the JOB will automatically be validated and saved. Click OK on the SIDE TOOLBAR when you are ready to close the JOBS form. Note: If you used the Add mode and not the Define mode to create a JOB you will need to press the ESC key or click CANCEL when you are done adding JOBS. This is necessary because once you start the ADD mode anywhere in the CCS Programs the add mode is automatically reinstated for you after each save until you cancel it or close the Form. Suta:[2 alphanumeric characters] State w/h:[2 alphanumeric characters] Local w/h:[3 alphanumeric characters] NOTE: These fields are needed only if you have employees who are subject to being taxed by more than one state or locality. They are particularly useful in handling employee's who move from location to location, where one or more of these locations are subject to different taxes. These fields will be disabled unless you check the Multi-State Employees check box on the Company Form. Enter the 2 or 3 digit state abbreviation or local tax table ID that is associated with this job. See Multi-State Employees for details.
|
|
|