|
|
|
|
GENERAL LEDGER Account Entry/Edit Form The G/L Entry/Edit Form allows you to View, Add, Edit or change G/L Accounts.
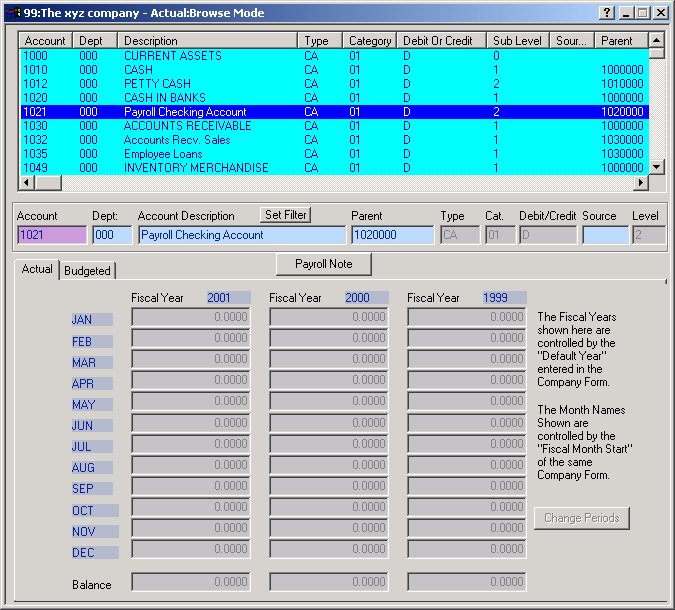
As depicted above, the active COMPANY is "The XYZ company #99". The user is viewing (Browse mode) the Account 1021-000 which has been given the description "Payroll Checking Account." Note: When you select an Account from the LIST control (by clicking on a line), the associated Account data will be displayed in the bottom portion of the Form. You may also delete ACCOUNTS by highlighting an ACCOUNT and clicking the DELETE key. Clicking on a Column heading will sort the list by that Column; clicking again on the column header will toggle the sort order (Ascending vs. Descending). For example, if you wanted the above data sorted by description, click on the Description column header and the data will be alphabetized from A to Z (Ascending). Click again on the column header and the data will be seen from Z to A (Descending). Note: Although this form contains predefined controls, they may be configured to meet your specific "Business Rules." See Validation Methods for more information on customizing controls. See The Mouse verses the Enter/Tab Keys for information on moving through a form. See Importing Data for information on importing initial data. Account numbers are assigned by the operator and should be well thought out to allow for growth and unanticipated future changes. The G/L Account numbers entered here are used by the CCS G/L, A/R, A/P and Payroll modules directly. In addition you may use this dialog to enter enough information to facilitate the PAYROLL to G/L export routines when not using the CCS G/L. See the Payroll to G/L Export dialog for more information.
G/L ACCOUNTS Maintenance: To Add a new G/L ACCOUNT NUMBER: 1. Select Maintenance|G/L Accounts from top menu bar. 2. Click ADD on the SIDE
TOOLBAR or 3. Complete the form as described below. After the last Entry is completed, the record will be saved automatically. To Edit an existing G/L ACCOUNT NUMBER: 1. Select Maintenance|G/L Accounts from top menu bar. 2. Enter the G/L ACCOUNT NUMBER you wish to edit in the ACCOUNT Control. Press ENTER. If the G/L ACCOUNT NUMBER exists, it will be displayed in the G/L ACCOUNTS Form. (To search alphabetically by name, see Alpha Search.) Additionally, you can select the G/L ACCOUNT NUMBER from the LIST control in the upper portion of the Form. 3. Complete any changes needed as described below. Tabbing past the last entry, moving records or clicking ADD or OK on one of the TOOLBARS will validate and save your changes. To Delete an existing G/L ACCOUNT NUMBER: 1. Select Maintenance|G/L Accounts from top menu bar. 2. Enter the G/L ACCOUNT NUMBER you wish to delete in the ACCOUNT field. Press ENTER. If the G/L ACCOUNT NUMBER exists it will be displayed in the G/L ACCOUNTS form. Additionally, you can select the G/L ACCOUNT NUMBER from the LIST control in the upper portion of the Form. 3. Click the DELETE button on the SIDE TOOLBAR or See Edit Modes for more information on the Edit modes used by most CCS forms. The Controls of the G/L ACCOUNT NUMBER Form: Note: The values shown below in square brackets represent the default range applicable to each control; however these ranges can be configured to allow additional values (or restrict values). See Validation Methods for more information. The ACCOUNT NUMBER is used to uniquely identify a G/L ACCOUNT. This will be the value used to represent a particular G/L ACCOUNT throughout the program. If this G/L Account number is associated with a particular Department enter that department number here. Note: If you are defining G/L Accounts within the CCS Payroll for use during the Payroll to G/L export routines, then please read the discussion in the Payroll to G/L Export Dialog on this subject.
ACCOUNT DESCRIPTION:[1 to 30 alphanumeric characters] The ACCOUNT DESCRIPTION is used to describe the G/L ACCOUNT. This name (or description) will appear on most reports pertaining to G/L ACCOUNTS. PARENT NUMBER:[0000000-9999999] The PARENT NUMBER Is used by . If this G/L ACCOUNT is associated with . Otherwise, leave the entry blank, or enter a zero. Type:[1 to 2 alphanumeric characters] Enter one of the following: CA - Current Assets FA - Fixed Assets OA - Other Assets CL - Current Liabilities LL - Long Term Liabilities C - Capital E - Expense I - Income Category (Cat.) [1 to 2 alphanumeric characters] Categories that can be used to group accounts during reporting. Debit/Credit[1 alpha character] Enter one of the following: D - Debit C - Credit H - Header (this is a special grouping heading) Your choice determines the normal state of the account, the abnormal state will be shown in parenthesis. Source:[1 to 4 alphanumeric characters] The source is an optional grouping. Enter a source here if this account should only be affected by a particular source. After you complete the above entry, the G/L ACCOUNT will automatically be validated and saved. Click OK on the SIDE TOOLBAR when you are ready to close the G/L ACCOUNT form. Note: If you used the Add mode instead of the Define mode to create a G/L ACCOUNT, you will need to press the ESC key or click CANCEL when you are done adding G/L ACCOUNTS: Once you start the ADD mode anywhere in the CCS Programs, the add mode is automatically reinstated for you after each save until you cancel it or close the Form.
See the Payroll to G/L Export dialog for more information on the use of G/L Accounts during the G/L Export.
My G/L does not use the same format for G/L accounts numbers as the CCS G/L does, can I still use the payroll to G/L Export? Yes. The CCS G/L Uses a 4-3 account structure, (That is 4 characters as a base number followed by a 3 character department identifier); however, many other structures are used for G/L accounts numbers. This is normally not a problem. 1st. You do not need to define G/L Accounts in order to create a G/L Export or G/L Journal entry report. The Account information is used only to link the the account you enter in the E/D code with a "Description". If the account is not found, no description information will be exported or reported, however the Account number and all amounts will transfer properly. No other information in the G/L Account form is used during the export process. 2nd. You can use the CCS G/L structure to enter your G/L numbers even if the structure differs, by simply ignoring the 4-3 structure used by the CCS G/L. During the export process, the CCS Payroll will pad the numbers you enter and reformat to the 4-3 format, for lookup purposes only. For instance, suppose your G/L uses only a 5 digit number (no department number). Then enter your 5 digit number in the E/D code as it would appear in your G/L. "12345" for example: When the CCS Export parses this number is will create a lookup account number of 1234-500. Thus if you created an account of 1234-500 in the above form, the description of that account (1234-500) will be used during the reporting and transfer of your account 12345. Some other examples: 123 becomes 1230-000. 1234-55 becomes 1234-550. Accounts numbers greater than 7 total characters are not fully supported and will be truncated for look up purposes. Therefor 12345-6789 becomes, 1234-678. This number will then be used in the look up processes. Note: The above examples assume you are using 3 digit department numbers. If you have set the department size within the CCS Payroll to an alternate value, then the truncation and lookup logic will utilize your department size and not the default 3 digit department size that were used in the above examples. The G/L Account number transferred to your G/L will always be formatted exactly as you entered in the E/D code. No change to the structure will occur in the actual data transferred.
Note: You must use G/L Account numbers to interface to a G/L system, name (or description) alone is not supported.
|
|
|