|
|
|
|
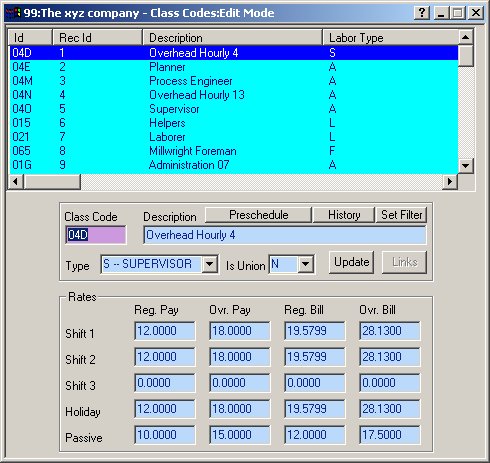
CLASS Entry/Edit Form The CLASS Entry/Edit Form allows you to View, Add, Edit or Delete CLASSES.
As depicted above, the active COMPANY is "The xyz company #99". The user is editing (Edit mode) the CLASS "04D" which has been given the description "Overhead Hourly 4." Note: When you select a CLASS from the LIST control (click on a line) in the upper portion of the Form, the associated CLASS will be displayed in the bottom portion of the Form. You may also delete CLASSES by highlighting a CLASS and clicking the DELETE key. Clicking on the Column heading will sort the list by that Column, Clicking again on the column header will toggle the sort order (Ascending vs. Descending). Note: Although this form contains predefined controls, they may be configured to meet your specific "Business Rules". See Validation Methods for more information on customizing controls. See The Mouse verses the Enter/Tab Keys for information on moving through a form. See Importing Data for information on importing initial data. Both CRAFT and CLASS are 3 character alphanumeric fields. The CLASS designates the EMPLOYEE'S position, skill (or pay) level (Supervisor, Foreman, Journeyman, Apprentice etc.), whereas the CRAFT specifies an EMPLOYEE'S talents, profession or trade such as Painter, Carpenter, Doctor etc. CRAFTS and CLASSES are assigned by the operator and should be well thought out to allow for growth and unanticipated future changes. CRAFT and CLASS codes are used by the CCS Payroll, TK, PM, and Training Modules. CLASS and CRAFT are optional. However, if you want to pay employees at one rate and bill them out at another rate, you must create Classes. See Craft and Classes in the EMPLOYEE FORM for further discussion. CLASS Maintenance: To Add a new CLASS: 1. Select Maintenance|CLASSES from top menu bar or go to the Home Menu, Click the "Codes" button, then "CLASSES" button on the Codes Menu 2. Click ADD on the SIDE
TOOLBAR or 3. Complete the form as described below. After the last Entry is completed, the record will be saved automatically. To Edit an existing CLASS: 1. Select Maintenance|CLASSES from top menu bar or go to the Home Menu, Click the "Codes" button, then "CLASSES" button on the Codes Menu 2. . Enter the CLASS NUMBER you wish to edit in the CLASS CODE. Control. Press ENTER. If the CLASS exists it will be displayed in the CLASS Form. (To search alphabetically by name, see Alpha Search.) Additionally, you can use the RECORD buttons to locate a particular CLASS or select the CLASS from the LIST control in the upper portion of the Form. 3. Complete any changes needed as described below. Tabbing past the last entry, moving records or clicking ADD or OK on one of the TOOLBARS will validate and save your changes. To Delete an existing CLASS: 1. Select Maintenance|CLASSES from top menu bar or go to the Home Menu, Click the "Codes" button, then "CLASSES" button on the Codes Menu 2. . Enter the CLASS you wish to delete in the CLASS CODE. Press ENTER. If the CLASS exists it will be displayed in the CLASS Form. Additionally, you can use the RECORD buttons to locate a particular CLASS or select the CLASS from the LIST control in the upper portion of the Form. 3. Click the DELETE button on the SIDE TOOLBAR or
See Edit Modes for more information on the Edit modes used by most CCS forms. The Controls of the CLASS Form: Note: The values shown below in square brackets represent the default range applicable to each control; however these ranges can be configured to allow additional values (or restrict values). See Validation Methods for more information. CLASS CODE.:[1 to 3 alphanumeric characters] The CLASS CODE is used to uniquely identify a CLASS. This will be the value used to represent a particular CLASS throughout the program. Note:As shipped, the VALIDATION logic expects a value of 000-0zz. CLASSES starting with a alphabetical character (letter instead of number) are not allowed so as to enable the automatic searching of CLASSES by entering any portion of the CLASS description in the CLASS CODE field. If you wish to change this functionality, simply remove the CLASS_ALPHA_SEARCH parent from the controls validation method. DESCRIPTION:[1 to 25 alphanumeric characters] The CLASS DESCRIPTION is used to describe the CLASS. This description will appear on most reports pertaining to CLASSES. The CLASS TYPE is used to designate the CLASS. The choices are as follows: <L>abor, <S>upervisor, <F>oreman, <E>quipment or <A>dmininstration. These designations are generally used in reporting; however some CCS routines such as the Events Auto Create Mode utilize this field directly. Note:You may add additional designators by changing the validation method for the CLASS TYPE. Enter <Y>es if this class will be used by union employees, else enter <N>. RATES:[-9999.9999 - 99999.9999] The rates determine both the amount paid to an employee who is given this CLASS CODE in a paycheck or timecard as well as the amount billed out for that employee's time. Shifts 1, 2, and 3 generally represent day, evening and night shifts, while shift 4 is holiday pay and shift 5 is passive pay (show-up pay). If you will not be using a particular shift, then just enter 0.00 for each of the entries on the line. After you complete the above entry, the CLASS will automatically be validated and saved. Click OK on the SIDE TOOLBAR when you are ready to close the CLASSES form. Note: If you used the Add mode and not the Define mode to create a CLASS you will need to press the ESC key or click CANCEL when you are done adding CLASSES. This is necessary because once you start the ADD mode anywhere in the CCS Programs, the add mode is automatically reinstated for you after each save (i.e., a new, blank record is initialized) until you cancel it or close the Form.
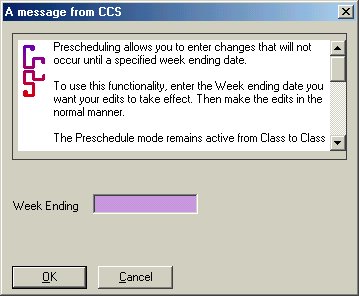
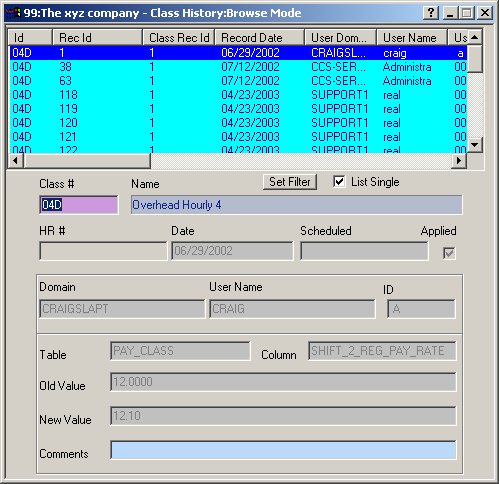
The Preschedule Button allows you to make changes to CLASS records that will not take effect until the date that you specify. The process is thoroughly discussed in the CCS Message textbox pictured above. Enter the date that the edits you are about to make should take effect. Every change that you make to any CLASS while in the Preschedule mode becomes a pending record that is not put into place until the desired date. These records can be deleted prior to the target date--see HISTORY, below. CCS Payroll tracks all changes made to any Class via the Class Form. This history is viewable by clicking on the History Button. When you click on this button, you are taken to the Class History Browse screen (see below). CCS looks to see if the CLASS that you have selected has any History records. If so, a scrollable list of this history is presented so that you can select the desired one. If not, you are so informed.
History records cannot be added or edited. If a record has not been Applied (which will only be true if the record was created via the Preschedule process), then you can delete it via the normal Delete options. Otherwise, all you can do is view these records and add a comment where desired. As pictured above, the Shift 2 Regular Bill Rate for Class 04D (Overhead Hourly 4) was changed from 12.00 to 12.10 on June 29, 2002. Comment:[30 Alpha-numeric Characters] Add a brief comment to this History record. When you make a change to the rates of any CLASS CODE, you may elect to have these rates reflected in any existing timecard and paycheck records that are not yet closed. Any new timecards or paychecks created will always reflect the current values of the CLASS table. Pressing the Update will present a dialog (shown below) that will allow you to specify the range of existing records to be updated using the current rates. Note: It is only necessary to update one time after you have finished all desired changes to all CLASS CODES, and then only if you want the current rates applied to existing timecards or paychecks.
To update the existing timecard/payecheck records with the current class rates, simply complete the range criteria and click "Update". All timecards and paychecks for the week ending date and class ranges will be updated using the current rates of the class table. Timecards and paychecks that have been "Closed out" will not be affected.
|
|
|