|
|
|
|
TAGS Entry/Edit Form
The TAGS Entry/Edit Form allows you to View, Add, Edit or Delete TAGS. A TAG is a user-defined entity that is used to link Training TITLE(s) to EMPLOYEE(s), thereby allowing the CCS Training Program to determine who needs what training. TAGS can be assigned to EMPLOYEES manually (i.e., one EMPLOYEE at a time) or programmatically by any combination of the following four EMPLOYEE attributes: 1. CRAFT: An EMPLOYEE's skill assignment (Electrician, Painter, etc.) 2. CLASS: An EMPLOYEE's classification (Helper, Administrator, Estimator, etc.) 3. CREW: An EMPLOYEE's crew assigment (Steel Worker, Turnaround, Grounds Maintenance, etc.) 4. JOB: An EMPLOYEE's job assignment. Certain jobs, for example, might require CPR training. How TAGS are created and linked to EMPLOYEES is entirely up to the user. You could, for example, determine that all Painters assigned to a certain CREW were required to work in a high noise area or to work at great heights which, in turn, might require them to need additional training applicable to working in hazardous locations. You would then create the TAG for Hazardous Location Training and fill in the CRAFT and CREW controls to specify the proper recipients. Be sure to read How it all works before adding new TAGS.
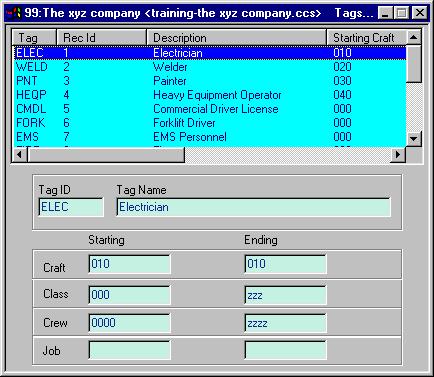
As shown above, the active COMPANY is #99, "The xyz company", the user is viewing (Browse mode) the TAG "ELEC" which has been defined with a description of "Electrician". As shown TAG "ELEC" will be applied to CRAFT 010 EMPLOYEES only, without regard to their CLASS or CREW. That is, this TAG will be added to all EMPLOYEES who have a Craft code of 10. (TAGS are added to or removed from the EMPLOYEE file automatically via the automatic routines or manually via the TAGS list in the EMPLOYEE Entry/Edit Form.) Note: When you select a TAG from the LIST control in the upper portion of the Form (by clicking on a line), the associated TAG data will be displayed in the bottom portion of the Form. Clicking on a Column heading will sort the list by that Column; clicking again on the column header will toggle the sort order (Ascending vs. Descending). For example, if you wanted the above data sorted by description, click on the Description column header and the data will be alphabetized from A to Z (Ascending). Click again on the column header and the data will be seen from Z to A (Descending). Note: The example, above, contains pre-defined controls for demonstration purposes. However, how TAGS are configured in your company is entirely up to you. See Validation Methods for more information on customizing controls. See The Mouse verses the Enter/Tab Keys for information on moving through a form. See Importing Data for information on importing initial data. Note: Do not use "The xyz company" to add TAGS. TAGS must be added to the COMPANY in which they will be used. The xyz company is used only for demonstration purposes.
TAGS Maintenance: To Add a new TAG: 1. Select Maintenance|TAGS from top menu bar or go to the Home Menu and click the "TAGS" button. 2. Click ADD on the SIDE
TOOLBAR or 3. Complete the form as described below. After the last Entry is completed, the record will be saved automatically. To Edit an existing TAG: 1. Select Maintenance|TAGS from top menu bar or go to the Home Menu and click the "TAGS" button. 2. . Enter the TAG ID you wish to edit in the TAG ID Control. Press ENTER. If the TAG exists, it will be displayed in the TAGS Form. Additionally, you can use the RECORD buttons to locate a particular TAG or you can select the TAG from the LIST control in the upper portion of the Form. 3. Complete any changes needed as described below. Tabbing past the last entry, moving to a different TAG record, or clicking ADD or OK on one of the TOOLBARS will validate and save your changes. To Delete an existing TAG: 1. Select Maintenance|TAGS from top menu bar or go to the Home Menu and click the "TAGS" button. 2. . Enter the TAG ID you wish to delete in the TAG ID. Press ENTER. If the TAG exists, it will be displayed in the TAGS Form. Additionally, you can use the RECORD buttons to locate a particular TAG or you can select the TAG from the LIST control in the upper portion of the Form. 3. Click the DELETE button on the SIDE TOOLBAR or See Edit Modes for more information on the Edit modes used by most CCS forms.
The Controls of the TAGS Form: Note: The values shown below in square brackets represent the default range applicable to each control; however these ranges can be configured to allow additional values (or restrict values). See Validation Methods for more information. TAG ID:[1 to 4 alphanumeric characters, case insensitive] The TAG ID is used to uniquely identify a TAG. This will be the value used to represent a particular TAG throughout the program; therefore careful consideration should be given when assigning TAG ID's to insure that the ID is as meaningful as possible . For example, a TAG of "ELEC" might be a better choice then "T444" for a TAG representing the training needed for all electricians: The TAG ID alone conveys some meaning and may, therefore, be more readily recognized by someone viewing a list of TAGS when no Description is displayed. Before beginning to assign TAG ID's, carefully put together a list of the TAGS you will be defining and their meanings. Leave a little room in your design to allow for the "unknown." For example, instead of (or in addition to) using "ELEC" or "WELD" for an electrician and welder respectively, you might be better served by using "ELC1" and "WLD1". If you subsequently determine that some, but not all electricians need additional training, you simply add the TAG "ELC2" via this Form and assign it only to those EMPLOYEES who will be needing the additional training. Description:[1 to 25 alphanumeric characters] The TAG DESCRIPTION (or TAG NAME) is used to describe the training TAG. This description will appear on most reports pertaining to training TAGS. The Ranges: The Ranges below are used to determine who will be given the TAG automatically by various routines within the CCS Training Program. The Add and Remove TAGS utility uses these values to Add or Remove a TAG from all EMPLOYEES based on the values entered in these ranges. Additionally, when you change an EMPLOYEE's CRAFT, CLASS, CREW or JOB (or when you enter/import a new hire), the CCS Training Program will search the TAGS Table to determine what TAGS need to be added or dropped from his or her TAGS list. To have a TAG applied to all EMPLOYEES, use ranges that will include all CRAFTS, CLASSES, CREWS and JOBS, i.e. 000-zzz. (Unless reconfigured, this will be the default entry that is displayed for each control.) Note: Each range is a restrictive, not permissive filter. That is, if an EMPLOYEE meets one set of criteria but not another, the TAG will not be included in his or her TAGS list. The table below gives a few examples of this concept:
The STARTING CRAFT is the beginning of a range of CRAFTS used for TAG assignment. If an EMPLOYEE has a CRAFT greater than or equal to this value and all other ranges pertain, this TAG will be added to his or her TAG list via the automatic routines. The ENDING CRAFT is the end of a range of CRAFTS used for TAG assignment. If an EMPLOYEE has a CRAFT less than or equal to this value and all other ranges pertain, this TAG will be added to his or her TAG list via the automatic routines. The STARTING CLASS is the beginning of a range of CLASSES used for TAG assignment. If an EMPLOYEE has a CLASS greater than or equal to this value and all other ranges pertain, this TAG will be added to his or her TAG list via the automatic routines. The ENDING CLASS is the end of a range of CLASSES used for TAG assignment. If an EMPLOYEE has a CLASS less than or equal to this value and all other ranges pertain, this TAG will be added to his or her TAG list via the automatic routines. The STARTING CREW is the beginning of a range of CREWS used for TAG assignment. If an EMPLOYEE has a CREW greater than or equal to this value and all other ranges pertain, this TAG will be added to his or her TAG list via the automatic routines. The ENDING CREW is the end of a range of CREWS used for TAG assignment. If an EMPLOYEE has a CREW less than or equal to this value and all other ranges pertain, this TAG will be added to his or her TAG list via the automatic routines. The STARTING JOB s the beginning of a range of JOBS used for TAG assignment. If an EMPLOYEE has a JOB greater than or equal to this value and all other ranges pertain, this TAG will be added to his or her TAG list via the automatic routines. The ENDING JOB is the end of a range of JOBS used for TAG assignment. If an EMPLOYEE has a JOB less than or equal to this value and all other ranges pertain, this TAG will be added to his or her TAG list via the automatic routines. After you complete the Above Entry, the TAG will automatically be validated and saved. Click OK on the SIDE TOOLBAR when you are ready to close the TAGS form. Note: When you add a new TAG or edit the Ranges of an existing TAG, then use the Add Tags Utility to add the tag to all employees who meet the newly entered criteria. (The Add tags utility first removes the TAG from all employees and then adds the TAG to employees as required by your selection criteria.) Note: If you used the Add mode and not the Define mode to create a TAG you will need to press the ESC key or click CANCEL when you are done adding TAGS. This is necessary because once you start the ADD mode anywhere in the CCS Training Program it is automatically reinstated for you after each save until you cancel it or close the Form.
|
|
|