|
|
|
|
EVENTS Entry/Edit Form
The EVENTS Entry/Edit Form allows you to View, Add, Edit or Delete Training EVENTS. A training EVENT is an occurrence of a seminar, instruction, lecture, class, etc. where training is/was given to one or more EMPLOYEES. Each EVENT can cover any number of Topics ( TITLES). Via the EVENTS Entry/Edit form you can perform the following: 1. Create Training EVENTS (classes, seminars etc.). 2. Schedule Training for any Selection of EMPLOYEES who are to receive the Training. 3. Enter Completion status (Completed, Failed, Excused, etc. ) for each EMPLOYEE who received (or failed to receive) the training. Note: EMPLOYEES can partake in any training EVENT without regard to their current requirements. For example, you can schedule every EMPLOYEE on a JOB site to receive a training EVENT whether or not the topics that are covered are required for each of the EMPLOYEES. EMPLOYEES who did not require the training will still receive a STATUS for the EVENT. Should the EMPLOYEE training requirements change at a later date and mandate that some of the EMPLOYEES be trained in one or more of the topics covered within the EVENT, the CCS Training Program will properly credit them for the training already received. Be sure to read How it all works before adding new EVENTS. The EVENT Entry/Edit Form:
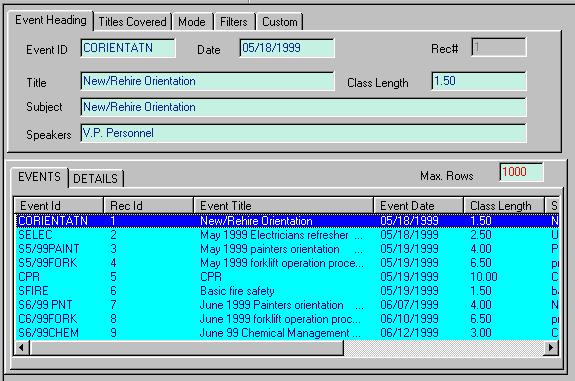
As shown above, the user is viewing (Browse mode) the Event ID 'CORIENTATN', Event Title 'New/Rehire Orientation'. This EVENT is a 1.5 hour session. The EVENT Form is divided into two main areas: the lower area and the upper area. The lower portion of the form contains two tabs: EVENTS Tab: Displays a listing of all EVENTS. (This tab is currently selected above.) DETAILS Tab: Displays all EMPLOYEES who are scheduled to attend the currently selected EVENT. The upper portion contains five tabs: Event Heading, Titles Covered, Mode, Filters, and Custom. These will be examined in detail below. Event Creation Overview: Complete the first three tabs of the upper portion of this form to create a new EVENT: 1. EVENT HEADING Tab: Enter information that describes the EVENT. 2. TITLES COVERED Tab: Assign one or more TRAINING TITLES, selecting from the TITLES that you have created via the TITLES Entry/Edit Form screen. 3. MODE Tab: Fill in selection criteria for the CRAFT, CLASS, CREW, and JOB controls that determine who needs to attend this EVENT. EMPLOYEES can then be added to this EVENT automatically (all employees within the defined criteria) or manually. Once the EVENT has been saved, it will appear in the List Control Box that is contained in the EVENTS Tab on the bottom half of the window. When you select an EVENT from the LIST control in the EVENTS Tab of the lower portion of the Form (by clicking on a line), the associated EVENTS data will be displayed in the top portion of the Form. Clicking on a Column heading will sort the list by that Column; clicking again on the column header will toggle the sort order (Ascending vs. Descending). For example, if you wanted the above EVENTS sorted by Event Title, click on the Event Title column header and the data will be alphabetized from A to Z (Ascending). Click again on the column header and the data will be seen from Z to A (Descending). Details concerning the creation or modification of EVENTS are given below. The EVENT Entry/Edit Form (Details Tab):
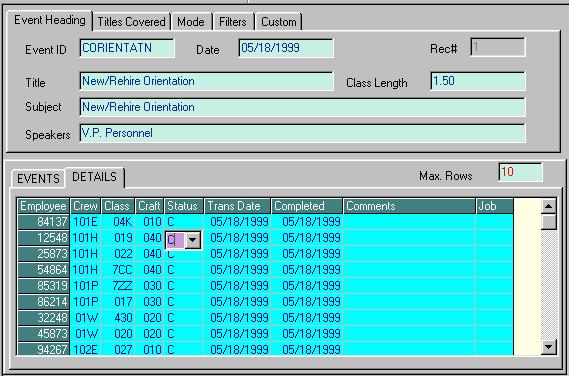
Once EMPLOYEES have been added to an EVENT, they appear on the DETAILS Tab. You can, therefore, select an EVENT on the EVENTS Tab and view all enrolled EMPLOYEES by clicking on the DETAILS Tab. The DETAILS tab pictured above shows several of the employees who attended the New/Rehire Orientation scheduled for May 18, 1999. In the example above, all visible EMPLOYEES have been given a status of 'C', which the operator has associated with the meaning "Complete." See STATUS, below for complete details on the available options. Note: The selected EMPLOYEE's NAME will appear in the lower left corner of the screen. It is not visible in the EVENTS window. Note: Although this form contains predefined controls, they may be configured to meet your specific "Business Rules." See Validation Methods for more information on customizing controls. See The Mouse verses the Enter/Tab Keys for information on moving through a form.
To Add a new EVENT: 1. Select Maintenance|EVENTS from top menu bar or go to the Home Menu and click the "EVENTS" button. 2. Click ADD on the SIDE
TOOLBAR or 3. Complete the form as described below. After the last Entry is completed, the records will be saved automatically. To Edit an existing EVENT: 1. Select Maintenance|EVENTS from top menu bar or go to the Home Menu and click the "EVENTS" button. 2. Enter the EVENT ID for the EVENT you wish to edit in the EVENT ID field and press ENTER. If the requested EVENT exists, it will be displayed in the form. Additionally, you can use the RECORD buttons to locate a particular EVENT or select an EVENT from the EVENTS List Control in the lower portion of the form. 3. Complete any changes needed as described below. Tabbing past the last entry, moving records or clicking ADD or OK on one of the TOOLBARS will validate and save your changes. Detail Lines are saved as soon as you move to another detail Line. To Delete an existing EVENT: 1. Select Maintenance|EVENTS from top menu bar or go to the Home Menu and Click the "EVENTS" button on the Home Menu. 2. . Enter the EVENT ID you wish to delete in the EVENT ID field. Press ENTER. If the EVENT exists it will be displayed in the form. Additionally, you can use the RECORD buttons to locate a particular EVENT, or select an EVENT from the EVENTS LIST control in the lower portion of the Form. 3. Click the DELETE button on the SIDE TOOLBAR or You may also delete EVENTS by highlighting an EVENT in the EVENTS List and pressing the DELETE key. After an EVENT is deleted you will need to run the Reevaluate EVENTS Routine to update the Training Status File. See Edit Modes for more information on the Edit modes used by most CCS Forms.
Events Header Tab: Note: The values shown below in square brackets represent the default range applicable to each control; however these ranges can be configured to allow or restrict additional values . See Validation Methods for more information. EVENT ID:["T*", "S*","F*","PSM*","C*"] The EVENT ID provides each EVENT with a unique 10 character alphanumeric identifier. This ID will be used throughout program to reference the EVENT. As shipped the CCS Accounting program requires that all EVENT IDS must start with a T, S, F, C or PSM as shown in the following table:
This field is for the date that you first created the training record. The date entered here does not effect any training status records: the CCS Training Program uses the dates in the detail (lower) section for computing training compliance. However, you may find this date useful for sorting and selection in reports. Title:[] , Subject:[], Speakers:[], CLASS Length:[] These fields are used to describe the TRAINING EVENT. As shipped, TITLE, Subject, and CLASS Length have been defined as required fields but those definitions may be changed if needed. Note: CLASS Length should be entered in a decimal hourly format. Thus a 90-minute CLASS should be entered as 1.5.
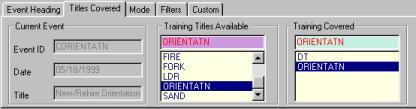
The Titles Covered Tab is divided into three areas: Current Event: This area shows information about the EVENT that you selected on the Event Heading Tab. The information in these three controls (Event ID, Date, and Title) is Read Only, i.e., not available for editing. Training Titles Available: The List Control in this area contains every TITLE you created via the TITLES Entry/Edit Form. Training Covered: The List Control in this area contains all the Training that will be covered by this particular EVENT. The EVENT pictured above will cover Training Titles DT and ORIENTATN. Therefore all EMPLOYEES who partake in this EVENT and complete it successfully will receive credit for both TITLES DT and ORIENTATN. There are two ways to select Training Titles that will be covered by this EVENT: 1. Double Click on any TITLE in the Training Titles Available. 2. Select any TITLE from the Training Titles Available. Then press the INSERT key. If, during the creation of an EVENT, you accidently select the wrong TITLE, simply select it in the TITLES Covered List and press the DELETE key. NOTE: Do not click on the Delete Button to remove a TITLE. The Delete Button (as do all toolbar buttons) pertains to the entire EVENT. Note: You can create a new TITLE from this screen by typing a new TITLE directly in either the Training Titles Covered List or the Training Covered List and pressing the INSERT key. You will be asked to confirm the entry of the new TITLE and then be taken to the TITLES Entry/Edit Form to complete the required data for this addition. Once this process is completed, you must then add this new TITLE to the Training Covered List Control as described in #1 or #2 above.
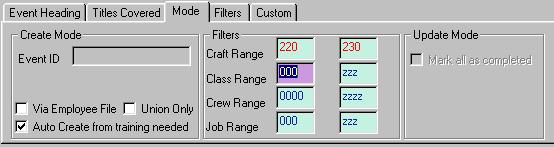
NOTE: All of the controls on the Create Mode and Filters sections of the Mode Tab are disabled once an event has been created. As shown, EMPLOYEES will be automatically added based on a "Need to Know" basis. That is only those EMPLOYEES who are required to have the training that is being covered (DT and ORIENTATN in our example) will be selected by the CCS Training Auto Create Routine. Additionally only those EMPLOYEES who have a CRAFT code (in their EMPLOYEE table) of 220 to 230 will be included. The CLASS and CREW ranges have been left wide open so as to prevent them from restricting the selection process. Via Employee File:[Checked or Unchecked] If checked, all EMPLOYEES will be scheduled for this event, irrespective of their training requirements. NOTE: If this control is checked, Auto Create (below) will be unchecked, and vice versa. Auto Create:[Checked or Unchecked] If checked, this EVENT will only be assigned to those EMPLOYEES who have the required TAG(S). NOTE: If this control is checked, Via Employee File will be unchecked, and vice versa. WARNING: If neither Via Employee nor Auto Create is checked, The CCS Training Program will not add any EMPLOYEES to the EVENT. All EMPLOYEES must then be to added manually in the Detail section. Union Only:[Checked or Unchecked] If checked, only EMPLOYEES who are marked as union members will be enrolled in this EVENT. This filter is additive. That is, union membership is added as an additional parameter to whatever else you set up on this tab. Craft, Class, Crew, and Job Ranges: All of these controls are used as filtering parameters for the assignment of EVENTS to EMPLOYEES. As pictured above, only EMPLOYEES in CRAFTS 220 - 230 (who have the proper TAGS) will be scheduled for this EVENT. Mark All As Completed:[Checked or Unchecked] This control is disabled unless you are on the Details Tab. If the lower portion of the screen is on Details and you check this control, all EMPLOYEES will automatically receive a STATUS of 'C' (Completed). The Completed Date will be filled with the system date.
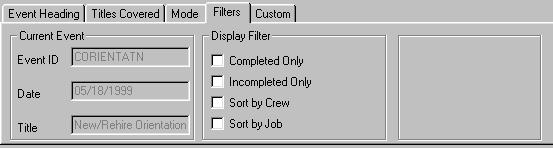
The Event ID, Date, and Title controls are for your information and convenience only; they are read-only. The Display Filter options control which EMPLOYEES will be visible in the detail section and in what order they will be presented. Clicking the COMPLETED ONLY control will show only those EMPLOYEES who have a STATUS of 'C*'; the INCOMPLETE ONLY checkbox displays all others. The Sort by CREW sorts the EMPLOYEES based on their CREW while Sort by Job shows EMPLOYEES according to their JOB assigments. If neither Sort by Crew nor Sort by Job is checked, EMPLOYEES will be sorted by EMPLOYEE number. NOTE: These options do not effect the creation of the EVENT, but rather how you will view the detail. They can be changed at any time. If you have not defined any Custom Controls, then tabbing past the Sort by Job checkbox will cause CCS Training to create the EVENT and to Auto Create Detail records according to the parameters you entered in the Mode Tab. All of the data will be automatically saved. You now have the following options:
Note: If you move to the detail section with the mouse while the ADD MODE is still active, you won't be able to Add or Edit detail. To correct the problem simply reposition the cursor back in the Header section and click the CANCEL button. You will then be free to edit the EVENT or EVENT Detail. Note:The Auto Create routines automatically add the detail records in both the Define mode and Add Mode; they are not affected by the method you close the form.
The EVENT Detail is used to enter the EMPLOYEES who are to receive the training this EVENT is covering. All EMPLOYEES entered here will be considered to have been scheduled to receive all the training covered by all the TITLES COVERED by this EVENT. Additionally, those EMPLOYEES who receive a COMPLETED STATUS will be given full credit for all the TRAINING that is COVERED. Note: While in the cursor is located anywhere within the
Detail section. the Toolbar commands will affect the detail section,
not the header section. For Example: If you click the To access this column, click into the column to the right of EMPLOYEE (CREW, as pictured above). Then press <Shift-Tab> to move back one column. You cannot gain access to this column via the mouse. Enter the EMPLOYEE Number for an EMPLOYEE who is to be included in this EVENT or whose existing record you wish to edit. Tip: You do not need to manually search for an EMPLOYEE in the EVENT detail. When you type over an existing EMPLOYEE number, the CCS Training Program will automatically search for that EMPLOYEE within the EVENT. If the EMPLOYEE is found, the cursor will be repositioned to the existing detail line for that EMPLOYEE. If the EMPLOYEE does not exist, the cursor will be repositioned to the last line, and the ADD mode will be invoked. Tip:You can select an EMPLOYEE alphabetically by entering any portion of his or her last name in the EMPLOYEE# field and pressing <Enter>. A window will pop up that contains all of the EMPLOYEES whose last names match your input string. Select the desired EMPLOYEE by moving to the desired row and double-clicking or pressing <Enter>. This field will default to the CREW that was entered for this EMPLOYEE in the EMPLOYEE Table. The CREW is designed to be a sub grouping of the JOB column. CREW is a required field used internally by the training program in the determination of training requirements. Although not mandatory, CCS recommends that the CREW begin with the first 3 characters of the JOB with which it is associated. The CREW generally reflects a location or work force under a single supervisor (or foreman). The CREW is a case sensitive field; however, some ODBC drivers will not recognize the difference between CREW 101A and CREW 101a. Therefore, CCS recommends that you use Upper Case Letters only for CREW designators. See the discussion on CREWS in the EMPLOYEE Entry/Edit Form for more information. CLASS:[000-zzz] and CRAFT:[000-zzz] These fields will default to the CLASS and CRAFT that were entered for this EMPLOYEE in the EMPLOYEE Table. Both CLASS and CRAFT are 3 character alphanumeric fields. CLASS designates the EMPLOYEE'S position and skill or pay level and usually relates to titles such as Supervisor, Foreman, Journeyman, Apprentice, etc. CRAFT specifies an EMPLOYEE'S talent, profession, or trade. Examples might be Painter, Carpenter, Doctor etc. CLASSES and CRAFTS are arbitrarily assigned by the operator and should be well thought out to allow for future growth and expansion. (See the discussion on CRAFTS & CLASSES in the EMPLOYEE Entry/Edit Form for more information.) Both are required fields that are used internally by the training program in the determination of training requirements. Both CLASS and CRAFT are case sensitive fields; however some ODBC drivers will not recognize the difference between CLASS 10a and CLASS 10A, for example. Therefore, CCS recommends that you use Upper Case Letters only for both CLASS and CRAFT designators. STATUS:[C??, S??, F??, E??, I??, U??] The STATUS column is used to enter the level of completeness (and/or score) for each EMPLOYEE in this EVENT. Each Status may be followed by an optional score or user defined code. You may add, edit or change the allowable Statuses as required to better fit your COMPANY; however, the Status 'C' and 'S' are used internally by the CCS Training Program and must not be changed. As shipped, the CCS Training Program, allows the following Statuses. C: Completed status. An EMPLOYEE who receives a status of 'C' will receive full credit for all topics (TITLES) covered by this EVENT. Optionally, you may follow the 'C' with a test score to indicate the EMPLOYEE'S score in this EVENT. For Example: Use 'C95' to represent that the EMPLOYEE completed the EVENT with a score of 95. Note: The CCS Training Program ignores any values following the 'C' status. So 'C25' will be treated as Completed even if the score that follows the 'C' is failing. Anything following the 'C' status is for your information only; however, that information can be quite useful in report generation. S: Scheduled status. When an EMPLOYEE has a status of 'S', he or she is considered to be scheduled for the EVENT. Optionally, follow the 'S' with a group number to indicate which group or session (if the training seminar will be held more than once to accommodate a large training audience etc.) that this EMPLOYEE will attend. For Example: Use 'C02' to represent that the EMPLOYEE is to attend the second occurrence (or grouping) of this EVENT. Note: The CCS Training Program ignores the values you enter after 'C'. That data is for your information only; however, it can be useful in generating "Sign In" reports for an EVENT. Note: See Sign in Reports in the Reports Dialog. This report is designed to print a listing of all [scheduled] EMPLOYEES, and will provide a hard copy of those who should have attended and, when used as a sign-in sheet, those who actually attended each EVENT. The remaining Status designations are ignored by the CCS Training Program and are defined for your convenience only. However, they may be quite useful in report generation. E: Excused., U: Unexcused, I: Incomplete, F: Failed. The Transaction date is the date that this EMPLOYEE is scheduled to attended the EVENT (or the first day for multi day EVENTS). While adding an EVENT, the current system date is the default value; however, you are free to override it. The CCS Training Program uses the Transaction date to track scheduling. The Completed date is the date that this EMPLOYEE actually completed this EVENT. If he or she did not complete the EVENT (with a status of 'C'), then leave this field blank. The CCS Training Program uses the Transaction date for tracking completions and refresher dates. The Comment column is provided for any comments that may be applicable to this EMPLOYEE for this EVENT. The Comments Column is ignored by the CCS Training Program and is provided for you information only. This field will default to the JOB that was entered for this EMPLOYEE in the EMPLOYEE Table. See the Jobs Form for more information. If you have not defined any Custom Controls, then the Detail Line will automatically be saved as soon as you complete the data entry. Click OK to close the form or click ADD, EDIT or Delete on the SIDE TOOLBAR to add, edit or delete another detail line. Additionally, you can use the SHIFT-TAB key to move back into the EMPLOYEE # column in order to locate ( or add) another EMPLOYEE. Note: Once you close an EVENT that has been modified (or newly created), the CCS Training Program will ask you if you wish to Reevaluate the training. You may choose not to evaluate at this time; however, the training status file will not reflect the changes in the EVENT until the reevaluation routine is run. You will have to select Reevaluate EVENTS from the Utilities Form to initiate this process. The CCS Training Program keeps track of what changes have been made and will properly update the EMPLOYEES the next time a reevaluation routine is run regardless of how many EVENTS have been modified.
|
|
|