|
|
|
|
CLIENTS Entry/Edit Form The CLIENT Entry/Edit Form allows you to View, Add, Edit or Delete CLIENTS.
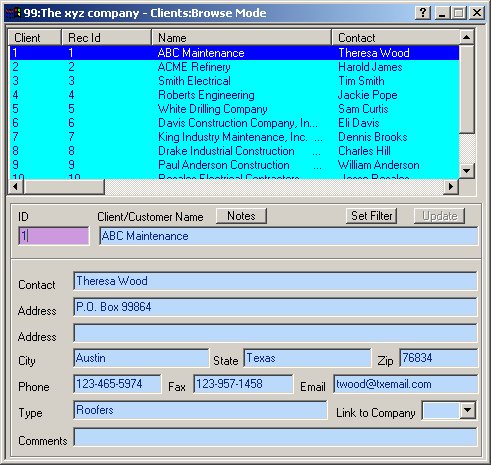
As depicted above, the active COMPANY is "The xyz company #99". The user is viewing all of the existing CLIENTS for this company (Browse Mode) and has currently selected Client #1, which has been named "ABC Maintenance." Note: When you select a CLIENT from the LIST control in the upper portion of the Form (by clicking on a line), the associated CLIENT data will be displayed in the bottom portion of the Form. Clicking on a Column heading will sort the list by that Column; clicking again on the column header will toggle the sort order (Ascending vs. Descending). For example, if you wanted the above data sorted by client name, click on the Client Name column header and the data will be alphabetized from A to Z (Ascending). Click again on the column header and the data will be seen from Z to A (Descending). Note: This form contains controls with predefined labels and validation routines. However, these controls may be configured to conform to your specific "Business Rules." See Validation Methods for more information on customizing controls. See The Mouse verses the Enter/Tab Keys for information on moving through a form. See Importing Data for information on importing initial data. A CLIENT is an entity utilized in job costing. Employees can be assigned to specific clients. For example, a law firm would want to track how much time each employee spent on each client's case. How you set up your CLIENTS is entirely up to you; however, careful consideration of these assignments is important for two reasons: (1) You will be able to make better use of the tools available via the CCS Accounting series. (2) You will be able to create more meaningful reports. CLIENTS Maintenance: To Add a new CLIENT: 1. Select Maintenance|CLIENTS from top menu bar or go to the Home Menu, click the "Codes" button, and then "CLIENTS" button on the Codes Menu. 2. Click ADD on the SIDE
TOOLBAR or 3. Complete the form as described below. After the last Entry is completed, the record will be saved automatically. To Edit an existing CLIENT: 1. Select Maintenance|CLIENTS from top menu bar or go to the Home Menu, click the "Codes" button, and then "CLIENTS" button on the Codes Menu. 2. . Enter the CLIENT NUMBER you wish to edit in the CLIENT NO. Control. Press ENTER. If the CLIENT exists it will be displayed in the CLIENTS Form. (To search alphabetically by name, see Alpha Search.) Additionally, you can use the RECORD buttons to locate a particular CLIENT or select the CLIENT from the LIST control in the upper portion of the Form. 3. Complete any changes needed as described below. Tabbing past the last entry, moving records or clicking ADD or OK on one of the TOOLBARS will validate and save your changes. To Delete an existing CLIENT: 1. Select Maintenance|CLIENTS from top menu bar or go to the Home Menu, Click the "Codes" button, then "CLIENTS" button on the Codes Menu 2. . Enter the CLIENT NO. you wish to delete in the CLIENT NO.. Press ENTER. If the CLIENT exists it will be displayed in the CLIENTS Form. Additionally, you can use the RECORD buttons to locate a particular CLIENT or select the CLIENT from the LIST control in the upper portion of the Form. 3. Click the DELETE button on the SIDE TOOLBAR or See Edit Modes for more information on the Edit modes used by most CCS forms. The Controls of the CLIENTS Form: Note: The values shown below in square brackets represent the default range applicable to each control; however, these ranges can be configured to allow additional values (or restrict values). See Validation Methods for more information. The CLIENT NO. is used to uniquely identify a CLIENT. This will be the value used to represent a particular CLIENT throughout the program. NAME:[1 to 30 alphanumeric characters] The CLIENT NAME is used to label the CLIENT. This NAME will appear on most reports pertaining to CLIENTS CONTACT:[1 to 80 alphanumeric characters] Enter the name of the Contact Person for this client. If, for example, your client is a firm, and there is one person there that you deal with primarily, put his/her name in this field. ADDRESS:[1 to 30 alphanumeric characters] Enter the client's mailing address here. CITY:[1 to 30 alphanumeric characters] Enter the client's city here. STATE:[1 to 25 alphanumeric characters] Enter the client's state here. ZIP:[1 to 10 alphanumeric characters] Enter the client's zip code here. PHONE:[1 to 25 alphanumeric characters] Enter the client's telephone number. FAX:[1 to 25 alphanumeric characters] Enter the client's FAX number. TYPE:[1 to 126 alphanumeric characters] Use this field to categorize your clients. LINK TO COMPANY:[Select from lookup] Payroll Service Bureau Only: Select the Company to whom this Client links. (See Setting Up a Service Bureau for details.) EMAIL:[1 to 40 alphanumeric characters] Enter your client's e-mail address. COMMENT:[1 to 126 alphanumeric characters] Enter comments pertaining to this client. Additional space for comments pertaining to this client.
|
|
|